
I still remember my first attempt at cutting a full sheet of plywood on my table saw. I muscled that wobbly 4×8 sheet onto the table, started pushing, and within seconds everything went sideways—literally. The sheet twisted, the cut wandered off my line, and I nearly lost control of the entire operation. It was dangerous, frustrating, and the ruined sheet cost me $60.

That experience taught me that cutting plywood on a table saw isn’t just about having a sharp blade and pushing forward. It’s a completely different beast than ripping dimensional lumber, requiring specific techniques, proper support, and a bit of planning to get professional results safely.
If you’ve ever struggled with plywood tearout, wavy cuts, or the sheer awkwardness of handling large sheets, you’re not alone. But here’s the good news: once you understand the right approach, cutting plywood becomes straightforward and even enjoyable. You’ll produce cabinet-quality cuts without a $5,000 panel saw.
In this guide, I’ll walk you through everything I’ve learned from cutting hundreds of plywood sheets over the past decade—from initial setup to the final cut, including all the tricks that separate clean, accurate results from frustrating disasters.
Why Plywood Is Different (And Why It Matters)
Before we dive into techniques, let’s understand why plywood behaves so differently than solid wood on your table saw.
Size and Weight Challenges
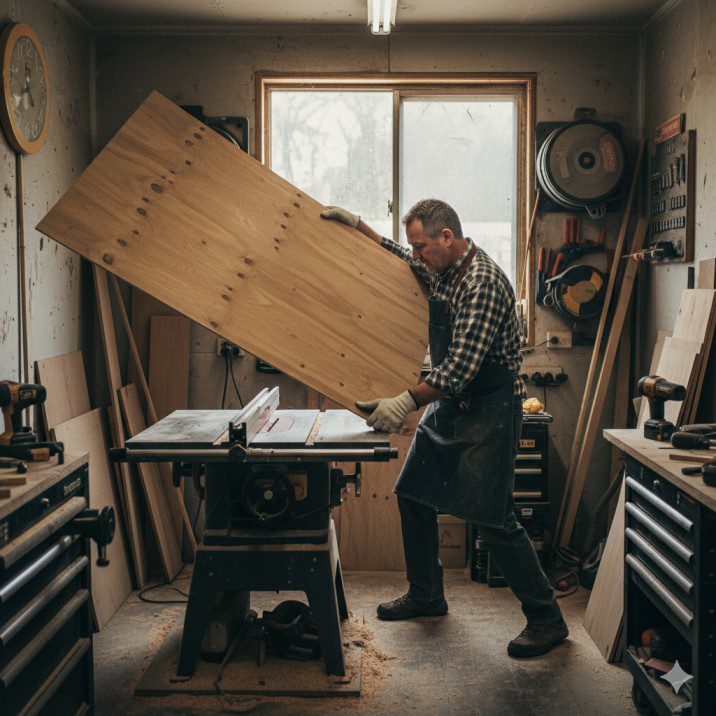
A full 4×8 sheet of 3/4-inch plywood weighs 50-70 pounds depending on species and quality. That’s manageable weight, but the size creates massive leverage problems. When you’re pushing a sheet through your saw, even slight misalignment at the back edge translates to the blade wandering significantly at the front.
I learned this physics lesson the hard way. Your hands are typically 6-8 feet behind the cut line when feeding a full sheet. Any twist or angle you introduce gets amplified dramatically by the time it reaches the blade. This is why proper support and technique matter so much more with sheet goods than with narrow boards.
Veneer Tearout Issues
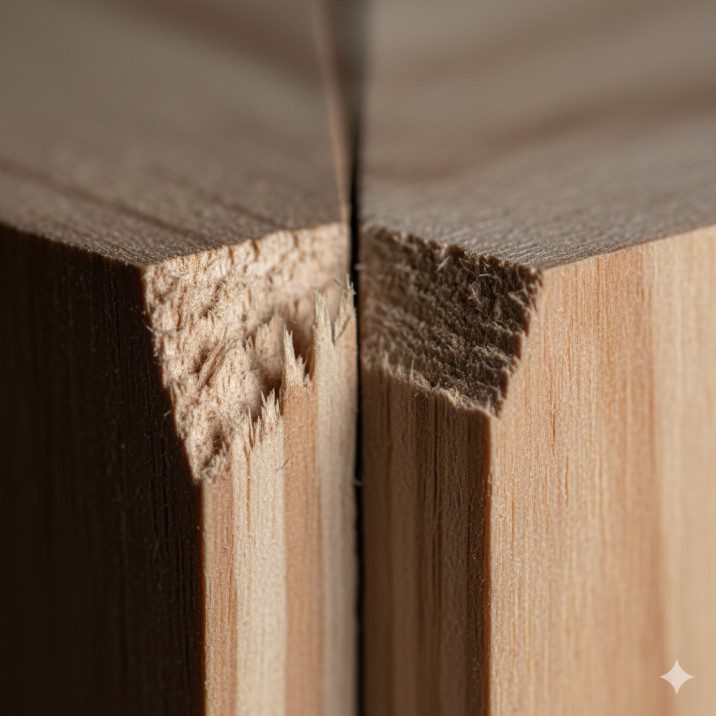
Plywood consists of thin veneer layers glued together. That beautiful oak or birch face veneer you paid extra for is only about 1/32 inch thick. When your blade exits the top surface, it wants to tear those delicate wood fibers rather than cut them cleanly.
The result? Ugly splintering along your cut edges that no amount of sanding will fix. I’ve ruined cabinet sides by ignoring tearout prevention, then spent hours trying to orient damaged edges where they wouldn’t show. Learning to prevent tearout from the start saves massive headaches later.
Blade Exit Tearout
Here’s what happens at the microscopic level: as the blade tooth exits the top veneer, it lifts those thin fibers before cutting through them completely. Without support right at the cut line, those fibers splinter and tear rather than shearing cleanly.
The back side of your cut (where the blade enters the material) usually looks perfect because the blade pushes fibers down into solid material. But that top surface? Without preventive measures, it’s a splintery mess.
Internal Voids and Core Issues
Lower-grade plywood often has voids or gaps in the inner plies. When your blade hits these voids, the unsupported veneer can crack or tear. This is especially problematic with construction-grade plywood versus cabinet-grade Baltic birch.
I once tried cutting cheap 3/4-inch construction plywood for shop shelving and got frustrated by the inconsistent cuts. The voids caused the blade to grab unpredictably. Upgraded to better plywood and the same techniques suddenly worked beautifully. Sometimes the material quality matters as much as technique.
Essential Setup for Clean Plywood Cuts
Success with plywood starts before you make the first cut. Proper setup makes everything easier and safer.
The Right Blade Makes All the Difference

Your standard 40-tooth combination blade might work okay for plywood, but it won’t give you the best results. For consistently clean plywood cuts, you want:
80-tooth plywood blade or crosscut blade: More teeth mean smaller gullets and finer cuts. Each tooth removes less material, reducing the chance of tearout. I switched to an 80-tooth blade specifically for sheet goods and the difference was immediately obvious—significantly less tearout on both sides of the cut.
Thin kerf blade (optional): Removes less material, requiring less motor power and creating less stress on the veneer. Not essential, but helpful if your saw is underpowered or you’re cutting thick plywood.
Sharp blade: This can’t be overstated. A dull blade tears rather than cuts, no matter how many teeth it has. If you see burn marks or excessive tearout, your blade probably needs sharpening. I sharpen my plywood blade every 20-30 sheets of cutting.
Zero-Clearance Insert Is Non-Negotiable
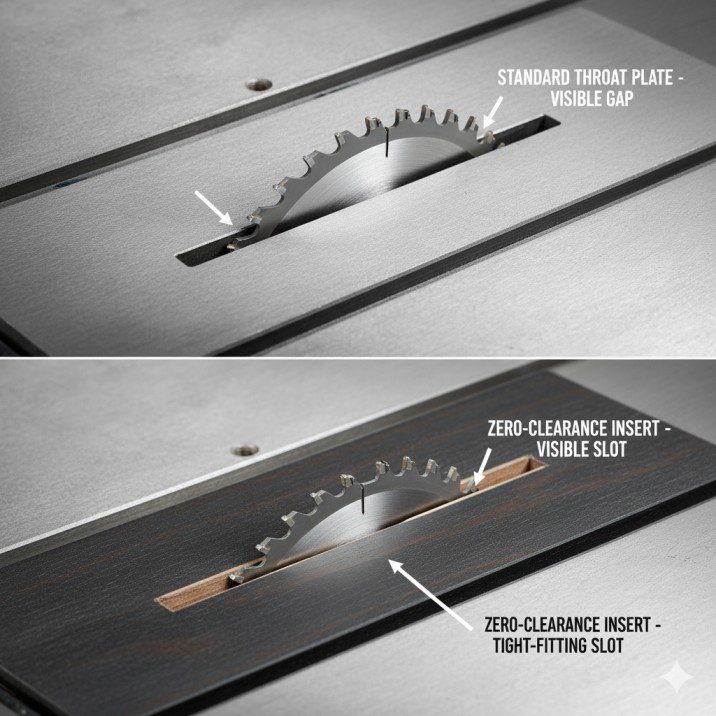
The gap around your blade in the standard throat plate allows thin veneer to deflect downward as the blade exits, causing tearout on the bottom surface. A zero-clearance insert eliminates this gap, supporting the veneer right up to the blade.
How to make one: Take a piece of 1/2-inch MDF or hardboard, trace your existing throat plate, and cut it to match. Lower your blade completely, place the new insert in position (you may need to adjust the height using the factory plate’s mounting hardware), then slowly raise the blade through the new insert. This creates a perfect blade-width slot with zero clearance.
I make a new zero-clearance insert every few months as the slot widens with use. They’re cheap to make and the improvement in cut quality is dramatic.
Outfeed Support Is Absolutely Critical
This is probably the single most important factor for safe, accurate plywood cutting. Without proper outfeed support, you’re fighting physics and gravity while trying to push a large, heavy sheet through your saw.
What you need: Support that’s exactly level with your saw table, extending at least 4 feet behind the blade, and ideally as wide as your saw table. This can be a dedicated outfeed table, a roller stand positioned correctly, or even sawhorses with plywood placed at the right height.
I use a simple outfeed table I built for $50 in materials. It’s mounted on adjustable feet so I can dial it in perfectly level with my saw. That outfeed table transformed my plywood cutting from a wrestling match into a controlled operation.
For more on building proper support, check our table saw outfeed table guide.
Side Support for Wide Sheets
Full sheets extend 4 feet to the left of your blade when making the initial breakdown cuts. Without side support, that cantilevered weight pulls the sheet down and away from your fence, ruining cut accuracy.
Quick solution: Position a roller stand or a sturdy table to the left of your saw at the same height as your table. Even a simple sawhorse with a piece of foam insulation on top works. The goal is preventing the sheet from tipping or twisting as you feed it through.
Blade Height Adjustment
Set your blade height so the teeth clear the top of your plywood by about 1/4 inch. This is higher than you’d set for ripping lumber, but the full tooth engagement at this height produces cleaner cuts with less chance of binding.
Too low and the blade pushes material forward rather than cutting cleanly. Too high and you’re exposing more blade than necessary, reducing safety and actually increasing tearout potential.
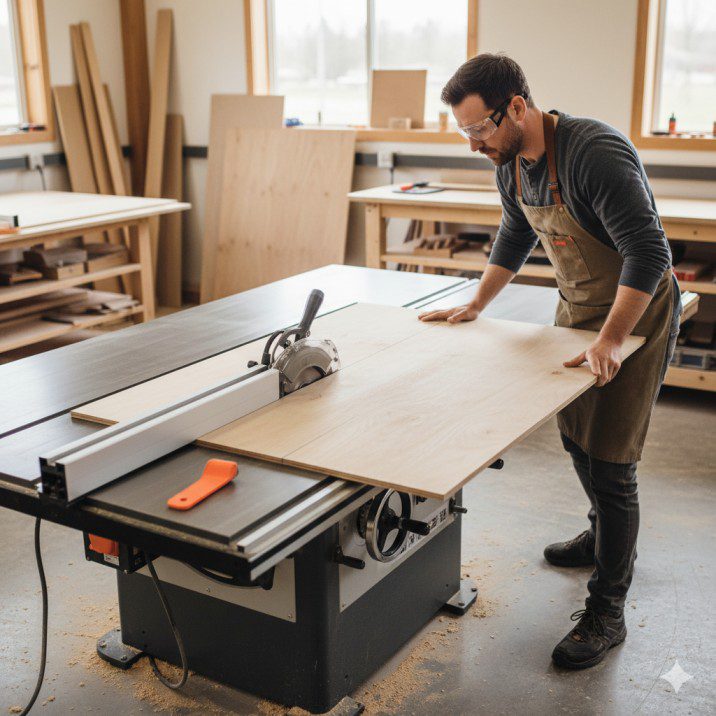
Breaking Down Full Sheets: The Smart Approach
Here’s a reality check: safely cutting a full 4×8 sheet on most home shop table saws is challenging at best, dangerous at worst. Professional shops use panel saws or have extensive support systems. In a typical garage or basement shop, you need a smarter strategy.
The Circular Saw First-Cut Method
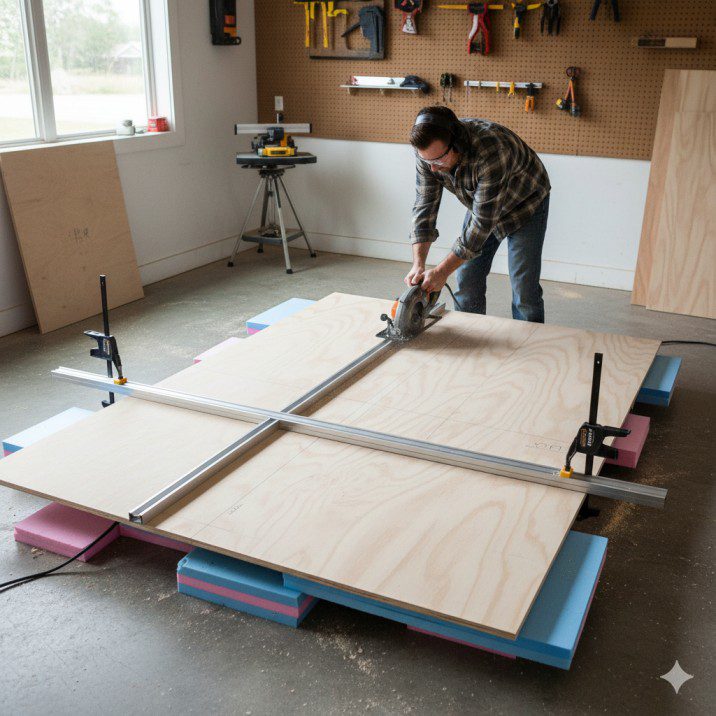
My standard approach for full sheets: I don’t even try to cut them full-size on my table saw. Instead, I use a circular saw with a straight-edge guide to break the sheet down into manageable sections first.
The process:
- Mark your rough cutting lines on the sheet (adding 1/4 inch extra for final table saw trimming)
- Support the sheet on foam insulation or sawhorses
- Clamp a straight-edge guide parallel to your cut line
- Make the rough cut with your circular saw
- Take the now-manageable pieces to your table saw for final accurate cuts
This approach is safer, less physically demanding, and actually produces better results because you’re handling smaller pieces that you can control properly at the table saw.
I spent years trying to force full sheets through my table saw before accepting that the circular saw first-cut method is simply smarter for home shops. My cuts got more accurate and safer immediately.
Alternative: The Track Saw Solution
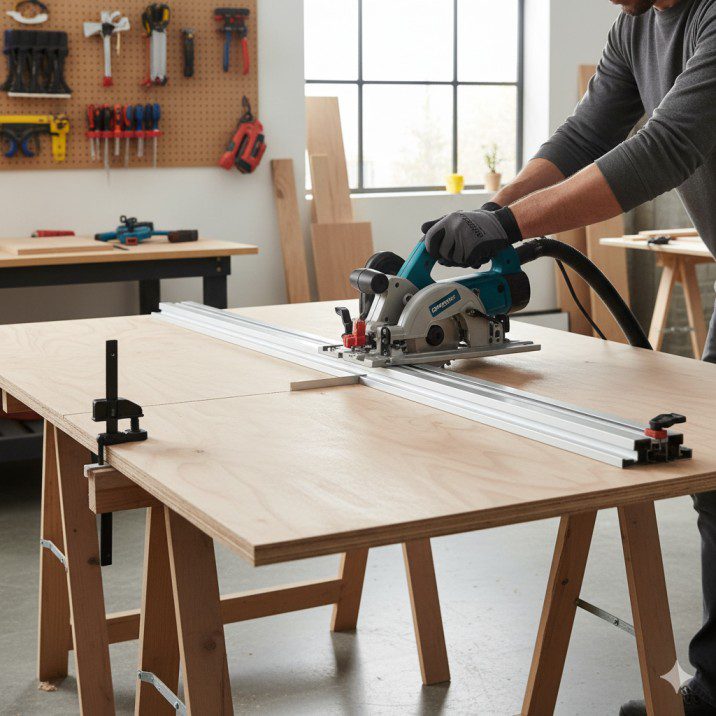
If you regularly work with sheet goods, a track saw is a game-changing investment. These specialized circular saws run on an aluminum track, producing table-saw-quality cuts right where the sheet lies.
I bought a track saw three years ago and now I rarely take full sheets to my table saw at all. The track saw makes perfectly straight, splinter-free cuts without fighting large sheets on your table saw. It’s not cheap ($400-$800 for quality systems), but if you do significant plywood work, the time savings and reduced frustration justify the cost quickly.
Setting Up for Rip Cuts
Once you have manageable pieces (half sheets or smaller), rip cuts on the table saw become straightforward:
Step 1: Position your fence for the desired width Step 2: Verify the fence is parallel to the blade (critical for plywood) Step 3: Set up outfeed and side support Step 4: Position yourself so you can push the entire length without reaching or losing balance Step 5: Make a test cut on scrap if this is a critical dimension
Crosscutting Plywood Safely
Crosscutting plywood requires different support strategy than ripping:
For pieces up to 24 inches wide: Your miter gauge can handle these, though I strongly recommend a crosscut sled for better control and accuracy. The large bearing surface of a sled supports the plywood properly and prevents it from shifting during the cut.
For wider pieces: This is where things get tricky. Crosscutting wide plywood panels on a table saw challenges your ability to maintain control. Consider:
- Using a circular saw with guide for very wide crosscuts
- Building or buying a panel-cutting sled if you do this regularly
- Getting a helper to support the far end during the cut
I built a crosscut sled specifically for plywood that accommodates pieces up to 30 inches wide. For anything larger, I use my circular saw or track saw without hesitation.
Learn more table saw techniques on our table saw how-to guide.
Step-by-Step: Making the Perfect Cut
Now let’s walk through the actual cutting process for clean, accurate results every time.
Pre-Cut Checklist

Before you start your saw, verify:
- [ ] Blade is sharp and appropriate for plywood (60+ teeth)
- [ ] Zero-clearance insert is in place
- [ ] Outfeed support is positioned and level
- [ ] Side support is ready for wide pieces
- [ ] Fence is locked parallel to blade
- [ ] Blade height is set correctly (1/4 inch above material)
- [ ] Your path is clear with no trip hazards
- [ ] You know where the power switch is
Preventing Tearout: The Tape Trick
Here’s a simple trick that dramatically reduces tearout on crosscuts and challenging cuts: apply painter’s tape along your cut line on the top surface before cutting. The tape supports the veneer fibers as the blade exits, preventing them from lifting and splintering.
I use this technique for any cut where the edge will be visible on the finished project. It takes 30 seconds and saves potentially hours of repair work or wasted material. Blue painter’s tape works perfectly—it’s cheap, readily available, and removes cleanly after cutting.
Scoring Cuts for Zero Tearout
For absolutely critical cuts where visible faces must be perfect, use a two-pass scoring technique:
Pass 1: Set your blade to cut just 1/8 inch deep—barely scoring through the face veneer. Make your cut at this shallow depth.
Pass 2: Raise the blade to full cutting height and make the complete cut.
The shallow scoring cut cleanly severs the veneer fibers before the full-depth cut. This prevents any possibility of tearout, though it obviously takes twice as long. I reserve this technique for high-visibility edges on furniture-grade projects where perfection matters more than speed.
Proper Feeding Technique
Body position and feeding technique matter enormously with large plywood pieces:
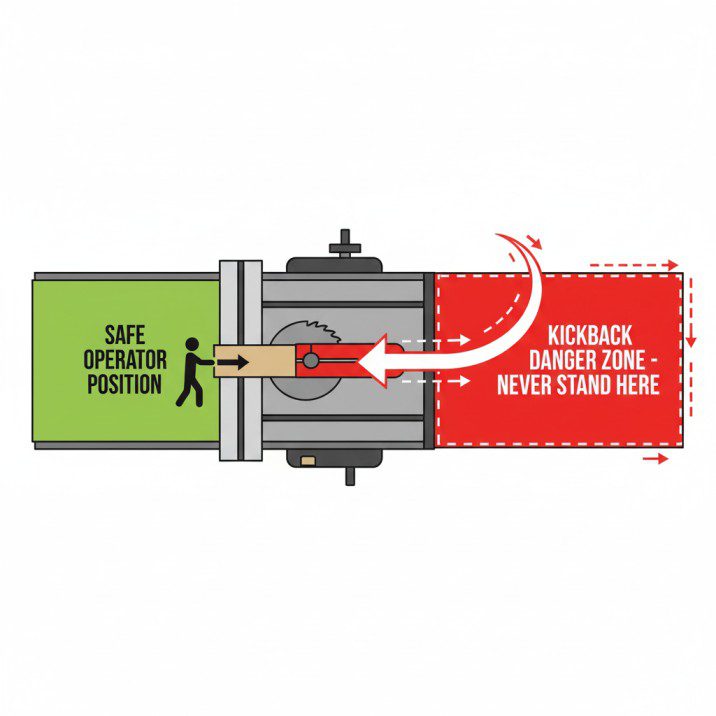
Starting position: Stand to the left side of the blade, never directly behind it (kickback zone). Your body should move with the material as it feeds through.
Hand placement: Your left hand steadies the sheet against the fence near the front edge. Your right hand pushes the sheet forward. Keep both hands well away from the blade path.
Feed pressure: Push firmly but steadily—don’t force. Let the blade do the cutting. If you’re fighting the cut or the motor is bogging down, you’re pushing too hard or your blade is dull.
Support the weight: As the sheet moves onto your outfeed support, shift your focus to keeping it flat and moving steadily. Don’t let the outfeed end drop or lift.
Finishing the cut: As the end of the sheet approaches the blade, use a push stick or push block to maintain pressure while keeping your hands safe. Never reach over or past the blade to pull material through.
What Good Technique Feels Like
When you’re doing everything right, the cut should feel controlled and smooth. The sheet slides easily against the fence and table. The motor maintains consistent speed without bogging down. You’re not fighting to keep the sheet aligned—it naturally wants to stay against the fence.
If the cut feels difficult, stop and troubleshoot. Something in your setup needs adjustment.
Troubleshooting Common Problems
Even with proper technique, issues arise. Here’s how to diagnose and fix common plywood cutting problems.
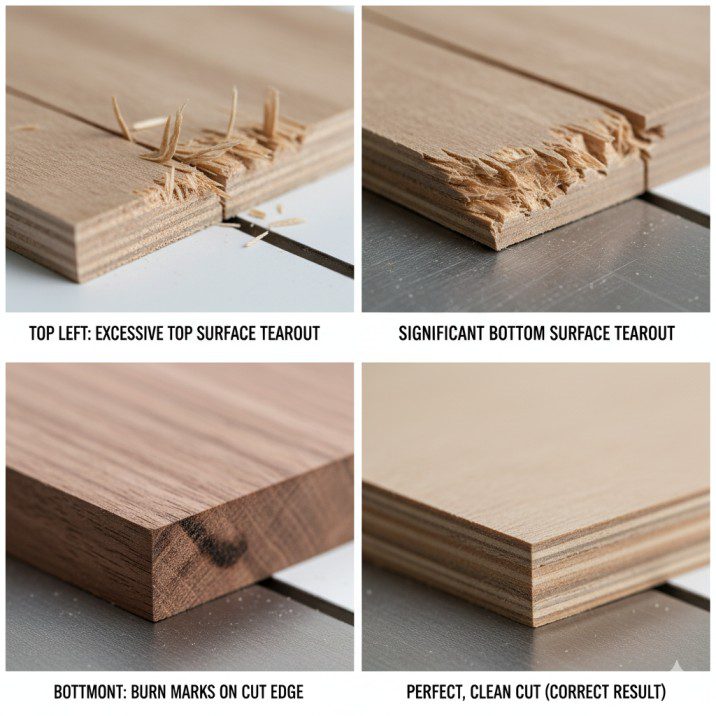
Problem: Excessive Tearout on Top Surface
Causes and solutions:
- Dull blade → Sharpen or replace blade
- Wrong blade type → Switch to 60+ tooth plywood blade
- Feeding too fast → Slow down feed rate
- Blade too high → Lower blade to 1/4 inch above material
- No zero-clearance insert → Install one
Problem: Tearout on Bottom Surface
Causes and solutions:
- Gap around blade in throat plate → Install zero-clearance insert
- Blade too dull → Sharpen or replace
- Cheap plywood with poor-quality face veneer → Use better quality material or score the cut line first
Problem: Cut Wanders from Fence Line
Causes and solutions:
- Fence not parallel to blade → Adjust fence alignment
- Not maintaining pressure against fence → Focus on keeping material against fence throughout cut
- Sheet too heavy/large to control → Break down into smaller pieces first
- Side support inadequate → Add or adjust side support
This is the most common problem I see beginners struggle with. The solution is almost always a combination of better support and more deliberate pressure keeping the sheet against the fence.
Problem: Burn Marks on Cut Edge
Causes and solutions:
- Dull blade → Sharpen or replace immediately
- Feeding too slowly → Increase feed rate
- Fence binding the material → Verify fence is parallel to blade
- Blade gummed up with pitch → Clean blade with pitch remover
Burn marks aren’t just cosmetic—they indicate excessive friction that can lead to dangerous kickback.
Problem: Blade Binding or Kickback
Causes and solutions:
- Riving knife not installed → Install riving knife for all through-cuts
- Material pinching blade → Verify fence is parallel; use riving knife
- Trying to back out of cut → Never reverse material while blade is spinning
- Internal plywood stress releasing → Use riving knife; feed steadily without stopping mid-cut
Kickback is the most dangerous table saw hazard. If you experience kickback or binding, stop immediately and reassess your entire setup before continuing.
Problem: Rough or Fuzzy Cut Edge
Causes and solutions:
- Wrong blade for material → Use fine-tooth blade for plywood
- Feeding too fast → Slow feed rate
- Poor quality plywood → Better material produces better results
- Moisture in plywood → Allow material to acclimate to shop conditions
For detailed saw selection and setup, see our table saw buying guide.
Advanced Techniques for Better Results
Once you’ve mastered the basics, these advanced techniques take your plywood cutting to the next level.
The Climb-Cut Method for Crosscuts
This controversial technique involves feeding material against the blade rotation rather than with it. It’s potentially dangerous if done incorrectly, but produces absolutely tearout-free cuts when executed properly.
I only recommend this for experienced woodworkers who understand the risks. The blade wants to pull the material into itself, so you must maintain firm control. Use it only for short crosscuts with a sturdy sled or miter gauge, never for rip cuts.
The result is a glass-smooth cut edge with zero tearout because the blade teeth are cutting down into the material rather than up and out.
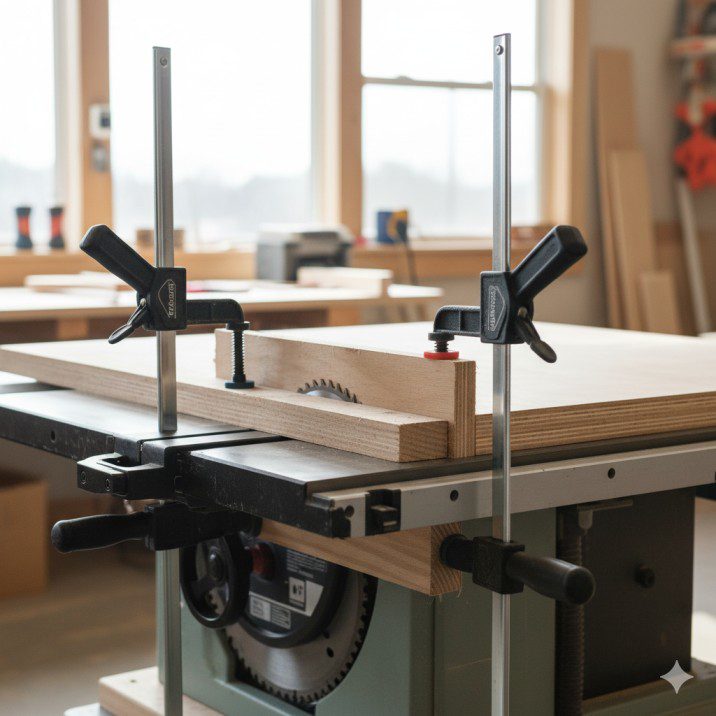
Using Sacrificial Backing
For small pieces or critical crosscuts, clamp a sacrificial piece of scrap wood behind your plywood at the cut line. The backing supports the veneer as the blade exits, preventing tearout.
This is simpler and safer than climb-cutting while producing similar results. I keep strips of 1/4-inch MDF specifically for this purpose.
The Kerf-Splitter Trick
For long rip cuts in plywood that tends to pinch (common with lower-grade material), insert a thin wedge into the kerf behind the blade as you cut. This keeps the kerf open and prevents binding.
A simple paint-stirring stick works perfectly as a kerf splitter. Position it in the kerf about 6 inches behind the blade and let it follow as you feed the material through.
Panel-Cutting Sled for Repetitive Cuts
If you regularly cut multiple plywood pieces to identical dimensions, build a panel-cutting sled with a stop block system. This lets you set up once and produce dozens of identically sized pieces with perfect accuracy.
I built a simple sled with adjustable stop blocks for cabinet work. When I need 20 shelf pieces at exactly 11.75 inches wide, I set the stop once and cut all 20 pieces knowing they’re identical. The time savings and consistency are huge.
Safety Considerations You Can’t Ignore
Plywood cutting presents unique safety challenges beyond typical table saw work.
The Kickback Zone
Never stand directly behind the blade. Kickback propels material back along the blade’s path—exactly where you’d be standing. Position yourself to the left side of the blade where kicked material will miss you.
I’ve seen kickback send a 2-foot piece of plywood across a 20-foot shop in under a second. It’s violent and dangerous. Respect it by staying out of the kickback zone.
Riving Knife and Splitter Use
Use your riving knife for every through-cut. This simple device prevents the kerf from closing behind the blade, virtually eliminating binding and kickback risk. There’s no legitimate reason to remove it for through-cuts.
Avoid Loose Clothing and Gloves
Large sheets mean you’re reaching and moving more than with small pieces. Loose sleeves, dangling drawstrings, or gloves can catch on material or saw components. Roll up sleeves, secure loose clothing, and never wear gloves while operating the saw.
Two-Person Jobs
Some cuts legitimately require a helper—particularly full-sheet operations if you haven’t broken down the sheet first. There’s no shame in asking for help. It’s smart safety practice.
When working with a helper, designate one person as the operator and one as the support person. The operator controls the saw and guides the cut. The support person only supports weight—never pushing or pulling material in ways that could affect the cut line.
Know Your Limits
If a cut feels unsafe or beyond your control, stop. Find a different approach. I’ve walked away from problematic cuts, rethought my strategy, and come back with a safer method. Better to take extra time than risk injury.
Frequently Asked Questions
What’s the best blade for cutting plywood? An 80-tooth plywood blade or crosscut blade produces the cleanest cuts. More teeth mean smoother results with less tearout. Expect to pay $40-$80 for a quality blade, but it’s worth every penny.
How do I cut plywood without a table saw? Use a circular saw with a straight-edge guide or invest in a track saw. Both can produce table-saw-quality cuts on plywood. For many home woodworkers, this is actually a better solution than struggling with full sheets on a table saw.
Should I cut plywood face up or face down? Face up for table saw cuts. The blade exits the top surface where tearout occurs, so that’s where you want your visible face with protective measures (zero-clearance insert, sharp blade) in place.
How do I prevent plywood from splintering when cutting? Use a sharp, fine-tooth blade (60+ teeth), install a zero-clearance throat insert, apply painter’s tape along the cut line, and consider scoring cuts for critical edges. Proper blade height and feed rate also matter significantly.
Can I cut plywood on a small table saw? Yes, but break down full sheets with a circular saw first. Trying to manage full 4×8 sheets on a small saw is dangerous and impractical. Cut sheets into half or quarter sections, then make final cuts on your table saw.
Why does my plywood cut curve or wander? Usually this means your fence isn’t parallel to the blade, you’re not maintaining consistent pressure against the fence, or you lack adequate support for the weight of the sheet. Address fence alignment first, then improve your support system.
Final Thoughts: Practice Makes Perfect
Cutting plywood on a table saw intimidated me for years. Those first few attempts were frustrating disasters that made me question whether I could do woodworking at all. But here’s what I learned: it’s not about strength or wrestling the material into submission. It’s about proper setup, adequate support, and controlled technique.
Your first few plywood cuts might not be perfect. That’s okay. Use less expensive material for practice. Cut some rough shelving or shop furniture before tackling your dream cabinet project. Each sheet you cut teaches you something about how your particular saw handles large material.
The techniques I’ve shared here come from cutting hundreds of sheets over a decade—along with learning from my mistakes and getting advice from woodworkers much more experienced than I was. You don’t need to make all those mistakes yourself.
Start with the basics: get a proper blade, make a zero-clearance insert, set up adequate support. Those three things alone will transform your results. Then gradually incorporate the advanced techniques as you gain confidence and experience.
Remember that professional cabinet shops use dedicated panel saws for a reason—they’re specifically designed for sheet goods. Your table saw wasn’t primarily designed for this, so don’t feel bad if you struggle initially or decide that a circular saw or track saw better suits your needs for breaking down plywood. Use the right tool for the job, even if it’s not the one sitting in the middle of your shop.
Most importantly, never compromise safety for convenience. If a cut feels dangerous or you’re losing control of the material, stop and find a better approach. No project is worth an injury.
Quick Action Steps:
- Invest in a quality 80-tooth plywood blade before your next sheet goods project
- Make a zero-clearance insert this weekend—takes 15 minutes and costs almost nothing
- Set up or build proper outfeed support at the same height as your saw table
- Break down full sheets with a circular saw before taking pieces to your table saw
- Practice on scrap plywood or inexpensive material before cutting project pieces
Your next plywood project is waiting. With the right preparation and technique, you’ll produce professional-quality cuts that make you proud of your craftsmanship. Now go make something beautiful.

Finlay Connolly is a woodworking enthusiast and power tool specialist with over a decade of hands-on experience in the workshop. As the founder and lead writer at ProTableSawReviews.com, Finlay combines expert knowledge with real-world testing to help woodworkers, DIYers, and professionals choose the best tools for the job. With a sharp eye for detail and a passion for precision, Finlay is committed to providing trustworthy, practical advice backed by years of experience and research in the field. Whether you’re cutting dados or comparing fence systems, you can count on Finlay for honest, reliable reviews that make your next cut your best one.