
I spent my first three years as a cabinetmaker wrestling full sheets of plywood across a table saw, cursing every awkward cut and near-miss moment. Then I visited a production cabinet shop where the lead builder casually loaded an 8-foot melamine panel onto a vertical panel saw, made four perfect cuts in under two minutes, and walked away without breaking a sweat. I looked at my table saw back home and thought, “Have I been doing this the hard way all along?”
But here’s what I learned over the next year of using both tools extensively: neither saw is “better.” They’re fundamentally different solutions designed for completely different workflows. The panel saw vs table saw debate isn’t about which cuts wood more accurately—it’s about matching the right tool to what you actually build, how you work, and what your body can handle day after day.
Whether you’re outgrowing a circular saw, planning a cabinet business, setting up a school workshop, or just tired of fighting with sheet goods, this guide will help you understand not just the specifications, but the real-world experience of working with each tool.
Table of Contents
- Understanding How Each Tool Actually Works
- What Each Saw Does Best (And Where It Struggles)
- Sheet Goods Handling: The Make-or-Break Factor
- Solid Lumber and Small Parts Reality
- Safety Comparison Beyond the Marketing
- Speed, Setup, and Real Workflow Efficiency
- Space Requirements Nobody Warns You About
- Cost Analysis: Initial Investment and Hidden Expenses
- Making the Right Choice for Your Actual Work
Understanding How Each Tool Actually Works
Before comparing specifications, let’s be clear about the fundamental operational difference between panel saws and table saws—because this single distinction drives everything else.
Panel Saw Operation: The Material Stays Still
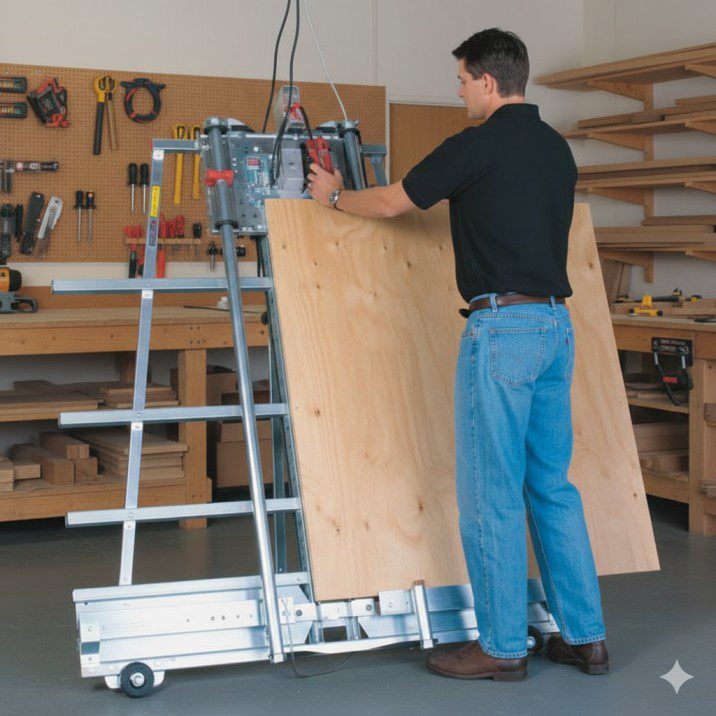
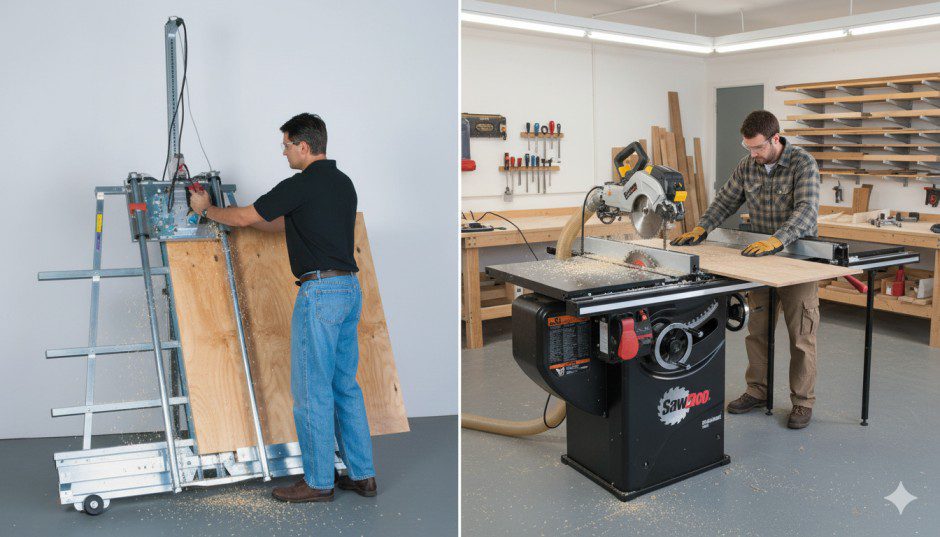
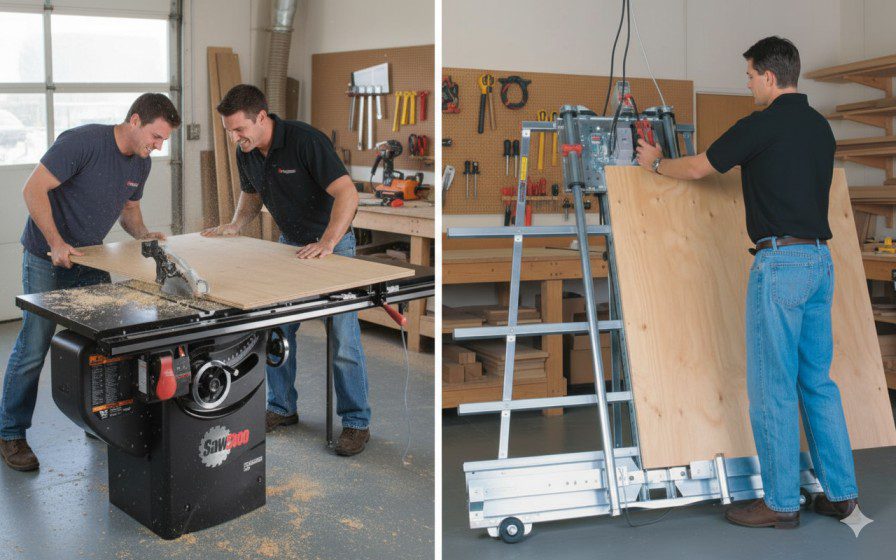
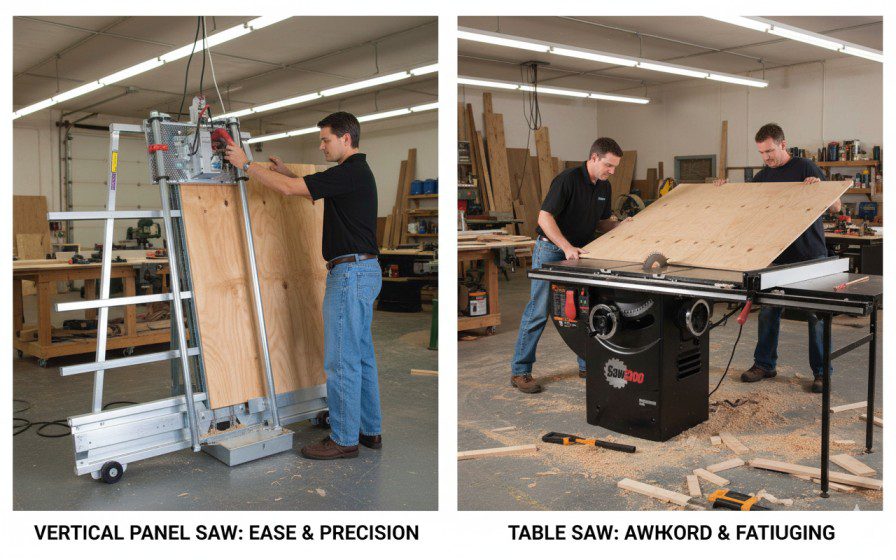
Panel saws flip the traditional cutting approach. You position the sheet against a vertical frame or horizontal bed, lock it in place, and move a saw carriage along precision rails to make the cut. The material stays supported throughout the entire operation.
Vertical panel saws mount the sheet upright against a frame with built-in rollers and clamps. You slide the carriage for crosscuts and rotate it for rip cuts. Most handle full 4×8 sheets, with industrial models reaching 5×10 capacity. Premium units add scoring blades that pre-cut the bottom veneer to prevent chip-out on melamine and laminates.
Horizontal beam saws lay the sheet flat on a large table where a powered overhead beam travels the length of the cut. These are the workhorses of high-volume cabinet shops that process dozens of sheets daily, often integrated with automated cut lists and labeling systems.
I watched a sign shop operator cut 20 identical panels in the time it would take me to set u
p my table saw fence and make two cuts. The panel saw’s built-in stops and guided carriage eliminated all the measuring, marking, and setup time I was used to.
Table Saw Operation: You Move the Material
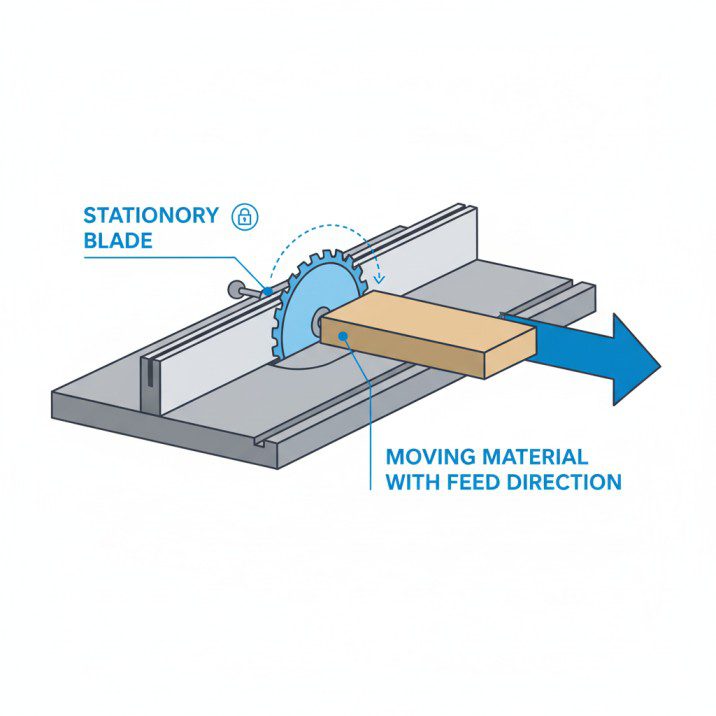
Table saws keep the blade stationary and spinning while you guide the workpiece past it using a rip fence for straight cuts, a miter gauge for angles, or a crosscut sled for square precision cuts. The versatility comes from your ability to add jigs, change blades, and adapt the setup for countless operations.
| Operation Type | Table Saw Method | What You Control |
|---|---|---|
| Ripping lumber | Feed board along fence | Feed speed, pressure against fence |
| Crosscutting | Use miter gauge or sled | Material positioning, push force |
| Sheet goods | Support and guide full sheet | Weight, stability, fence contact |
| Angles | Adjust miter gauge or tilt blade | Angle accuracy, material control |
| Dados/grooves | Install dado stack, set fence | Depth, width, feed rate |
| Small parts | Use push sticks and jigs | Safety distance, precise control |
The table saw rewards skill development and jig-making creativity. My crosscut sled took an entire weekend to build and tune, but now it delivers perfectly square cuts on everything from 2-inch blocks to 24-inch panels. That investment of time created a tool precisely matched to my needs.
For comprehensive guidance on table saw setup and technique, explore our table saw how-to guide with step-by-step instructions.
What Each Saw Does Best (And Where It Struggles)
The panel saw vs table saw comparison becomes crystal clear when you look at specific cutting scenarios rather than abstract capabilities.
Where Panel Saws Dominate
Breaking down full sheets safely and quickly. This is the panel saw’s defining advantage. A 4×8 sheet of plywood weighs 50-70 pounds. On a panel saw, you lean it against the frame, secure it with clamps or hold-downs, and make your cuts without ever supporting that full weight in an awkward position.
I’ve cut hundreds of sheets on both tools. On my table saw, even with perfect outfeed support, I finish the day with tired shoulders and a sore lower back. On a panel saw, I finish feeling like I barely worked.
Consistent accuracy on repeated panel cuts. Panel saws with flip stops and digital readouts make identical cuts mindlessly fast. Set the dimension once, cut 50 pieces, and every one matches within a few thousandths of an inch.
Cleaner edges on melamine and laminates. The scoring blade capability on many panel saws—especially vertical models—pre-cuts the bottom laminate layer before the main blade goes through. This nearly eliminates the chip-out that plagues brittle materials.
| Panel Saw Strength | Why It Matters | Real-World Impact |
|---|---|---|
| Sheet support | Material stays stable | Reduced fatigue, safer handling |
| Built-in precision | Calibrated stops and rails | Faster setup, fewer measurement errors |
| Scoring capability | Pre-cuts bottom veneer | Professional edges on melamine |
| Vertical orientation | Saves floor space | Fits smaller shops than table size suggests |
| Safer sheet handling | No awkward lifting/balancing | Lower injury risk, especially for solo workers |
Where Panel Saws Struggle
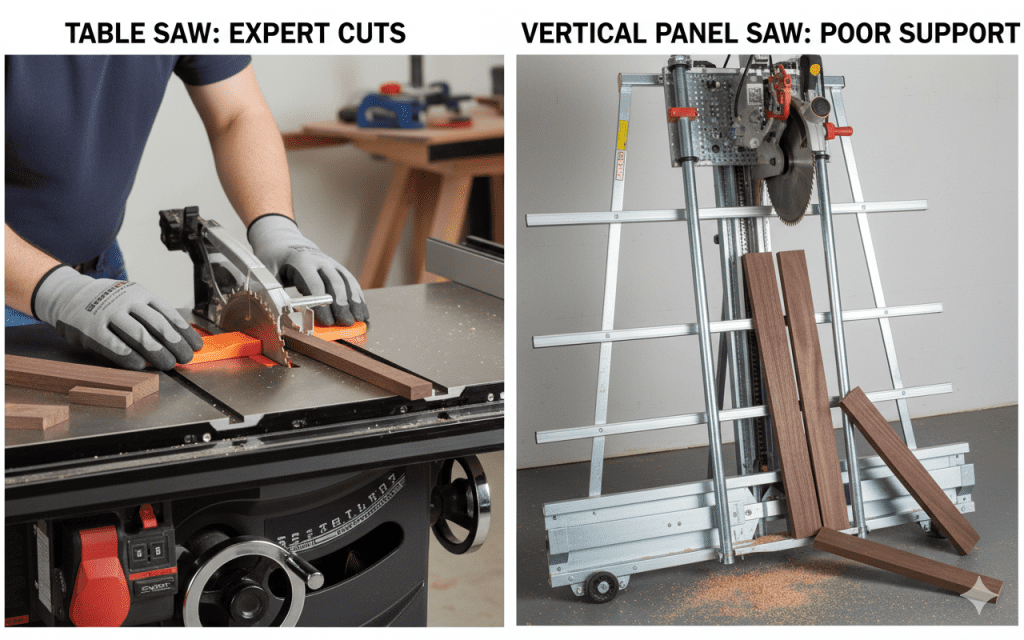
Small parts and narrow rips. Try cutting a 2-inch strip from a 6-foot board on a panel saw and you’ll immediately understand why these tools aren’t designed for that work. The support system expects wide panels, not narrow pieces.
Any joinery work. Panel saws cut straight lines at 90 degrees (and sometimes bevels on premium models). They don’t cut dados, rabbets, tenons, or grooves. If your projects require joinery, you need a different tool.
Solid lumber processing. While technically possible to cut boards on panel saws, the setup fights against you. These tools were engineered for sheets, and forcing them to handle dimensional lumber feels awkward and inefficient.
Where Table Saws Excel
Versatility across all operations. Ripping, crosscutting, bevels, dados, miters, small parts—table saws handle everything. This flexibility makes them the natural centerpiece of most woodworking shops.
Precision on solid lumber. The rip fence and miter gauges give you complete control when dimensioning hardwood boards. My table saw can rip a 10-foot walnut board to within 0.005 inches of target width, then crosscut it to exact length with my sled.
Joinery capabilities. Install a dado stack and suddenly you can cut grooves for cabinet backs, rabbets for drawer boxes, and tenons for face frames—all on the same tool.
Small parts accuracy. Try cutting 50 pieces of 1×2 stock to identical 6-inch lengths on a panel saw. Now try it on a table saw with a crosscut sled and stop block. The table saw completes the job in one-tenth the time with perfect repeatability.
| Table Saw Strength | Why It Matters | Real-World Impact |
|---|---|---|
| True versatility | Handles every common operation | One tool for multiple needs |
| Jig compatibility | Endless customization options | Adapts to specific project requirements |
| Solid lumber mastery | Designed for dimensional stock | Ideal for furniture making |
| Small parts control | Precision on pieces under 12″ | Perfect for detailed work |
| Joinery capability | Dados, rabbets, grooves | Complete cabinetry and furniture joinery |
Where Table Saws Create Problems
Sheet goods handling is genuinely dangerous. I’m not exaggerating—managing a full 4×8 sheet on a table saw demands constant vigilance, proper support, and ideally a helper. I’ve had sheets catch, twist, and bind even with good technique and outfeed support.
Space requirements multiply. That “60-inch” table saw actually needs 12-15 feet of clear space front-to-back when you account for infeed and outfeed support for long rips. Add side clearance for sheet goods and you’re looking at substantial floor space.
Setup time accumulates. Switching from ripping to crosscutting means swapping from fence to sled. Changing blade heights and angles, installing dado stacks, adjusting stops—each operation requires setup time that panel saws eliminate.
For detailed reviews of table saws across different categories and price points, check our best table saw reviews section.
Sheet Goods Handling: The Make-or-Break Factor
If you’re reading this comparison, sheet goods handling is probably your primary concern. Let’s be brutally honest about what each tool actually delivers.
Panel Saw Sheet Handling Reality
I helped a friend set up his new cabinet business last year. We were choosing between a quality table saw or an entry-level vertical panel saw for the same $2,500 budget. I pushed for the table saw—more versatile, better known, safer bet, right?
Six months later, he’s processing 30+ sheets weekly and thanked me for being wrong if he’d listened to me. The panel saw transformed his workflow:
Physical handling comparison:
| Handling Aspect | Panel Saw Experience | Table Saw Experience |
|---|---|---|
| Initial positioning | Lean against frame, gravity helps | Lift onto table, control full weight |
| During cut | Hands guide carriage only | Support and steer 50-70 pound sheet |
| Cut stability | Sheet clamped or held by rollers | Constant pressure needed against fence |
| Operator position | Stand comfortably to side | Awkward stance supporting material |
| Fatigue after 10 sheets | Minimal—mostly walking and measuring | Significant—shoulders, back, grip strength |
| Solo operation | Completely manageable | Possible but risky, helper recommended |
Edge quality on challenging materials:
Melamine and laminate-faced panels show the panel saw’s advantage dramatically. The chip-out that plagues table saw cuts on these materials comes from the exit side where fibers tear rather than cut cleanly.
Panel saws with scoring blades solve this by making a shallow pass that cuts the bottom veneer first, then following with the main blade. The result is clean edges on both sides without tape, backer boards, or post-cut cleanup.
I’ve compared edges directly: melamine cut on my table saw (with a quality 80-tooth blade and zero-clearance insert) versus the same material on a panel saw with scoring blade. The panel saw edge was noticeably cleaner, requiring zero touch-up versus 30 seconds of careful sanding per piece on the table saw cuts.
Table Saw Sheet Handling Reality
Let me describe cutting a full sheet on my table saw so you understand what you’re signing up for:
- Clear a path from the saw through the outfeed area—nothing can be in the way
- Lift the sheet onto the table (or use a helper to support it)
- Align one edge carefully against the fence
- Start the cut, maintaining constant pressure against the fence while controlling the sheet’s weight
- As the cut progresses past the blade, shift weight and body position to support the remaining material
- Guide the cutoff piece or keep it from binding as you complete the cut
- Manage the separated pieces coming off the table
That sequence demands:
- Adequate space (12+ feet front to back, 8+ feet side to side)
- Proper outfeed support (table, roller stands, or helper)
- Physical strength and stamina
- Experience reading how the sheet wants to move
- Constant vigilance for binding and kickback
I can do it safely after years of practice. But I watch beginners struggle with this operation, and I’ve seen enough near-misses to understand why panel saws exist.
Table saw sheet handling improvement strategies:
| Challenge | Solution | Effectiveness |
|---|---|---|
| Weight and balance | Outfeed table, roller stands | Helps significantly, doesn’t eliminate the challenge |
| Chip-out on melamine | 80-tooth TCG blade, zero-clearance insert, painter’s tape on cut line | Reduces but doesn’t eliminate chip-out |
| Cut accuracy | Take time with setup, use a straightedge guide for initial alignment | Good accuracy achievable with care |
| Solo operation safety | Track saw for rough breakdown, table saw for final sizing | Best compromise for solo workers |
| Fatigue management | Limit sheets per session, use proper lifting technique | Manages symptoms, doesn’t solve root cause |
The hybrid approach that actually works:
Many professional cabinet makers I know use this workflow: rough-break sheets with a track saw or panel saw into manageable pieces (20-30 inches maximum dimension), then move to the table saw for final sizing and edge cleanup. This combines the panel saw’s safety advantage with the table saw’s precision and versatility.
Solid Lumber and Small Parts Reality
The panel saw vs table saw comparison reverses completely when you move from sheets to dimensional lumber and small parts.
Table Saw Lumber Mastery
Ripping hardwood boards is where table saws feel most natural and deliver exceptional results. The rip fence, powerful motor, and stable table create perfect conditions for processing lumber.
Typical lumber operations:
| Operation | Table Saw Method | Why It Works |
|---|---|---|
| Ripping boards to width | Set fence, feed board along it | Direct control, excellent repeatability |
| Straightening rough edges | Jointing sled or straight-line jig | Creates true reference edge |
| Resawing thin stock | Tall fence, featherboards, proper blade | Achieves thickness not easily purchased |
| Batch cutting multiple pieces | Fence with stop block | Fast, identical parts |
| Small parts (under 12″) | Crosscut sled with hold-downs | Safe, accurate, repeatable |
I dimension probably 80% of my lumber on my table saw. An 8-foot cherry board enters rough-sawn and leaves as four perfectly sized pieces ready for joinery. The control and precision simply aren’t available on panel saws.
Panel Saw Lumber Limitations
Panel saws can technically cut boards, but everything about the experience fights against you:
Why lumber doesn’t work on panel saws:
- Support systems designed for wide panels, not narrow boards
- Vertical orientation awkward for long, flexible boards
- Clamps and hold-downs sized for sheet thickness, not dimensional lumber
- No effective way to manage narrow rips (under 6 inches)
- Operator position and control designed for large, stable panels
I tried cutting 1×6 pine boards on a vertical panel saw once—just to see if it could work for a project requiring straight crosscuts on hundreds of pieces. The setup was so awkward and the risk of the board slipping so concerning that I gave up after three cuts and moved to my table saw with a sled. What would have taken 30 minutes on the table saw would have required hours of frustration on the panel saw.
Small Parts Comparison
For parts under 12 inches in any dimension, table saws dominate completely:
Table saw advantages on small work:
- Crosscut sleds with integrated stops for perfect repeatability
- Push sticks and push blocks keep hands safe
- Zero-clearance inserts support small pieces without gaps
- Featherboards hold work securely against fence
- Blade guards and riving knives provide protection
Panel saw problems with small parts:
- Support system doesn’t accommodate small pieces
- Clamps too large and spaced too far apart
- Difficulty maintaining piece stability during cut
- Risk of pieces falling or shifting
- No practical jig solutions for small work
If more than 30% of your cutting involves solid lumber or small parts, the table saw is essentially your only practical option.
Safety Comparison Beyond the Marketing

Both tools can be operated safely with proper technique and equipment, but they present fundamentally different risk profiles.
Panel Saw Safety Advantages
Kickback risk dramatically reduced. The defining danger of table saws—violent kickback when wood binds or lifts—is almost eliminated on panel saws because the workpiece stays clamped or supported against a fixed frame throughout the cut.
In ten years of woodworking, I’ve experienced table saw kickback three times despite careful technique. It’s instantaneous and terrifying—wood launched at 100+ mph directly at your body. I’ve never experienced anything similar on a panel saw because the physics simply don’t allow it.
Ergonomic injury prevention. Lower back strain, shoulder fatigue, and grip exhaustion from wrestling heavy sheets accumulates into chronic pain over time. Panel saws eliminate most of this physical stress.
A cabinetmaker friend who switched from table saw to panel saw for his primary sheet breakdown told me his chiropractor visits decreased from twice monthly to twice yearly within six months of the change.
Table Saw Safety Challenges
Table saws demand respect and constant vigilance. The risks are well-documented and serious:
Primary hazards:
- Kickback: Wood violently ejected toward operator
- Contact injuries: Fingers, hands, or clothing contacting spinning blade
- Material control loss: Heavy or awkward pieces shifting during cut
- Ergonomic strain: Repetitive lifting, awkward positions, sustained exertion
Critical safety equipment and practices:
| Safety Element | Purpose | Non-Negotiable? |
|---|---|---|
| Riving knife or splitter | Prevents kerf from closing behind blade | Yes—eliminates most kickback causes |
| Blade guard | Protects hands from accidental contact | Yes—keep it on whenever possible |
| Push sticks (multiple types) | Keeps hands away from blade | Yes for narrow rips (under 6″) |
| Featherboards | Holds work against fence, reduces chatter | Highly recommended |
| Zero-clearance insert | Supports small pieces, reduces tearout | Recommended for quality and safety |
| Outfeed support | Prevents workpiece tipping or binding | Essential for long rips and sheets |
| Proper stance | Stand to side of blade path, not behind | Critical habit to develop |
SawStop technology consideration:
SawStop’s flesh-sensing brake system stops the blade within milliseconds of skin contact, preventing catastrophic injuries. This technology is available on many table saw models but not on panel saws.
I’ve never triggered my SawStop’s brake (thankfully), but knowing it’s there fundamentally changed how confidently I approach complex cuts. If safety is your primary concern and your work focuses on operations where table saws excel, SawStop-equipped models deserve serious consideration despite their premium pricing.
For comprehensive coverage of safety accessories and proper technique, visit our table saw accessories guide.
The Realistic Safety Bottom Line
Panel saws are objectively safer for their intended use—breaking down full sheets. Table saws are more dangerous but manageable with proper equipment, training, and respect.
Neither tool makes you safe. Your habits, training, and decision-making determine safety outcomes. I’ve seen careless operators create dangerous situations on both tools, and I’ve seen skilled craftspeople work safely on either one for decades without incident.
Speed, Setup, and Real Workflow Efficiency
The panel saw vs table saw comparison often focuses on cut quality while ignoring the time factor—how quickly can you go from measurement to finished part?
Panel Saw Speed Advantages
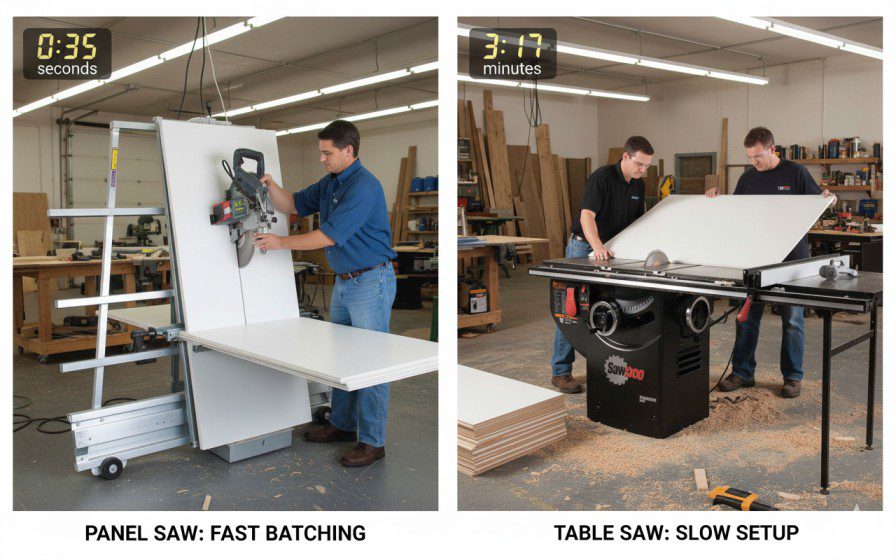
Minimal setup for repeated cuts. Panel saws with flip stops and digital readouts make batch cutting almost mindless. Set your dimension, make your cut, flip the stop, repeat. No measuring, no marking, no fence adjustments.
I timed myself cutting 20 identical cabinet side panels (24″ × 30″) on a friend’s vertical panel saw: 18 minutes total including loading sheets. The same task on my table saw with careful measuring and fence adjustments: 35 minutes. That’s nearly double the time for identical results.
No outfeed support coordination. Table saws require clear paths, positioned roller stands, or helpers for sheet work. Panel saws eliminate all that coordination—the support is built in.
Table Saw Speed Advantages
Instant operation for varied cuts. When you need to rip a board, crosscut it, then cut dados, the table saw handles all three operations without moving the workpiece to different tools. That versatility saves overall shop time even if individual operations take longer.
Quick adjustments for experienced operators. Once you’ve developed muscle memory on fence adjustments, blade height changes, and sled positioning, table saw setups become remarkably fast. My fence adjustment from one rip width to another takes 5-10 seconds with verification.
Real-World Workflow Comparison
Let me describe two actual projects to illustrate the workflow differences:
Project 1: Kitchen cabinet boxes (24 identical units)
Material: Melamine-faced plywood, requiring 96 side panels, 48 top/bottom panels, 24 backs
Panel saw workflow:
- Load sheet, set first dimension, cut all sides for first orientation (20 minutes)
- Rotate carriage, cut remaining sides (18 minutes)
- Repeat for tops/bottoms (15 minutes)
- Cut backs (12 minutes)
- Total cutting time: 65 minutes
Table saw workflow:
- Position outfeed support and side roller (5 minutes)
- Rough-break sheets to manageable sizes with track saw (35 minutes)
- Final-size side panels at table saw (25 minutes)
- Reset fence, cut tops/bottoms (20 minutes)
- Reset fence, cut backs (15 minutes)
- Total cutting time: 100 minutes
Project 2: Arts & Crafts dining table (solid wood)
Material: 8/4 white oak for legs, 4/4 oak for aprons and top boards
Table saw workflow:
- Rip legs to dimension (10 minutes)
- Crosscut legs to length with sled (5 minutes)
- Rip apron pieces (8 minutes)
- Crosscut aprons to length (5 minutes)
- Rip and crosscut top boards (15 minutes)
- Cut mortises with dado stack (20 minutes)
- Total cutting time: 63 minutes
Panel saw workflow:
- Not practical for this project—would require extensive setup awkwardness and still need table saw for joinery
- Estimated time: 2-3× longer with significantly more frustration
The pattern is clear: Panel saws dominate sheet-heavy projects, table saws dominate lumber-heavy projects. If your work mixes both regularly, you need to choose which operation represents the bigger bottleneck or pain point.
Space Requirements Nobody Warns You About
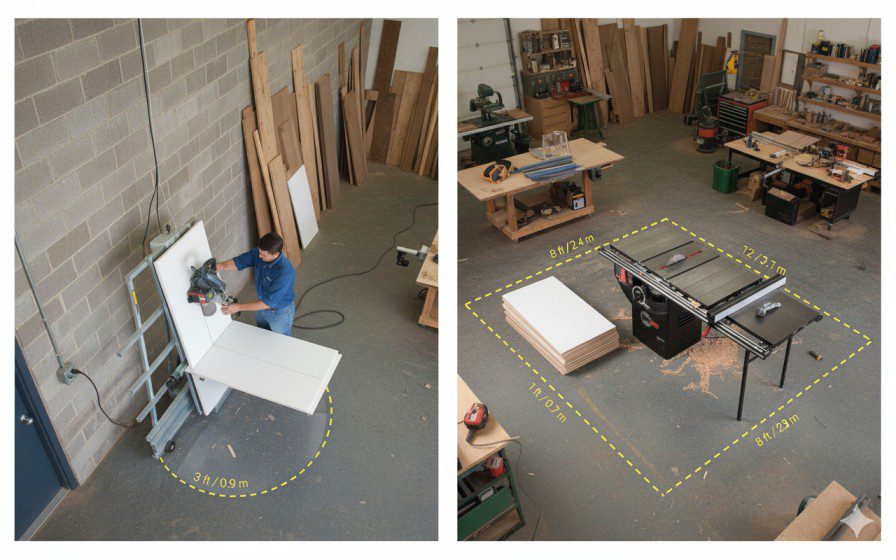
The panel saw vs table saw decision often hinges on workshop space, but the real space requirements extend far beyond the tool’s base dimensions.
Panel Saw Space Reality
Vertical panel saws seem space-efficient because they stand upright—a 60″ wide × 24″ deep footprint sounds manageable. But that’s misleading.
Actual space requirements for vertical panel saws:
| Space Factor | Minimum | Recommended | Why |
|---|---|---|---|
| Tool footprint | 60″ × 24″ | 72″ × 30″ | Larger models handle bigger sheets |
| Front clearance | 48″ | 60″ | Space to position and load sheets |
| Side clearance | 36″ each side | 48″ each side | Cut pieces need exit space |
| Overhead clearance | 96″ | 108″ | Full 8′ sheets plus carriage height |
| Total floor space | ~60 sq ft | ~90 sq ft | Functional working area |
I watched a friend install a vertical panel saw in his single-car garage (12′ × 20′ space). The saw physically fit against one wall, but the front clearance required for loading sheets meant his workspace was constantly congested. He eventually moved to a two-car garage because the space constraints created dangerous working conditions.
Horizontal beam saws demand even more room—think 10′ × 12′ footprint minimum for the tool alone, plus clearance for loading and operator movement. These belong in dedicated shops with 400+ square feet available.
Table Saw Space Reality
Table saws also consume far more space than their table dimensions suggest.
Actual space requirements for table saws:
| Saw Type | Base Size | Rip Capacity | Needed Depth (front-to-back) | Needed Width | Total Area |
|---|---|---|---|---|---|
| Jobsite saw | 26″ × 22″ | 24″ right | 10-12 feet | 7 feet | ~80 sq ft |
| Contractor saw | 40″ × 27″ | 30″ right | 12-14 feet | 8 feet | ~100 sq ft |
| Cabinet saw | 44″ × 27″ | 30″-52″ right | 12-16 feet | 9-12 feet | ~140 sq ft |
My cabinet saw with 52″ fence capacity requires 14 feet of clear space front-to-back for comfortable ripping of 8-foot boards, and at least 10 feet side-to-side when cutting sheet goods. That’s nearly 140 square feet dedicated primarily to one tool.
The Space Comparison That Actually Matters
For sheet-dominant work: Panel saws use space more efficiently because all operations happen in essentially the same footprint. Table saws require massive clearance zones that can’t be used for anything else.
For mixed work: Table saws justify their space requirements through versatility—that 140 square feet handles ripping, crosscutting, joinery, and small parts all in one location.
The workshop size threshold:
- Under 200 sq ft: Neither tool ideal—consider track saw + workbench
- 200-300 sq ft: Table saw possible if it’s primary tool, panel saw only if sheet-focused
- 300-500 sq ft: Either tool can work depending on primary work type
- 500+ sq ft: Room for either tool or potentially both in dedicated areas
For comprehensive workshop planning guidance, explore our table saw buying guide covering space allocation and tool selection.
Cost Analysis: Initial Investment and Hidden Expenses
The panel saw vs table saw pricing comparison reveals surprising complexity beyond the purchase price.
Initial Investment Breakdown
Panel saw pricing:
| Panel Saw Type | Price Range | What You Get | Best For |
|---|---|---|---|
| Entry vertical | $1,500-$3,000 | Manual carriage, basic stops, 4×8 capacity | Small cabinet shops, DIY, schools |
| Mid-range vertical | $3,000-$6,000 | Scoring blade, digital stops, better build | Professional cabinet shops |
| Premium vertical | $6,000-$12,000+ | Heavy-duty construction, automation features | High-volume production |
| Horizontal beam saws | $8,000-$50,000+ | Automated, multi-sheet capacity, integration | Industrial production |
Table saw pricing:
| Table Saw Type | Price Range | What You Get | Best For |
|---|---|---|---|
| Jobsite saw | $300-$700 | Portable, light, decent accuracy | Contractors, job sites, tight budgets |
| Contractor/Hybrid | $800-$2,000 | Better power and precision | Serious DIY, small shops |
| Cabinet saw | $2,000-$5,000 | Premium accuracy, power, features | Furniture makers, professional shops |
| Sliding table saw | $4,000-$15,000+ | Cabinet saw + sliding carriage | European-style shops, sheet + solid work |
Hidden and Ongoing Costs
Panel saw additional expenses:
| Cost Category | Amount | Frequency | Notes |
|---|---|---|---|
| Installation/setup | $200-$500 | One-time | Professional mounting recommended |
| Additional blades | $100-$300 | Every 1-2 years | Main blade + scoring blade if equipped |
| Replacement parts | $100-$300/year | As needed | Rollers, bearings, carriage components |
| Dust collection | $300-$800 | One-time | Adequate CFM for shroud |
| Blade sharpening | $40-$80 | 2-4 times/year | More frequent with heavy use |
Table saw additional expenses:
| Cost Category | Amount | Frequency | Notes |
|---|---|---|---|
| Outfeed table | $150-$600 | One-time | Essential for sheet work |
| Crosscut sled | $50-$200 | One-time | DIY or purchased |
| Dado stack | $150-$400 | One-time | Critical for joinery |
| Additional blades | $200-$500 | One-time | Rip, crosscut, combo, specialty |
| Mobile base | $100-$300 | Optional | Flexibility in smaller shops |
| Dust collection | $400-$1,500 | One-time | Overhead + below-table collection |
| Blade sharpening | $50-$100 | 2-4 times/year | Multiple blades to maintain |
The 5-Year Total Cost Comparison
Let’s project realistic ownership costs for each tool type:
Mid-range vertical panel saw (5-year total):
- Initial purchase: $4,000
- Setup/installation: $300
- Dust collection: $500
- Maintenance/parts: $1,000
- Blade replacement/sharpening: $600
- Total 5-year cost: $6,400
- Annual cost: $1,280
Quality cabinet table saw (5-year total):
- Initial purchase: $3,000
- Outfeed table: $400
- Dado stack + additional blades: $600
- Crosscut sled materials: $100
- Dust collection: $800
- Maintenance/parts: $400
- Blade sharpening: $400
- Total 5-year cost: $5,700
- Annual cost: $1,140
The value equation: Panel saws cost more upfront and annually, but that extra cost buys safety, ergonomics, and efficiency specifically for sheet goods. Table saws cost less overall while delivering far greater versatility—but that versatility only matters if you actually use it.
Making the Right Choice for Your Actual Work

After examining every angle of the panel saw vs table saw comparison, let’s cut through the complexity with honest decision-making guidance.
Choose a Panel Saw If You:
Process 15+ full sheets monthly. This is the threshold where panel saw efficiency and ergonomics justify the investment. Below this volume, the cost and space requirements outweigh the benefits.
Run a cabinet or closet business. When your primary products are boxes made from sheet goods, the panel saw becomes the logical centerpiece of your workflow.
Work solo and value safety. If you’re breaking down sheets without helpers, the panel saw dramatically reduces injury risk and physical strain compared to wrestling material across a table saw.
Have vertical wall space but limited floor space. Vertical panel saws use space more efficiently than their footprint suggests, making them viable in long, narrow shop spaces.
Cut primarily melamine and laminates. The scoring blade capability of many panel saws delivers edge quality that’s difficult to match on table saws without extensive technique development.
Want to minimize physical strain. If you have back problems, shoulder issues, or simply want to preserve your body for years of woodworking, panel saws eliminate the lifting and wrestling that accumulates into chronic pain.
Choose a Table Saw If You:
Work primarily with solid lumber. If more than 50% of your cutting involves dimensional hardwood and softwood boards, the table saw’s versatility and efficiency with lumber makes it the obvious choice.
Need joinery capabilities. Dados, grooves, rabbets, and tenons are table saw territory. Panel saws can’t deliver these operations.
Build furniture rather than cabinets. Traditional furniture making with solid wood, complex joinery, and varied operations leverages everything table saws do best.
Cut occasional sheets (fewer than 10 monthly). Below this volume, rough-breaking sheets with a track saw and final-sizing on the table saw provides adequate capability without the panel saw investment.
Have adequate floor space (300+ square feet). Table saws require substantial clearance but reward that space allocation with incredible versatility.
Value one-tool-does-everything efficiency. When shop space or budget limits total tool count, table saws deliver the widest range of capabilities from a single investment.
Want the SawStop safety option. This revolutionary safety technology is only available on table saws, not panel saws.
The Both-Tool Solution (For Established Shops)
Professional cabinet and furniture shops often run both tools, using each for what it does best:
Optimal workflow with both:
- Panel saw breaks down full sheets to rough dimensions (slightly oversize)
- Table saw final-sizes pieces to exact dimensions with superior edge quality
- Table saw handles all solid lumber operations
- Table saw cuts all joinery (dados, grooves, rabbets)
- Panel saw handles all full-sheet repetitive cuts
Frequently Asked Questions
Can a table saw replace a panel saw for a cabinet business?
Technically yes, but practically it depends on volume. Under 15 sheets monthly, a table saw with proper outfeed support and careful technique handles the work adequately. Above that threshold, the physical strain, time inefficiency, and safety concerns make a panel saw increasingly worthwhile. Many cabinet shops start with table saws and add panel saws as volume grows.
Is a panel saw worth it for a hobbyist?
Rarely. Unless you’re building kitchens full of cabinets or doing extensive built-in work, hobbyists typically cut too few sheets to justify a panel saw’s cost and space requirements. A track saw for rough breakdown plus a quality table saw for final sizing delivers better overall capability for mixed woodworking projects.
Which tool is safer for beginners?
Panel saws are objectively safer for sheet goods handling because the material stays supported and kickback risk is minimal. However, table saws with proper safety equipment (SawStop technology, riving knife, blade guard) and good training are perfectly manageable for beginners. The “safer” tool is the one matched to the work—don’t buy a panel saw and then try to cut small parts on it.
Can I build furniture on a panel saw?
Not really. While you could technically cut boards, panel saws lack the versatility, joinery capability, and solid lumber handling efficiency that furniture making requires. Furniture builders need table saws (or table saws plus other tools like bandsaws and jointers).
How much space do I actually need for each tool?
Minimum functional space: vertical panel saw requires about 60 square feet plus clearance (80-100 sq ft total); table saw requires 80-140 square feet depending on size. But both tools work better with more room. Honestly assess your space before committing—cramped working conditions are dangerous regardless of which tool you choose.
Final Thoughts: Choose Based on What You Actually Cut
The panel saw vs table saw decision isn’t about which tool is better—it’s about matching the right tool to your actual work. After years of using both, here’s my honest advice:
If you’re running a cabinet shop breaking down 20+ sheets monthly, buy the panel saw. Your back will thank you, your productivity will increase, and the safety benefits alone justify the investment. Add a contractor table saw later for solid lumber and joinery when budget allows.
If you’re building furniture, doing varied woodworking, or cutting fewer than 10 sheets monthly, buy the best table saw you can afford. The versatility will serve you better than specialized sheet-handling capability you rarely need. Use a track saw for occasional sheet breakdown and focus your investment on the tool you’ll use daily.
Don’t buy based on what you might do someday—buy based on what you’re cutting this month, next month, and for the foreseeable future. The right tool is the one matched to your actual work, your real space, and your honest budget.
Both tools will serve you well for decades if properly maintained. Choose confidently based on your work reality, commit to learning proper technique, and focus on building skills that matter more than the equipment itself. The saw is just a tool—your craftsmanship determines what you create with it.

Finlay Connolly is a woodworking enthusiast and power tool specialist with over a decade of hands-on experience in the workshop. As the founder and lead writer at ProTableSawReviews.com, Finlay combines expert knowledge with real-world testing to help woodworkers, DIYers, and professionals choose the best tools for the job. With a sharp eye for detail and a passion for precision, Finlay is committed to providing trustworthy, practical advice backed by years of experience and research in the field. Whether you’re cutting dados or comparing fence systems, you can count on Finlay for honest, reliable reviews that make your next cut your best one.