
Why Does My Table Saw Burn Wood?
(8 Causes + Exact Fixes)
Check your blade first. A dull blade is responsible for the majority of table saw burn marks — it generates heat instead of cutting cleanly. If the blade is older than 6 months of regular use, that’s very likely your problem. Second most common: feeding the wood too slowly. Push the board through at a consistent, steady pace — hesitating mid-cut lets the blade dwell on one spot and scorches it instantly. If those two don’t fix it, work through the 8 causes below.
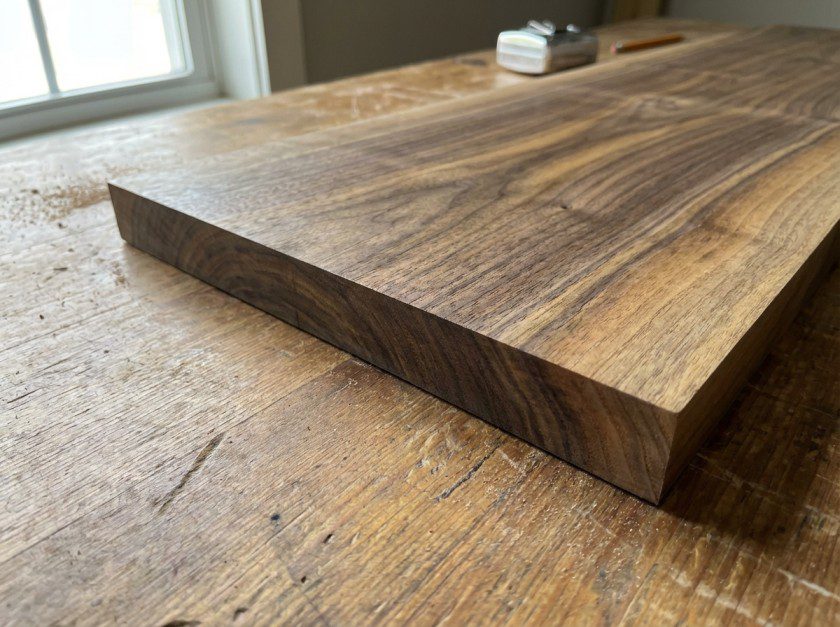
I ruined a beautiful piece of walnut last year — a board I’d been saving — because I didn’t notice my blade was getting dull. The burn marks were deep enough that I lost 2mm of thickness sanding them out. It was an expensive lesson, and an avoidable one.
A table saw that burns wood is almost always fixable in under 30 minutes, and most of the time it costs nothing. Below I’m walking you through all 8 causes in order of how likely they are, how to diagnose which one you’re dealing with, and the exact fix for each.
Why Table Saws Burn Wood — The Basic Mechanics
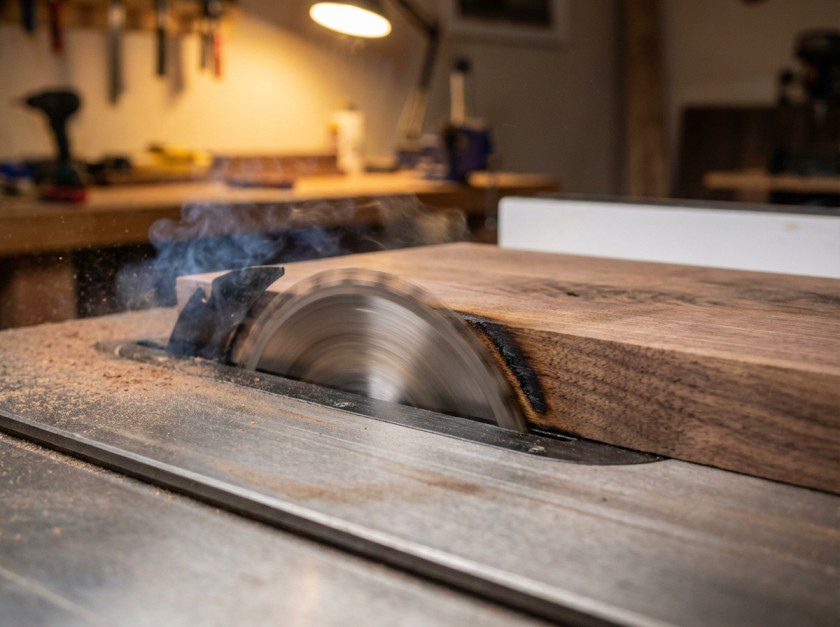
Wood burns when heat builds up faster than it can dissipate. On a table saw, that heat comes from friction — either the blade teeth are rubbing rather than cutting cleanly, or the wood is staying in contact with the spinning blade longer than it should. Understanding which type of friction is causing your burn marks makes diagnosing the cause much faster.
There are two distinct burn patterns to look for before you start troubleshooting:
- Burns on both sides of the cut edge — usually a blade problem (dull teeth, wrong blade type, pitch buildup) or a feed rate issue.
- Burns on only one side of the cut edge — usually a fence alignment problem. If the fence is even slightly out of parallel with the blade, it pinches the wood on one side.
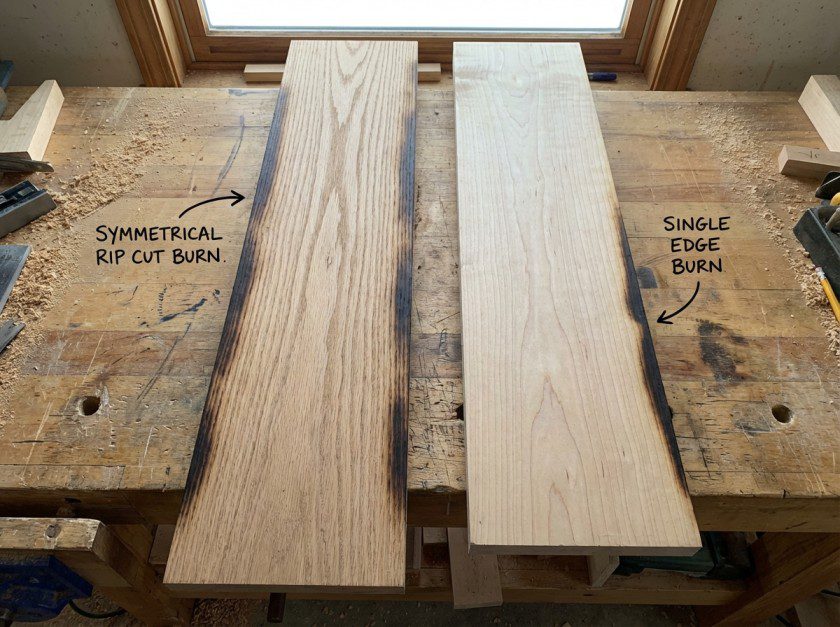
Burns on both sides point to blade or feed issues. Burns on one side only almost always mean the fence is out of parallel.
8 Causes of Table Saw Burn Marks (And How to Fix Each)
This is by far the most common cause — and the most overlooked because blade dulling happens gradually. A sharp blade shears wood fibers cleanly. A dull blade scrapes and rubs, generating heat that scorches the wood before the cut is even finished.
How to identify it: The saw requires noticeably more pushing force than it used to. Burn marks appear on both sides of the cut edge. The cut surface feels rough and torn rather than smooth. You may also notice the motor laboring under load.
- 1Unplug the saw and inspect the blade teeth with good lighting. Sharp carbide tips have clean, flat faces. Dull tips look rounded or chipped at the corners.
- 2If the blade has been in use for 6–12 months of regular shop work, assume it needs sharpening or replacement — even if it looks okay to the naked eye.
- 3Send it to a blade sharpening service (usually $15–$25) or replace it. See my guide to the best table saw blades for quality replacements that hold an edge longer.
- 4Run a test cut on pine after the new/sharpened blade is installed. Clean cut = problem solved.
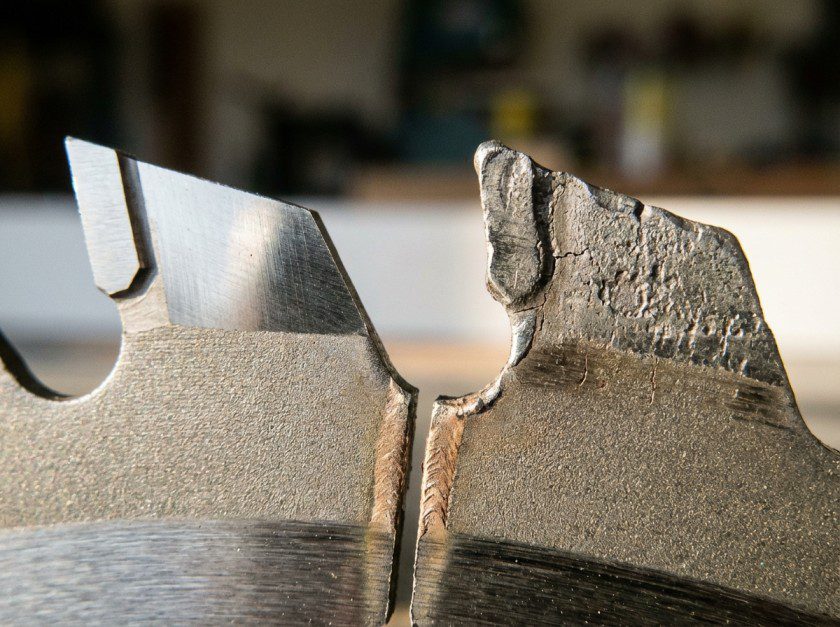
Left — sharp tooth with clean corners. Right — dull tooth with rounded carbide, the friction source for burn marks.
This is the second most common cause — and completely free to fix. The spinning blade generates heat at the point of contact. The longer any spot on the wood stays in contact with the blade, the more heat builds up. Feed too slowly and you’re essentially holding the wood against a hot spinning surface.
How to identify it: Burns only appear at the beginning or end of a cut where you hesitated, or when you were being extra cautious with a narrow piece. The blade and fence are both fine.
- 1Start the cut and commit to a smooth, continuous forward motion. Don’t stop mid-cut.
- 2The right feed rate varies by wood species and blade — hardwoods like maple and cherry need a slower but still continuous feed. Softwoods like pine can go faster.
- 3If you need to stop mid-cut for safety reasons, turn the saw off before stopping — never let the wood rest against a spinning blade.
- 4Use a push stick for narrow rips — hesitation is often caused by nervousness about fingers near the blade. A push stick gives you confidence to feed consistently.
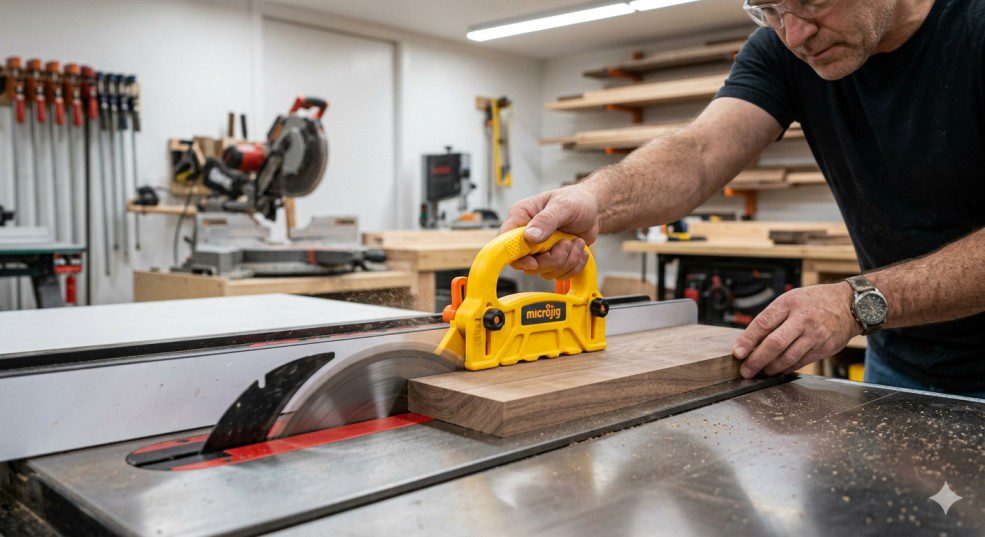
A push stick gives you control and confidence to feed at a consistent pace — hesitation mid-cut is a guaranteed burn mark.
If the fence is even slightly angled — not perfectly parallel to the blade — the wood gets pinched between the fence and the back of the blade as it exits the cut. That pinching creates intense friction on one side, and you get a burn mark on the fence side of the cut only. This is called “toe-in” and it’s a very common fence alignment issue.
How to identify it: Burn marks appear consistently on one face of the cut — the fence side. The cut may also feel like it wants to drift or requires more lateral pressure than usual.
- 1Unplug the saw. Place a reliable straightedge or combination square against the miter slot — this is your reference line parallel to the blade.
- 2Move the fence to touch the straightedge at the front of the blade. Measure the gap between the fence and straightedge at the rear of the blade.
- 3The fence should be either perfectly parallel or very slightly open at the rear (1/64 inch of outward angle) — never toed-in. Any toe-in causes pinching and burning.
- 4Adjust the fence according to your saw’s fence adjustment mechanism — most fences have cam bolts or pivot points for this. Consult your saw’s manual for the specific adjustment procedure.
- 5Re-check with the straightedge, lock the fence, and run a test cut.
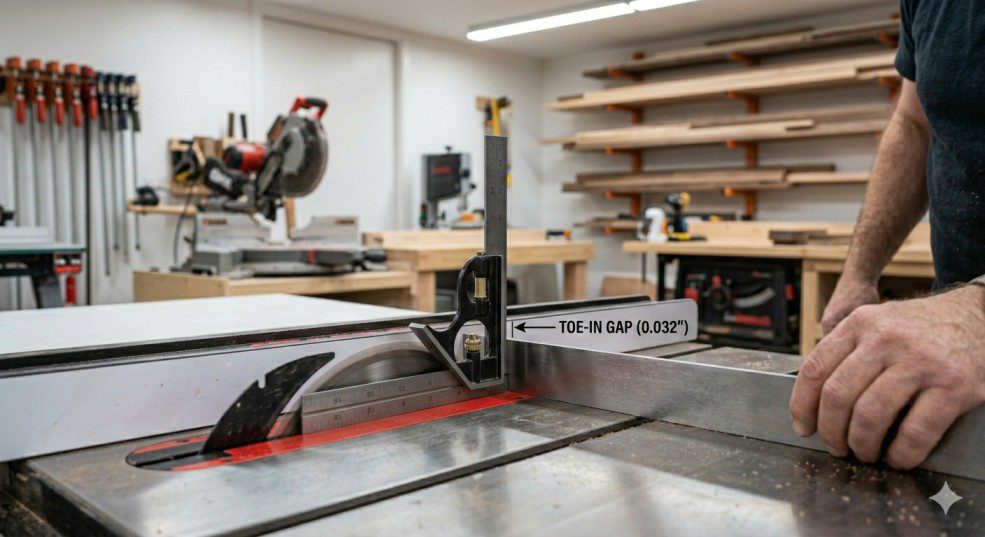
Checking fence-to-blade parallelism using the miter slot as reference — even 1mm of toe-in causes one-sided burning.
Pine, cedar, cherry, and other resinous woods coat blade teeth with a sticky brown resin over time. Once the buildup is thick enough, the teeth can’t cut cleanly — instead they drag resin through the cut, generating heat and leaving scorch marks. I’ve seen blades that looked dull but were actually just heavily gunked up — 15 minutes of cleaning restored them completely.
How to identify it: You can see the brown or black sticky buildup on the blade teeth with the naked eye. The blade may look dark or discolored even when the carbide tips themselves are still sharp.
- 1Unplug the saw and remove the blade.
- 2Soak the blade in a blade cleaning solution (CMT Formula 2050, Simple Green, or even oven cleaner works) for 5–10 minutes.
- 3Scrub the teeth with an old toothbrush or brass-bristle brush — the buildup comes off quickly once it’s soaked.
- 4Rinse well with water, dry thoroughly (especially the plate — moisture causes rust), and reinstall.
- 5Apply a light coat of paste wax to the blade plate to reduce future buildup. See my guide on paste wax for table saws — it makes a real difference.
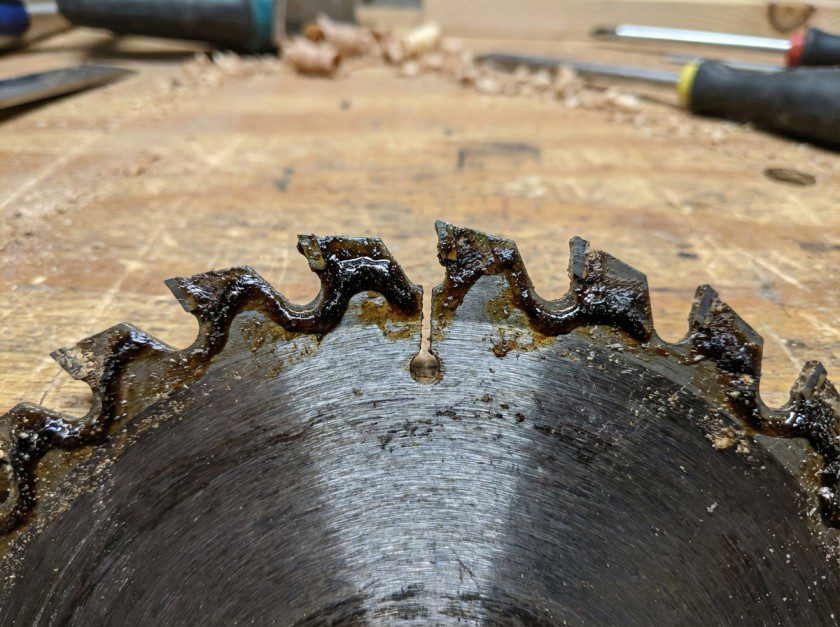
Heavy pitch buildup makes the blade drag instead of cut — 15 minutes of soaking and scrubbing can completely restore it.
Using a crosscut blade for ripping, or a fine-tooth blade designed for finishing cuts on a wide board rip, forces the blade to work against its design. An 80-tooth crosscut blade used for ripping hardwood will burn badly — the small gullets pack with sawdust that has nowhere to go, causing the blade to essentially sand rather than cut.
How to identify it: The burning started when you switched wood species or cut types, and your blade tooth count is either too high for the task or the wrong geometry entirely (crosscut vs rip).
As a rule: 24–30 teeth for ripping (fast, aggressive, large gullets clear sawdust efficiently). 60–80 teeth for crosscutting (finer, slower cut, smooth face). For general purpose work on a variety of materials, a quality 40-tooth ATB (alternate top bevel) blade is my go-to. See my guide to the best ripping blades and the best all-purpose blades for specific recommendations.
This one surprises a lot of people. When the blade is set too low — say, barely clearing the top of the board — the teeth exit the wood at a very shallow angle. That means each tooth spends more time in contact with the wood per revolution, and less time in open air cooling down. More contact time = more heat = burn marks.
How to identify it: Burning appears on a new piece of wood even with a sharp blade. You notice the blade height is set conservatively — close to the board thickness or only 1/4 inch above it.
- 1Raise the blade so the full tooth gullet clears the top of the board — typically 1/4 to 3/8 inch above the workpiece surface.
- 2This allows the teeth to clear the cut fully on each rotation, cool slightly, and re-enter the wood at a more aggressive angle.
- 3Note: some woodworkers set blades very low intentionally for safety (less exposed blade = less kickback potential). There’s a genuine trade-off. If you prefer a low blade setting, compensate by slowing down your feed rate slightly and using a sharp blade.
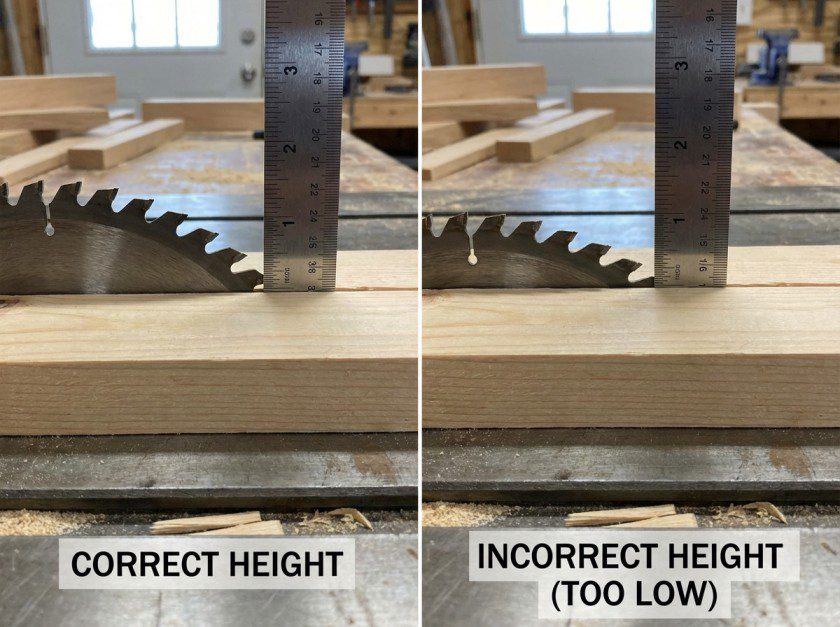
The full gullet should clear the top of the board — about 3/8 inch. Too low means each tooth spends longer in the wood, building heat.
A board that isn’t perfectly flat will flex and move as it passes the blade. If the board is cupped across its width, the edges will press harder against the fence or blade at different points in the cut. That uneven pressure creates intermittent pinching — and pinching creates friction and burning at those contact points.
How to identify it: Burn marks appear at irregular intervals along the cut, not consistently along the whole edge. The board required extra pressure to keep flat on the table or against the fence. You may have felt the cut “tighten up” at certain points.
- 1Before ripping, flatten one face of the board on a jointer (or hand plane if you don’t have a jointer). This gives you a reference face that sits flat on the table saw surface.
- 2Joint one edge straight so it rides cleanly against the fence without rocking.
- 3Now rip the board — the flat reference face and straight reference edge mean the board feeds through without pinching.
- 4If you don’t have a jointer, a hand plane or a straightening jig on the table saw can flatten one edge well enough for a clean rip.
The riving knife or splitter sits directly behind the blade in the kerf, keeping the two halves of the cut from closing back together. If the riving knife is removed, bent, or set too wide or narrow, the kerf closes around the back of the blade as the cut progresses — pinching the blade on both sides and creating burning along the full length of the cut.
How to identify it: Consistent burn marks along the full length of both cut faces. The saw may also feel like it’s binding or the board feels heavy to push through. You may have removed the riving knife to make a non-through cut and forgotten to reinstall it.
- 1Unplug the saw. Check that the riving knife or splitter is present and correctly installed behind the blade.
- 2The riving knife must be thinner than the kerf width but thicker than the blade plate — it sits in the kerf and holds it open without binding.
- 3Check that it’s centred directly in line with the blade — any lateral offset causes one-sided pinching.
- 4If the riving knife is bent, replace it. This is a safety-critical component — don’t run the saw without it for through cuts. See my guide on table saw splitters for the full explanation.
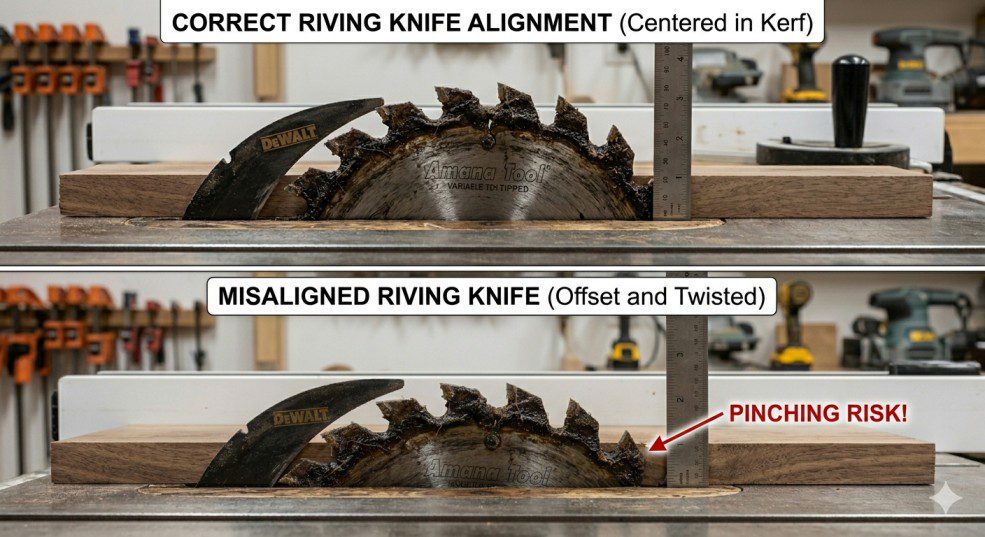
The riving knife must sit centred in the kerf — any offset or missing knife lets the cut close around the blade, causing pinching and burning.
Quick Diagnosis Table — Find Your Cause Fast
Use the burn pattern and symptoms to zero in on your most likely cause before reaching for tools:
| Symptom / Burn Pattern | Most Likely Cause | Fix | Cost |
|---|---|---|---|
| Both edges, requires more force to feed | Dull blade | Sharpen or replace | $15–$80 |
| End of cut only / after hesitation | Feed rate too slow | Feed technique | Free |
| One side only, fence side | Fence out of parallel | Realign fence | Free |
| Teeth visibly coated, resinous wood | Pitch/resin buildup | Clean blade | $5–$15 |
| Using high tooth-count blade for ripping | Wrong blade type | Swap to rip blade | $30–$100 |
| Blade barely above board surface | Blade height too low | Raise blade | Free |
| Irregular burns, board felt stiff mid-cut | Warped board | Joint board first | Free |
| Full-length burn both sides, binding feel | Missing/misaligned riving knife | Check/reinstall riving knife | Free |
How to Prevent Table Saw Burn Marks Going Forward
Once you’ve fixed the immediate problem, these habits will keep burn marks from coming back:
- Replace or sharpen blades on a schedule, not just when cuts go bad. For regular shop use, I send my main blade out for sharpening every 3–4 months, before it gets dull enough to cause problems. A dull blade also strains the motor and causes kickback.
- Clean the blade every time you switch from resinous to expensive wood. Pine and cedar leave residue fast. A quick scrub before moving to walnut or cherry prevents the buildup from burning your good stock. See how I approach table saw cleaning for the full routine.
- Check fence alignment every few months. Fences drift over time, especially on jobsite saws that get moved around. Takes 5 minutes with a straightedge and prevents burning on every single rip cut.
- Always joint boards before ripping. A flat face and straight edge means the board feeds through without rocking or pinching, regardless of species.
- Keep the riving knife installed for all through cuts. Never remove it unless absolutely necessary for a non-through cut, and reinstall it immediately after.
- Match the blade to the job. Have at least two blades — a 24–30 tooth rip blade and a 60–80 tooth crosscut/combination blade. Using the right blade for the cut makes a bigger difference than most people expect.
A clean, burn-free rip cut on hardwood — what a sharp blade, correct feed rate, and aligned fence produces every time.
FAQ — Table Saw Burn Marks
One-sided burning almost always means the fence is out of parallel with the blade. When the fence toes in — angled even slightly toward the blade at the back — the wood gets pinched between the fence and the rear of the blade as it exits the cut. Realign your fence so it’s parallel to the blade (or very slightly open at the rear) and the one-sided burning will stop.
Yes, but it depends on the depth of the burn. Light scorch marks (golden brown) can usually be removed with a card scraper or 120-grit sandpaper in the direction of the grain. Deep burns (dark brown or black) go into the wood fibers and require removing significant material — sometimes 1–2mm — which affects your final dimensions. It’s much better to fix the cause than to sand out burns after the fact.
Cherry and hard maple are denser and have more natural oils and resins than pine. Denser wood generates more friction heat, and the natural oils can scorch and discolor very quickly. Cherry in particular is notorious for burning — even with a sharp blade, it benefits from a slightly faster feed rate and a rip blade with large gullets that clear the dense dust efficiently. Keep your blade especially clean when working with cherry.
For a hobby shop doing moderate use, every 3–6 months or every 50–80 hours of cutting. For a professional shop running the saw daily, monthly sharpening is not unusual. The real indicator is cut quality — the moment you need more force to feed, or cuts start coming out rougher than usual, it’s time to sharpen. Don’t wait until you’re getting burn marks. See my guide on how to sharpen table saw blades for more detail.
Yes, significantly. Higher tooth count means smaller gullets between teeth — on rip cuts, those gullets pack with sawdust and cause the blade to heat up. A 24–30 tooth rip blade has large gullets that clear sawdust efficiently, keeping the blade cooler. Using an 80-tooth crosscut blade for ripping is a reliable way to get burn marks on every cut, regardless of how sharp the blade is.
The burning itself isn’t the danger — but the underlying causes often are. A dull blade requires more force to push through, increasing kickback risk. A misaligned fence pinches wood against the blade, which is one of the most common kickback triggers. A missing riving knife means the kerf closes around the blade. Fix the burn cause not just for cut quality, but for safety. See my guide on preventing table saw kickback for the full picture.
Conclusion
In most cases, a burning table saw is either a dull blade, a slow feed rate, or a fence alignment issue — and all three are free or cheap to fix. Start with the simplest cause and work down the list. The burn pattern tells you a lot: both sides means blade or feed, one side means fence, full length means riving knife.
I’ve burned more wood than I’d like to admit over the years, and almost every time it came back to one of these eight causes. Once you fix the source, clean cuts come back immediately.
Still getting burns after working through all 8 causes? Drop your specific situation in the comments and I’ll help you diagnose it.
Fix the Blade — Fix the Burns
If a dull or wrong blade was your culprit, I’ve already reviewed the best options across every category.

Finlay Connolly is a woodworking enthusiast and power tool specialist with over a decade of hands-on experience in the workshop. As the founder and lead writer at ProTableSawReviews.com, Finlay combines expert knowledge with real-world testing to help woodworkers, DIYers, and professionals choose the best tools for the job. With a sharp eye for detail and a passion for precision, Finlay is committed to providing trustworthy, practical advice backed by years of experience and research in the field. Whether you’re cutting dados or comparing fence systems, you can count on Finlay for honest, reliable reviews that make your next cut your best one.