
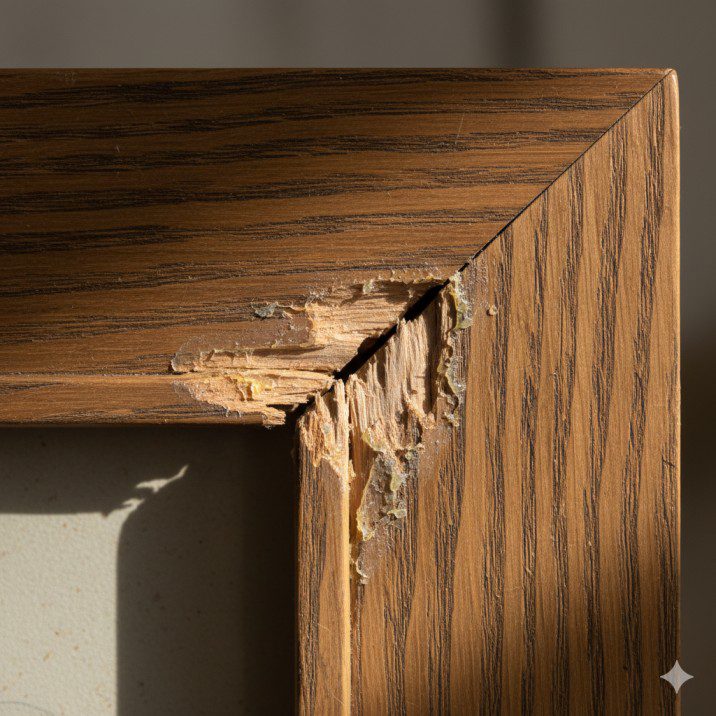
I still remember the first picture frame I built. I meticulously cut perfect 45-degree miters, glued them carefully, and clamped everything square. Two weeks later, three of the four corners had separated. The miters looked beautiful but had zero mechanical strength to resist the wood’s natural movement.
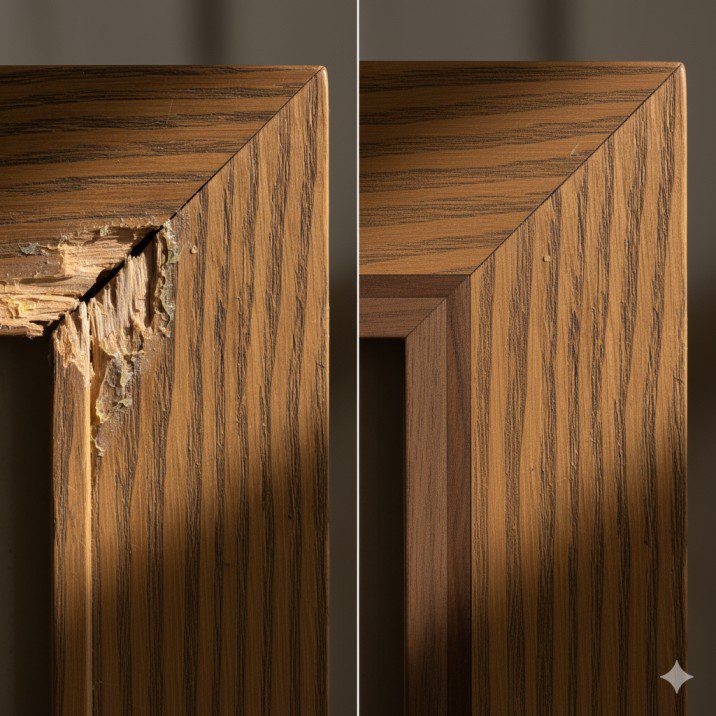
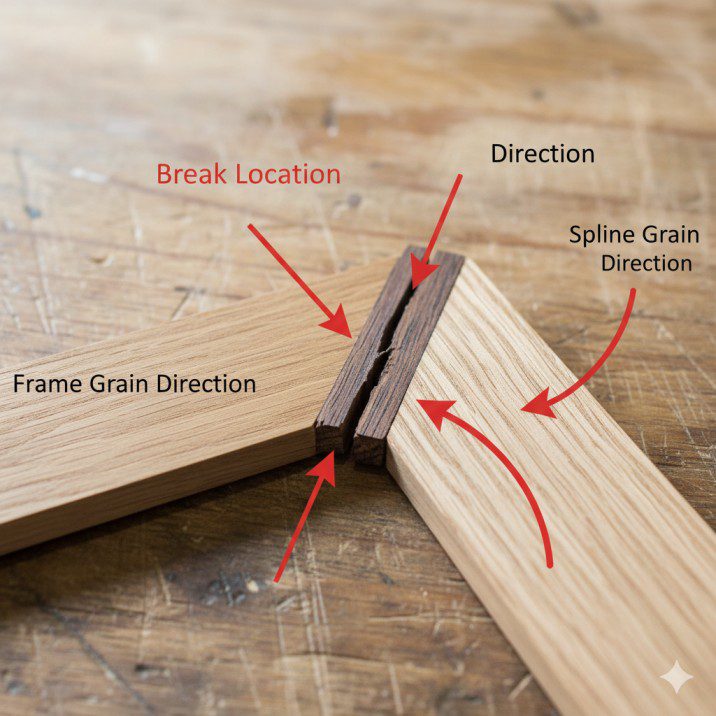
That failure taught me what experienced woodworkers already knew: miter joints need reinforcement. Enter the spline—a thin piece of contrasting wood inserted across the miter that transforms a weak glue joint into a mechanically strong, visually striking connection.
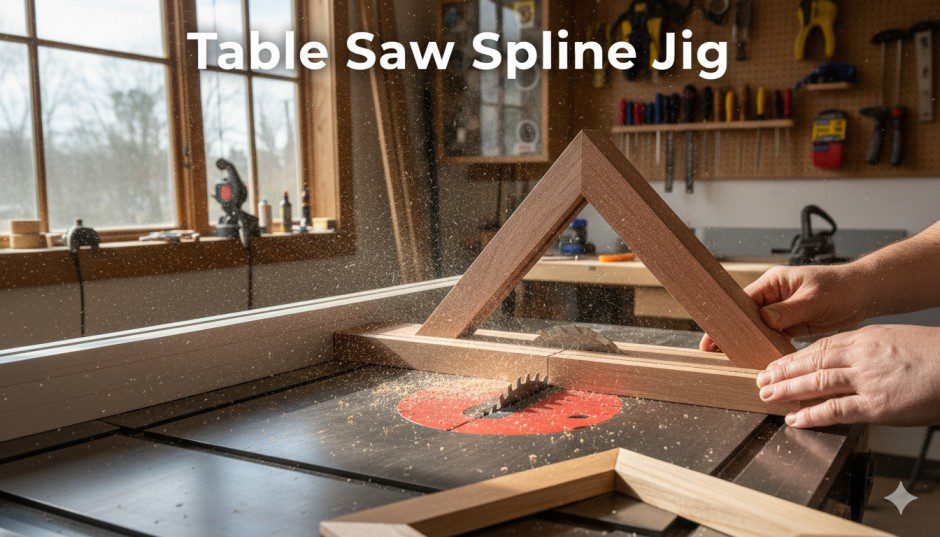
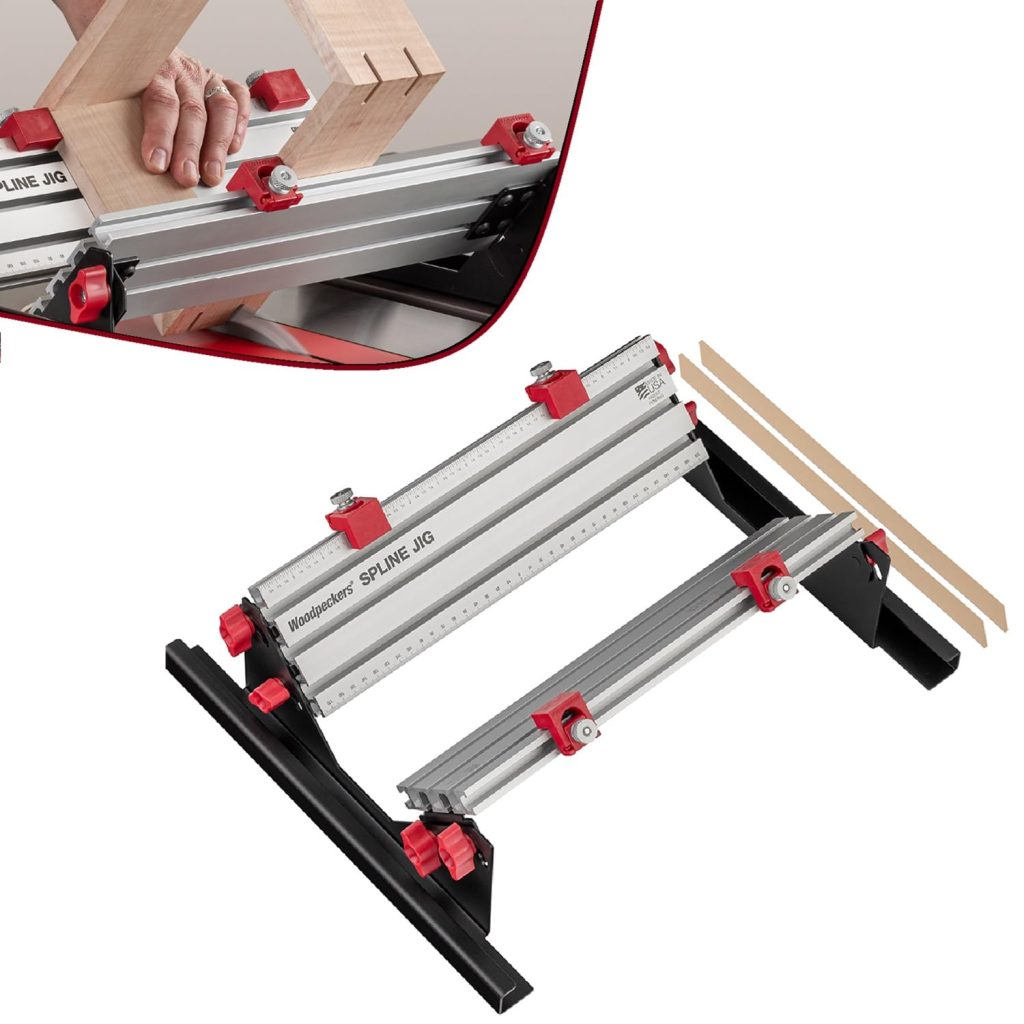
A table saw spline jig holds mitered assemblies at the correct angle while you cut slots for reinforcing splines. It’s one of those simple shop-made jigs that punches way above its complexity level, turning fragile miter joints into structural connections that last decades.
If you’ve ever had picture frames fall apart, miter joints open up, or box corners separate, splines are the solution you need. And the table saw spline jig is the tool that makes adding splines quick, accurate, and repeatable.
In this comprehensive guide, I’ll show you how to build an effective spline jig, use it safely for perfect results, and troubleshoot common problems. By the end, you’ll have the knowledge to reinforce every miter joint you make with professional-quality splines.
Why Miter Joints Need Splines
Before diving into jig construction, let’s understand why splines matter and what they actually accomplish.
The Fundamental Weakness of Miter Joints
Miter joints connect two pieces at an angle—typically 45 degrees for corners. The joint relies entirely on glue bonding to long-grain end surfaces. Here’s the problem: you’re gluing end grain to end grain, and end grain absorbs glue like a sponge, leaving minimal adhesive on the surface for bonding.
Wood movement compounds the issue. As humidity changes, wood expands and contracts across its width. This movement creates stress at miter joints, and glue bonds to end grain simply can’t resist those forces. The result? Joints that open up within months or years.
I’ve seen beautiful furniture pieces ruined by failed miter joints—picture frames with gaps at the corners, box lids that no longer fit properly, and cabinet doors with separated joints. All preventable with proper reinforcement.
How Splines Transform Joint Strength
A spline is a thin strip of wood (typically 1/8 to 1/4 inch thick) inserted into matching slots cut across both pieces of the miter. The spline provides three critical improvements:
Mechanical interlock: The spline physically bridges both pieces, creating structural connection beyond glue alone. Even if glue fails, the spline holds the joint together.
Long-grain glue surface: You’re now gluing long grain (the spline) to long grain (the slot walls). This is the strongest possible wood glue joint—far superior to end-grain connections.
Cross-grain reinforcement: The spline’s grain runs perpendicular to the joint’s stress direction, directly resisting the forces that want to pull miters apart.
According to Fine Woodworking’s joint strength testing, splined miters have approximately 8-10 times the strength of unsplined miters. That’s not a marginal improvement—it’s the difference between joints that fail and joints that last generations.
Visual Appeal of Contrasting Splines
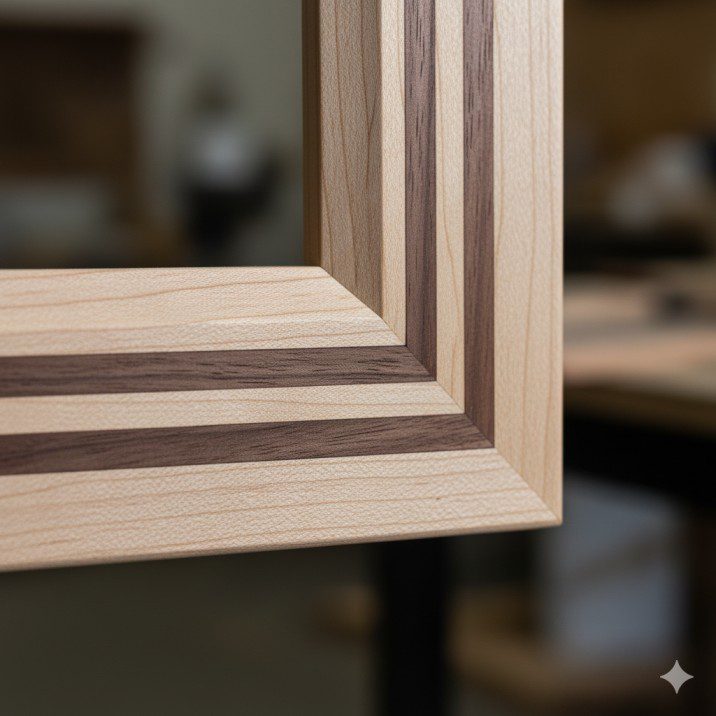
Beyond strength, splines offer aesthetic value. Using contrasting wood species—walnut splines in maple frames, for example—creates striking visual elements that showcase craftsmanship rather than hiding joints.
I’ve built dozens of picture frames with contrasting splines. They consistently draw compliments and make the piece look more sophisticated and intentional. What started as structural necessity became a signature design element in my work.
Types of Spline Jigs Explained
Several jig designs exist for cutting spline slots, each with advantages for different situations.
Vertical Hold-Down Jig (Most Common)
This design holds the mitered assembly vertically against a fence at 45 degrees to the blade. The workpiece sits in a V-shaped cradle that positions it correctly for cutting.
Advantages:
- Simple construction requiring minimal materials
- Stable support for most frame and box sizes
- Easy to see cut line and placement
- Works with standard table saw blades
Best for: Picture frames, small boxes, cabinet doors—any assembly that fits comfortably in the jig’s capacity.
This is the style I built first and still use for 90% of my spline work. It’s versatile, reliable, and straightforward to construct.
Horizontal Sled-Style Jig

This approach mounts the workpiece horizontally on a crosscut sled, using an angled fence to position the miter at 45 degrees to the blade.
Advantages:
- Accommodates larger assemblies more easily
- Provides excellent stability for heavy pieces
- Uses crosscut sled you may already own
- Good visibility during cutting
Best for: Large picture frames, wide boxes, door assemblies—anything too large or heavy for vertical jigs.
Miter Gauge Auxiliary Fence

The simplest approach: add a 45-degree auxiliary fence to your miter gauge. The mitered assembly rests against this angled fence while you push it through the blade.
Advantages:
- Minimal construction—just an angled fence
- No dedicated jig taking up shop space
- Quick setup for occasional spline cutting
Disadvantages:
- Less stable than dedicated jigs
- Requires careful workpiece support
- Not ideal for production work or multiple identical pieces
I use this method occasionally for one-off projects where building a dedicated jig isn’t justified, but it requires extra care to maintain consistent positioning.
Commercial Spline Jigs
Several manufacturers offer ready-made spline jigs that clamp to your saw table or fence.
Advantages:
- No construction time required
- Usually well-designed and adjustable
- Professional build quality
Disadvantages:
- Cost ($60-$150 typically)
- May not fit all table saw configurations
- Often less customizable than shop-built versions
For woodworkers who do significant spline work and prefer buying over building, commercial jigs like those from Rockler or Woodhaven work well. But a shop-built jig costs under $20 and performs just as effectively.
Learn more about essential table saw jigs on our table saw accessories page.
Building Your Own Spline Jig: Complete Plans
Here’s a proven vertical hold-down jig design that’s simple to build and highly effective. I’ve built this design three times with consistent success.
Materials and Tools Needed
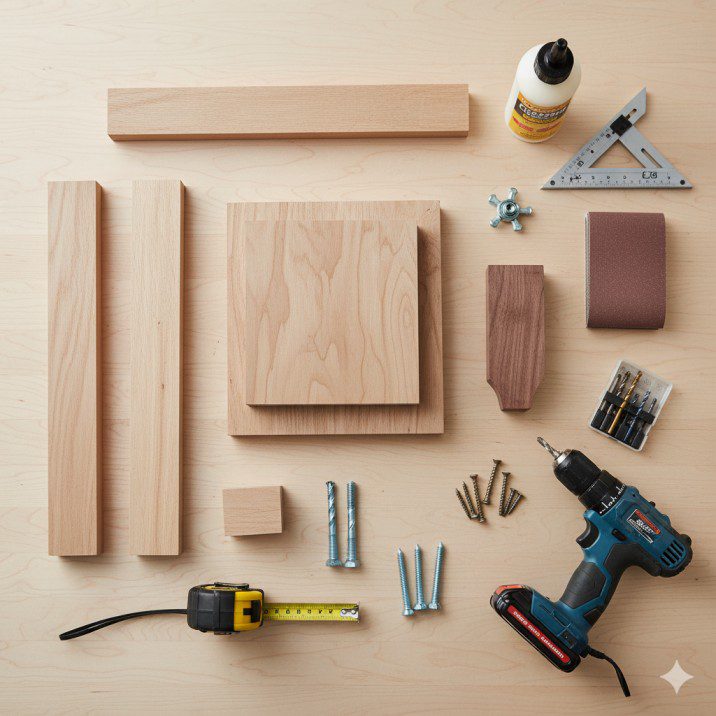
Materials:
- One piece 3/4″ plywood or MDF, 12″ x 18″ (base)
- One piece 3/4″ plywood, 6″ x 12″ (back fence)
- One piece 3/4″ hardwood, 2″ x 12″ (adjustable hold-down)
- Two 1/4″ carriage bolts, 3″ long with wing nuts
- Wood screws (1-1/4″ length)
- Wood glue
- Sandpaper (120 and 220 grit)
- Finish (optional—paste wax works well)
Tools Required:
- Table saw (obviously)
- Drill with bits
- Combination square
- Measuring tape
- Clamps
- Screwdriver
Total material cost: $15-$25 depending on what you have in your scrap pile.
Step-by-Step Construction
Step 1: Cut the Base
Cut your base piece to 12″ x 18″ from 3/4″ plywood or MDF. The base slides in your miter gauge slots, so verify it fits smoothly with minimal side-to-side play.
Cut a runner strip from hardwood (approximately 3/4″ x 3/4″ x 18″) that fits snugly in your miter slot. Glue and screw this runner to the underside of the base, ensuring it’s perfectly straight and parallel to the base edge.
Step 2: Build the Angled Fence
This is the critical component. Cut your 6″ x 12″ fence piece, then angle one edge at exactly 45 degrees. This angled face will support your mitered workpieces.
The angle must be accurate—use a quality combination square or digital angle gauge to verify 45 degrees exactly. Even 1-2 degrees of error affects spline alignment.
Attach the fence to the base at 90 degrees (perpendicular to the base edge). Position it approximately 4 inches from the front edge, leaving room for the workpiece to sit in front of the fence.
Step 3: Create the V-Cradle Support
Cut two triangular support pieces that create a V-shaped cradle against the angled fence. These prevent round or irregular workpieces from rolling while cutting.
The V-shape should be approximately 90 degrees (45 degrees on each side). Attach these supports to the base on either side of where your workpiece will sit, creating a channel that guides assemblies into correct position.
Step 4: Build the Hold-Down System
Cut your 2″ x 12″ hardwood hold-down piece. Drill two 1/4″ holes near the ends for your carriage bolts.
Position the hold-down parallel to the angled fence, about 2-3 inches away (adjust based on your typical workpiece size). Mark corresponding holes in the base, then drill these holes slightly oversized (5/16″) to allow adjustment.
Install carriage bolts from beneath the base, threads pointing up. The hold-down sits on top, secured with wing nuts that you can quickly loosen and tighten.
Step 5: Add Safety Features
Create a blade guard from clear acrylic or polycarbonate if desired. This covers the blade area while still allowing visibility. Not essential but adds safety—especially for production work.
Round over all sharp edges and corners. Sand everything smooth—you don’t want splinters while handling the jig during operation.
Step 6: Test and Calibrate
Make test cuts on scrap mitered pieces. Verify that:
- Slots are perpendicular to the joint line
- Depth is consistent across multiple cuts
- Workpiece sits securely without shifting
- Hold-down pressure is adequate but not excessive
Adjust the hold-down position and pressure until everything works smoothly. Mark the ideal position with pencil or tape for future reference.
Step 7: Apply Finish
Apply paste wax to the base and all surfaces that contact workpieces. This reduces friction and helps assemblies slide smoothly into position. Reapply wax every few months as needed.
For complete table saw techniques, visit our table saw how-to guide.
Using Your Spline Jig: Step-by-Step Technique
Building the jig is half the battle. Using it correctly ensures perfect results every time.
Pre-Cutting Preparation
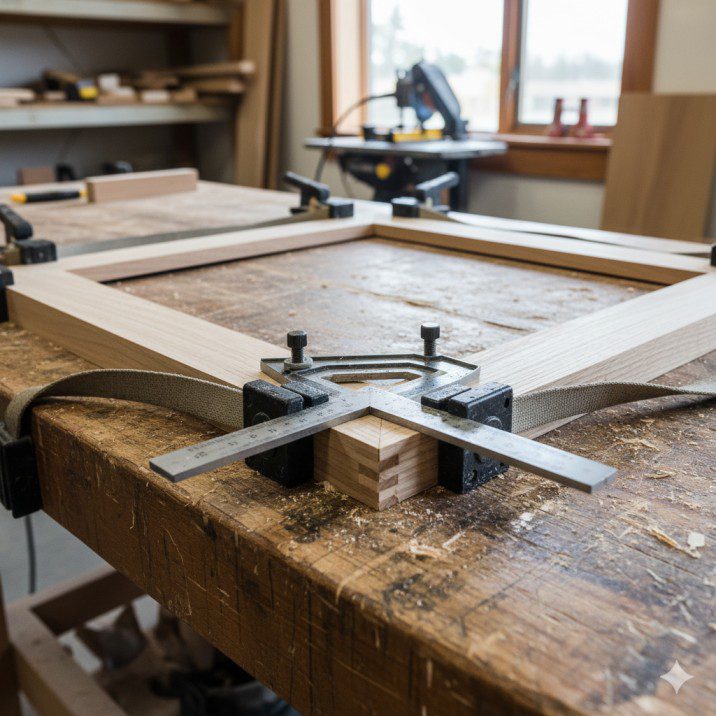
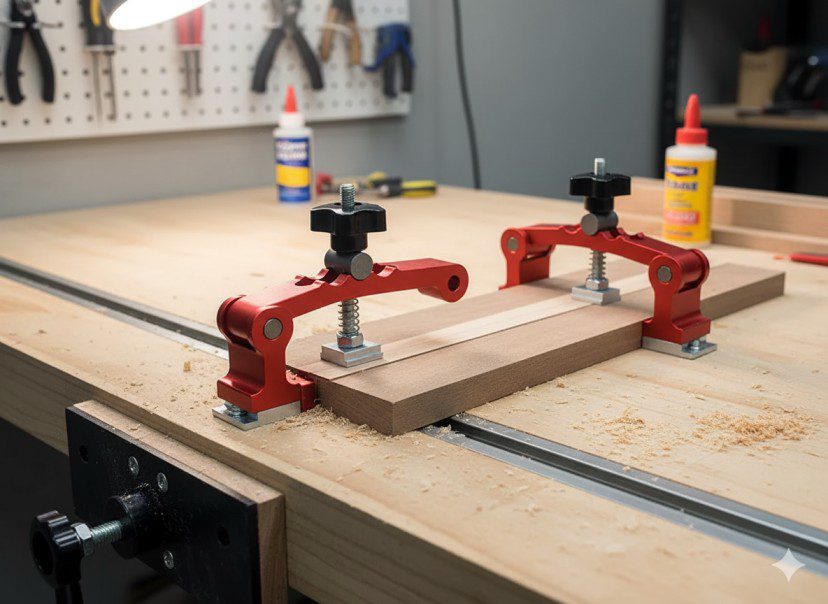
Step 1: Assemble your miter joint Glue and clamp your mitered frame or box. Let it cure completely (24 hours minimum). Never cut spline slots in unassembled pieces—alignment becomes nearly impossible.
Verify that corners are square and miters are tight. Any gaps or misalignment will show up after adding splines.
Step 2: Choose your spline material Select wood with straight, consistent grain. Splines are thin and fragile—grain runout causes breaks. I prefer hardwoods like maple, walnut, or cherry for strength and appearance.
For contrasting splines, pair light frames with dark splines or vice versa. The contrast emphasizes the joinery as a design feature.
Step 3: Set blade height Install a quality crosscut blade (50+ teeth). Set blade height to cut slightly more than halfway through your frame’s thickness. For a 3/4″ thick frame, set the blade about 7/16″ high.
Cutting deeper than halfway risks cutting through to the inside edge. Cutting too shallow creates weak splines that don’t engage enough material.
Step 4: Position the jig Place your jig in the miter gauge slot (or position it however your design requires). Adjust it so the blade will cut through the corner approximately 1/4″ to 3/8″ from the inside edge of your frame.
This placement provides strong reinforcement while keeping the spline visually balanced. Closer to the inside edge risks cutting through; farther out weakens the joint support.
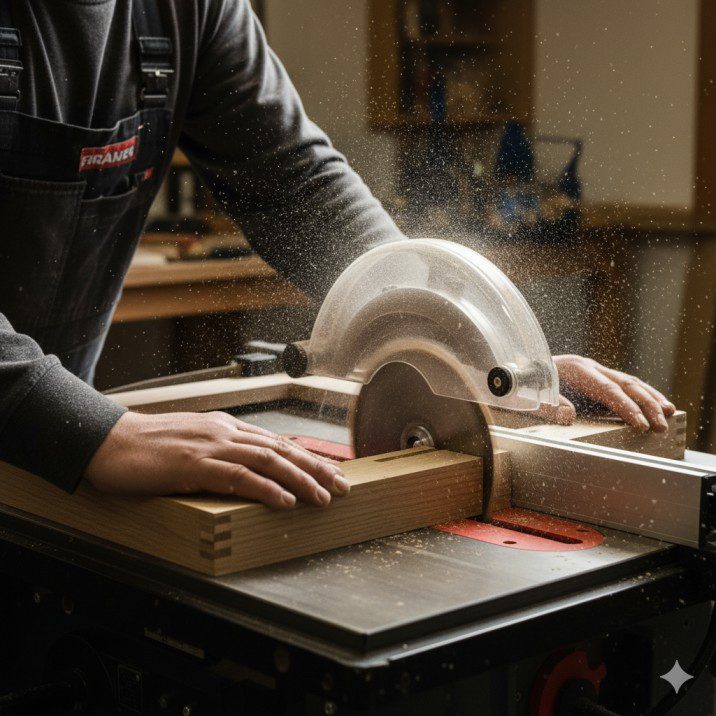
Making the Cut
Step 1: Secure the workpiece Position your assembled frame against the angled fence with the corner joint centered on the cut line. The joint should be oriented at 45 degrees to the blade.
Tighten the hold-down firmly. The assembly should not move at all when you push on it. Test security before starting the saw.
Step 2: Safety check Verify your hands will remain clear of the blade throughout the cut. Plan your grip and body position. Know where the power switch is.
Ensure the blade guard (if using one) is properly positioned. Wear safety glasses—this operation creates fine sawdust near face level.
Step 3: Make the cut Start the saw and let it reach full speed. Push the jig smoothly through the blade at a steady pace—not too fast, not too slow.
The cut should feel smooth and controlled. If you encounter resistance or vibration, stop and troubleshoot before continuing.
Step 4: Repeat for all corners Rotate your assembly to the next corner and repeat. For a four-cornered frame, you’ll make four cuts. Maintain consistent blade height and jig position for all cuts.
I mark completed corners with a pencil to avoid confusion during repetitive cutting.
Creating the Splines
Step 1: Mill spline stock Plane or resaw your chosen wood to the thickness of your blade kerf. Most standard blades cut 1/8″ kerfs, though thin-kerf blades require thinner splines.
The fit should be snug but not requiring excessive force. Too loose and the spline won’t strengthen the joint. Too tight and you risk splitting the frame during installation.
Step 2: Cut spline blanks Cut your splined stock into strips slightly wider and longer than your slots. For most picture frames, 3/4″ to 1″ wide works well.
Cut enough blanks for all corners plus a few extras. It’s easier to mill all splines at once than return to the process later.
Step 3: Test fit Try a spline in one slot. It should slide in with light hand pressure, fitting flush with both sides of the slot. If it’s too thick, replane the spline stock. Too thin? Start over with thicker material.
Step 4: Glue installation Apply glue to the slot walls (both sides) using a thin stick or acid brush. Insert the spline immediately, pushing it fully into the slot.
Wipe away any glue squeeze-out immediately with a damp cloth. Squeeze-out is harder to remove after it sets and can interfere with finishing.
Step 5: Final trimming After glue cures (minimum 4 hours, better overnight), trim splines flush with the frame surface using a flush-cut saw. Sand smooth with 220-grit sandpaper.
For proud splines (intentionally left projecting for visual effect), sand them to consistent height and round over the edges slightly.
Compare techniques with other joinery methods on our best table saw reviews.
Advanced Techniques and Variations
Once you master basic splines, these advanced techniques add versatility and visual interest.
Multiple Splines Per Corner
Instead of one centered spline, cut two or three parallel slots spaced approximately 1/4″ apart. Multiple splines provide even stronger joints and create striking visual patterns.
I use triple splines on boxes that will see heavy use—jewelry boxes with frequently opened lids, tool totes, workshop accessories. The added strength is noticeable, and the look is impressive.
Spacing considerations: Keep splines at least 1/4″ apart to prevent weakening the wood between slots. Verify that multiple cuts don’t position splines too close to inside or outside edges.
Decorative Spline Shapes
While standard rectangular splines work beautifully, you can create decorative variations:
Tapered splines: Cut spline blanks wider at one end, creating a bowtie or dovetail shape. This requires careful slot cutting but produces stunning results.
Curved splines: Use a bandsaw to cut gentle curves into spline edges before installation. The curves create organic visual interest while maintaining structural strength.
Inlaid splines: Create wider slots and insert thin strips of exotic wood or contrasting materials between two thinner splines. This creates multi-layered decorative elements.
Through Splines vs. Stopped Splines
Through splines (most common) cut completely through the frame corner, visible from both sides. They’re structurally strongest and showcase the joinery.
Stopped splines cut from one side only, leaving the opposite face uncut. This hides the spline on one side—useful when you want reinforcement without visible joinery on a particular surface.
Stopped splines require careful depth control and are trickier to execute, but they offer design flexibility for projects where through splines aren’t appropriate.
Splines in Non-Miter Joints
While most common in miters, splines reinforce other joints too:
Butt joints: Cut slots perpendicular to a simple butt joint connection. Not traditional, but it adds strength to basic joints.
Edge-to-edge panels: Reinforce glued-up panels with splines running perpendicular to the glue lines. This prevents seasonal panel movement from opening joints.
Angled joints other than 45°: Adjust your jig’s fence angle to accommodate hexagonal frames (60° miters), octagonal boxes (67.5° miters), or any custom angle.
Troubleshooting Common Problems
Even experienced woodworkers encounter issues with spline cutting. Here’s how to diagnose and fix common problems.
Problem: Spline Slots Don’t Align Across Joint
Causes:
- Jig fence isn’t exactly 45 degrees
- Workpiece shifted during cutting
- Inconsistent blade height between cuts
- Frame corners weren’t truly square before cutting
Solutions:
- Verify jig fence angle with precision square
- Increase hold-down pressure to prevent shifting
- Mark blade height with tape on saw and verify before each cut
- Use reliable squaring technique during frame assembly
Misaligned slots are the most frustrating problem because they’re difficult to fix after cutting. Prevention through careful setup is far better than trying to correct misalignment.
Problem: Splines Too Loose or Too Tight
Causes:
- Spline thickness doesn’t match blade kerf
- Wood moisture content changed between cutting and fitting
- Using different blade than originally used for test cuts
Solutions:
- Mill spline stock to exact blade kerf thickness (measure with calipers)
- Allow wood to acclimate to shop conditions before milling splines
- Use the same blade for all cuts and spline fitting
- For loose splines: apply thicker glue or add thin veneer shims
I keep multiple spline stock thicknesses on hand (1/8″, 3/32″, 7/64″) to match different blades and kerfs. This ensures perfect fit regardless of which blade I’m using.
Problem: Splines Break During Installation
Causes:
- Spline grain runs parallel to narrow dimension (cross-grain weakness)
- Splines are too thin for the wood species
- Forcing splines into too-tight slots
Solutions:
- Always orient spline grain along the long dimension
- Use stronger hardwoods (maple, oak) instead of softer species
- Slightly widen tight slots with fine sandpaper wrapped around the spline
- Apply less installation force—splines should fit with firm hand pressure, not hammer blows
Problem: Cut Position Varies Between Corners
Causes:
- Workpiece positioned inconsistently in jig
- Jig itself moves during cutting
- Variable blade height
Solutions:
- Add stops or registration marks to jig for consistent positioning
- Clamp jig to saw table or ensure miter slot runner fits snugly
- Lock blade height adjustment and verify it hasn’t shifted
Problem: Blade Burns or Leaves Rough Cut
Causes:
- Dull blade
- Feeding too slowly
- Wrong blade type (rip blade instead of crosscut)
Solutions:
- Use sharp crosscut blade (50+ teeth)
- Maintain steady, moderate feed rate
- Clean pitch and resin from blade regularly
For more troubleshooting help, see our table saw buying guide.
Safety Considerations
Cutting spline slots involves specific safety challenges beyond typical table saw work.
Small Workpiece Hazards
You’re cutting small, assembled frames that don’t offer much material to grip. Your hands are necessarily closer to the blade than with large workpieces.
Safety practices:
- Use the hold-down system religiously—never rely on hand pressure alone
- Keep hands on the jig base, not the workpiece
- Use push sticks or push blocks even with jig operation
- Never reach over or near the blade during cutting
I’ve had one near-miss when a frame shifted because I didn’t tighten the hold-down adequately. That scare taught me to always double-check security before starting the saw.
Blade Guard Challenges
Standard blade guards often interfere with spline jigs. You may need to remove the guard for these operations.
Compensating for guard removal:
- Extra caution with hand positioning
- Clear blade guard area (shield between hands and blade)
- Full concentration—no distractions during cutting
- Consider custom guard or shield attached to jig
Multiple Repetitive Cuts
Cutting splines for multiple frames means many similar cuts in succession. Repetition breeds complacency—the most dangerous mindset in woodworking.
Maintaining focus:
- Take breaks between frames
- Stay alert to each cut as if it’s the first
- Don’t rush production work
- Stop if you feel tired or distracted
Design Ideas and Inspiration

Splines offer tremendous creative potential beyond basic reinforcement.
Contrasting Wood Species
The most common decorative approach: use contrasting spline wood. Popular combinations:
- Walnut splines in maple frames (dark on light)
- Maple splines in cherry or mahogany frames (light on dark)
- Purpleheart or padauk for vivid color accents
- Ebony for dramatic black accents
I keep scrap pieces of various species specifically for spline material. Even small cutoffs work perfectly—this is an excellent way to use exotic wood scraps.
Geometric Patterns
Arrange multiple splines to create patterns:
- Alternating species in triple-spline corners
- Progressively sized splines (large, medium, small)
- Asymmetric placement for visual interest
- Radiating splines in boxes with eight sides
Proud Splines as Design Elements
Instead of trimming splines flush, leave them projecting 1/16″ to 1/8″ above the surface. Round over the edges slightly for a soft, finished look.
Proud splines create subtle texture and emphasize the handcrafted nature of your work. They’re particularly striking on boxes and small cabinets where you can feel the texture as you handle the piece.
Splines in Unexpected Places
Think beyond corners:
- Mid-panel decorative splines (non-structural)
- Splines joining horizontal dividers to cabinet sides
- Visible splines in furniture construction (Arts & Crafts style)
- Splines reinforcing edge-banded plywood
Once you understand spline technique, you’ll see applications everywhere. What started as corner reinforcement becomes a signature design element in your work.
Frequently Asked Questions
What thickness should splines be? Match your blade kerf thickness—typically 1/8″ for standard blades, thinner for thin-kerf blades. The spline should fit snugly with light hand pressure, neither loose nor requiring hammering.
Can I cut spline slots without a jig? Technically yes, but results are inconsistent and dangerous. The jig provides critical positioning accuracy and safety. Building a basic jig takes an hour and dramatically improves results.
What wood works best for splines? Hardwoods with straight, consistent grain. Maple, walnut, cherry, and oak are excellent choices. Avoid softwoods (too weak) and woods with irregular grain (prone to breaking).
How deep should spline slots be? Slightly more than halfway through the frame thickness. For 3/4″ material, cut 7/16″ to 1/2″ deep. Deeper risks cutting through to the inside; shallower reduces strength.
Do splines work in plywood or MDF frames? Yes, though less effectively than solid wood. Plywood’s layered structure doesn’t provide as much glue surface. MDF works but is weaker. Both benefit from splines, just not as dramatically as solid wood.
Can I use metal or plastic splines? Theoretically yes, but wood-to-wood glue joints provide better bonding. Metal or plastic would require mechanical fastening (pins or epoxy). Traditional wood splines are stronger and easier to execute.
Final Thoughts: Elevate Your Miter Joint Game
Building a spline jig was one of those shop projects that immediately paid dividends. The jig cost maybe $20 in materials and took an afternoon to build, but it transformed every mitered project I’ve made since.
Before splines, I lived with the nagging worry that frames might fall apart. I over-engineered other reinforcement methods—corner braces, screws hidden in routed grooves, complex joinery alternatives—trying to compensate for weak miters. Now I cut clean miters, add splines, and trust the joints completely.
The transformation isn’t just structural—it’s aesthetic. Contrasting splines became my signature detail. People notice them and ask about them. What started as hidden reinforcement became visible craftsmanship that elevates every project.
The beauty of spline jigs: Once built, they’re ready whenever you need them. No complex setup, no searching for special tools. The jig sits on your shelf until you’re assembling a frame, then it takes 10 minutes to cut perfect spline slots in all four corners.
Start simple with basic rectangular splines in single colors. As you gain confidence, experiment with multiple splines, contrasting species, and decorative variations. The technique rewards both basic application and creative exploration.
Most importantly: You’ll never again worry about miter joints failing. That peace of mind alone justifies building this simple jig. Every frame you make will be stronger, longer-lasting, and more beautiful than before.
Quick Action Steps:
- Build the basic vertical hold-down jig this weekend using scrap plywood
- Practice on scrap mitered pieces until you’re confident with the process
- Choose contrasting wood species for your first real splines
- Start with picture frames—simple projects that showcase spline technique
- Document your blade height and positioning settings for consistent future results
Your next picture frame, box, or mitered project deserves the strength and beauty that splines provide. The jig is simple, the technique is straightforward, and the results are immediately noticeable. Stop accepting weak miter joints and start building frames that last generations.

Finlay Connolly is a woodworking enthusiast and power tool specialist with over a decade of hands-on experience in the workshop. As the founder and lead writer at ProTableSawReviews.com, Finlay combines expert knowledge with real-world testing to help woodworkers, DIYers, and professionals choose the best tools for the job. With a sharp eye for detail and a passion for precision, Finlay is committed to providing trustworthy, practical advice backed by years of experience and research in the field. Whether you’re cutting dados or comparing fence systems, you can count on Finlay for honest, reliable reviews that make your next cut your best one.