
Introduction
If you’ve ever worked with rough lumber, you know how frustrating it can be to get perfectly straight edges without a dedicated jointer. But what if you could turn your table saw into a jointer with a simple, shop-made jig?
A jointer jig for table saw is a game-changer for woodworkers who want clean, square edges without investing in expensive machinery. In this guide, I’ll walk you through why you need one, how to build it, and the best techniques for flawless results—just like a pro.
Why Use a Jointer Jig on a Table Saw?
Jointers are great, but not everyone has the space or budget for one. A table saw jointer jig offers a smart alternative with several advantages:
✔ Cost-effective – No need for a separate jointer.
✔ Space-saving – Ideal for small workshops.
✔ Versatile – Works with any table saw.
✔ Precise – Delivers straight, glue-ready edges.
How a Jointer Jig Works
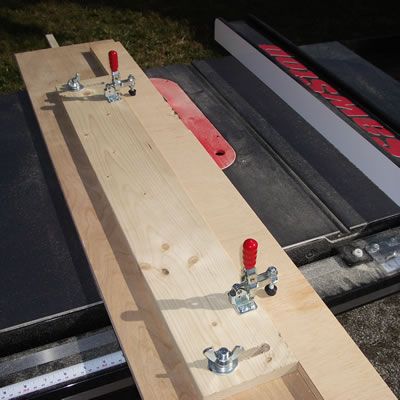
A jointer jig is essentially a straight-line ripping jig that holds your board at a slight angle while the table saw trims the edge. Here’s the basic principle:
- The board rides against a fence on the jig.
- The jig ensures only the high spots are cut.
- Multiple passes create a perfectly straight edge.
Building Your Own Jointer Jig for Table Saw
Materials You’ll Need
- ½” or ¾” plywood (for the base)
- Hardwood or MDF (for the fence)
- Screws or bolts
- T-track or clamps (optional)
Step-by-Step Instructions
1. Cut the Base
- Make a rectangular base slightly wider than your table saw’s rip capacity.
- Ensure it slides smoothly along the saw’s fence.
2. Attach the Fence
- Secure a straight hardwood or MDF fence at a 1–2° angle from the blade.
- This slight angle ensures only the high spots are trimmed.
3. Add Support & Clamping
- Install toggle clamps or T-tracks to hold the workpiece securely.
- Test for stability before use.
4. Fine-Tune the Jig
- Make test cuts on scrap wood.
- Adjust the fence angle if needed for smoother results.
Best Practices for Using a Table Saw Jointer Jig
To get the best results, follow these tips:
✅ Use a sharp blade – A rip blade or jointing blade works best.
✅ Take shallow cuts – Remove 1/16″–1/8″ per pass.
✅ Check for squareness – Ensure the jig doesn’t introduce twist.
✅ Work against the fence – Keep consistent pressure for even cuts.

POWERTEC 71395 Taper/Straight Line Jig for Table Saws with 3/4” Wide by 3/8” Deep Miter Slot
- ASSEMBLY CONTAINS: 36” Miter Bar, Base, Adjustable Fence, Push Knob, Hold Down Clamps, Tape Measure, Abrasive Grip Strips, T-Bolts, Hardware Screws, Washers and Mini Screw Driver
- FUNCTIONS: Primarily serves as a taper cutting jig for table saw – Secondarily operates as a stable straight line ripping jig – Your creativity is the limit
- PREMIUM BUILD: This woodworking taper jig is manufactured with high quality components; The base measures 32” x 7-7/8” ½” with MDF construction and melamine coating on both sides; Features a safe and easy-to-use design, indexing marks for easy angle setting, ergonomic anti-slip push knob, adjustable fence and hold down clamps to prevent shifting stock, abrasive grip strips to help stabilize your workpiece and detailed instructions for all skill levels
List Price :
Offer: 75.98
Go to AmazonJointer Jig vs. Dedicated Jointer: Pros & Cons
| Feature | Jointer Jig for Table Saw | Dedicated Jointer |
|---|---|---|
| Cost | Low ($10–$30 in materials) | High ($300–$1000+) |
| Space | Compact (uses table saw) | Requires extra floor space |
| Accuracy | Excellent with tuning | Built for precision |
| Versatility | Works with table saw tasks | Limited to jointing |
Verdict: If you already own a table saw, a jointer jig is a no-brainer for occasional edge jointing.
Common Mistakes & How to Avoid Them
❌ Rushing the setup → Take time to align the fence correctly.
❌ Cutting too deep → Light passes prevent tear-out.
❌ Ignoring blade sharpness → Dull blades cause rough edges.
FAQ: Jointer Jig for Table Saw
1. Can a table saw jointer jig replace a real jointer?
For edge jointing, yes—it works great for most tasks. However, face jointing (flattening wide boards) still requires a planer or dedicated jointer.
2. What’s the best angle for the jig’s fence?
A 1–2° angle is ideal. Too steep, and you’ll remove too much material; too shallow, and it won’t joint effectively.
3. Do I need a special blade for jointing on a table saw?
A rip blade (24–30 teeth) works best, but a dedicated jointing blade (flat-top grind) improves results.
4. How do I prevent snipe (uneven cuts) with a jointer jig?
Ensure the jig is stable, use consistent feed pressure, and take lighter passes.
Final Thoughts
A jointer jig for table saw is one of the most useful shop projects you can build. It saves money, space, and delivers professional-quality edges with minimal effort. Whether you’re a hobbyist or a seasoned woodworker, this jig will become a go-to tool in your workshop.
Ready to build yours? Grab some plywood, set up your table saw, and start jointing like a pro!

Finlay Connolly is a woodworking enthusiast and power tool specialist with over a decade of hands-on experience in the workshop. As the founder and lead writer at ProTableSawReviews.com, Finlay combines expert knowledge with real-world testing to help woodworkers, DIYers, and professionals choose the best tools for the job. With a sharp eye for detail and a passion for precision, Finlay is committed to providing trustworthy, practical advice backed by years of experience and research in the field. Whether you’re cutting dados or comparing fence systems, you can count on Finlay for honest, reliable reviews that make your next cut your best one.