Jointer Jig for Table Saw: How to Make Straight Edges Without a Jointer (2026 Guide) ⭐
How to Get Straight, Glue-Ready Edges Without a Dedicated Jointer
Three Jig Designs • Step-by-Step Build Plans • What Works, What Doesn’t • Bought vs. Built Options
What a Jointer Jig Actually Does — and What It Can’t
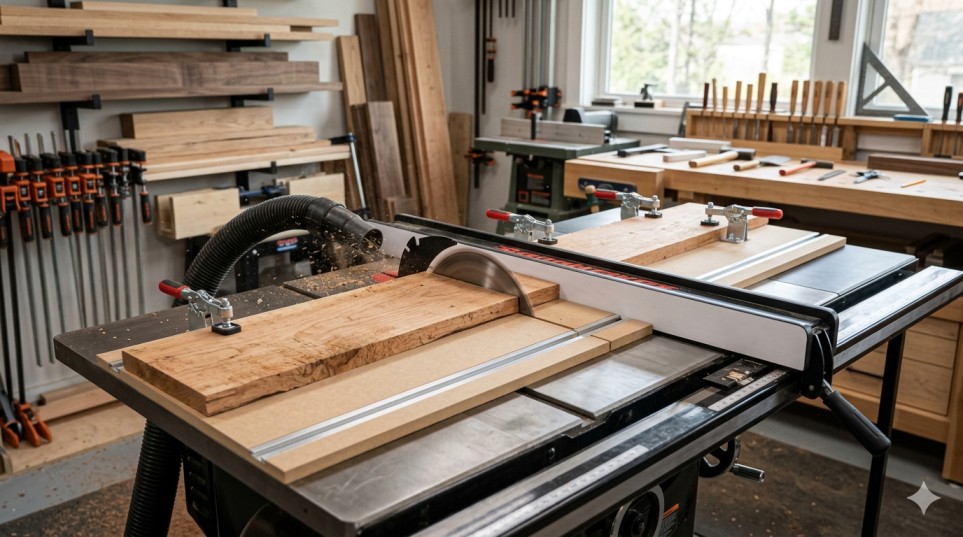
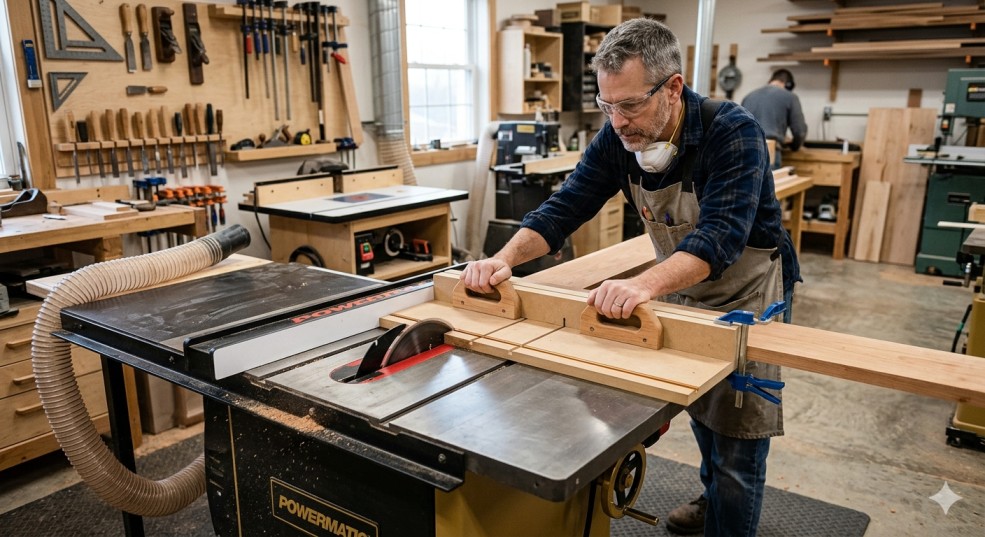
A jointer jig for the table saw gives you one thing: a straight reference edge on a board that doesn’t already have one. That’s the whole job. You clamp a rough, wavy-edged board to the jig, run the jig along the fence, and the blade removes whatever is necessary to produce a straight edge regardless of what the board’s natural shape was doing.
Once you have that first straight reference edge, you remove the board from the jig, place that straight edge against the fence, and rip the second edge parallel to it. Now you have a board with two straight parallel edges. From there, square up the ends with your miter saw or miter gauge and you’ve milled a rough board into workable stock using only a table saw.
That’s genuinely useful. But before going further, the limitations need to be stated clearly because most guides bury them or skip them entirely.
What this jig cannot do: A jointer jig handles edge jointing only — straightening the long edges of a board. It cannot flatten the face of a cupped, bowed, or twisted board. If your board has a significant wind or cup, those problems remain after edge jointing. Face flattening requires a jointer, a thickness planer with a sled, or hand planes. If you’re working with seriously distorted stock, edge jointing alone won’t give you usable lumber.
With that stated: for the vast majority of real woodworking situations — getting panel boards ready for glue-up, straightening the edge of rough lumber before dimensioning, getting a clean square edge for cabinet face frames — the jointer jig works well and the limitations don’t affect you. One woodworker who processed 15 boards of oak using a table saw jointing jig reported finishing in 30 minutes what would have taken a couple of hours otherwise. That efficiency is real.
Why You’d Use a Jointer Jig Instead of a Dedicated Jointer
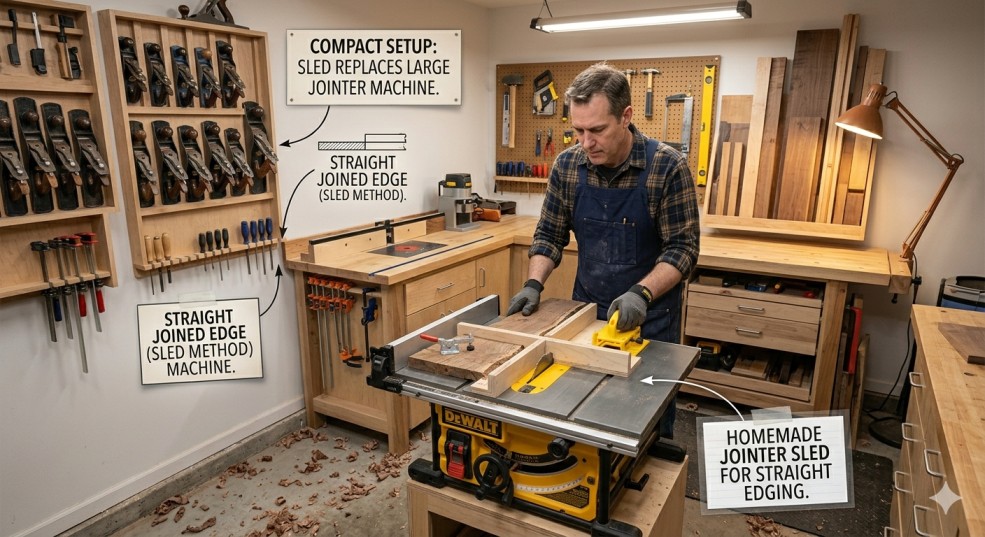
The practical cases are straightforward. Floor space is a real constraint in small shops — a 6-inch jointer needs its own footprint and clearance on both sides for outfeed. Budget is a real constraint at any stage of building a shop. And for occasional edge jointing work, owning and maintaining a separate machine doesn’t always make sense when the table saw jig produces results that are indistinguishable from a machine jointer for glue-up purposes.
There’s also a workflow case: if you’re working with reclaimed lumber or pallet wood with embedded nails or grit, running it across a jointer risks expensive damage to the machine knives. Running it past a table saw blade with a jointing jig means you’re risking a blade you can replace for $40, not jointer knives that cost considerably more to replace and recalibrate.
The flip side is equally honest: if you’re doing serious volume production work where you’re milling rough lumber regularly, a dedicated jointer is the right tool. The jig is a smart workaround for occasional use and small-shop constraints, not a permanent production substitute.
The Three Main Jig Designs — Which One to Build
There’s more than one way to do this. The three designs cover different situations and different levels of board distortion.
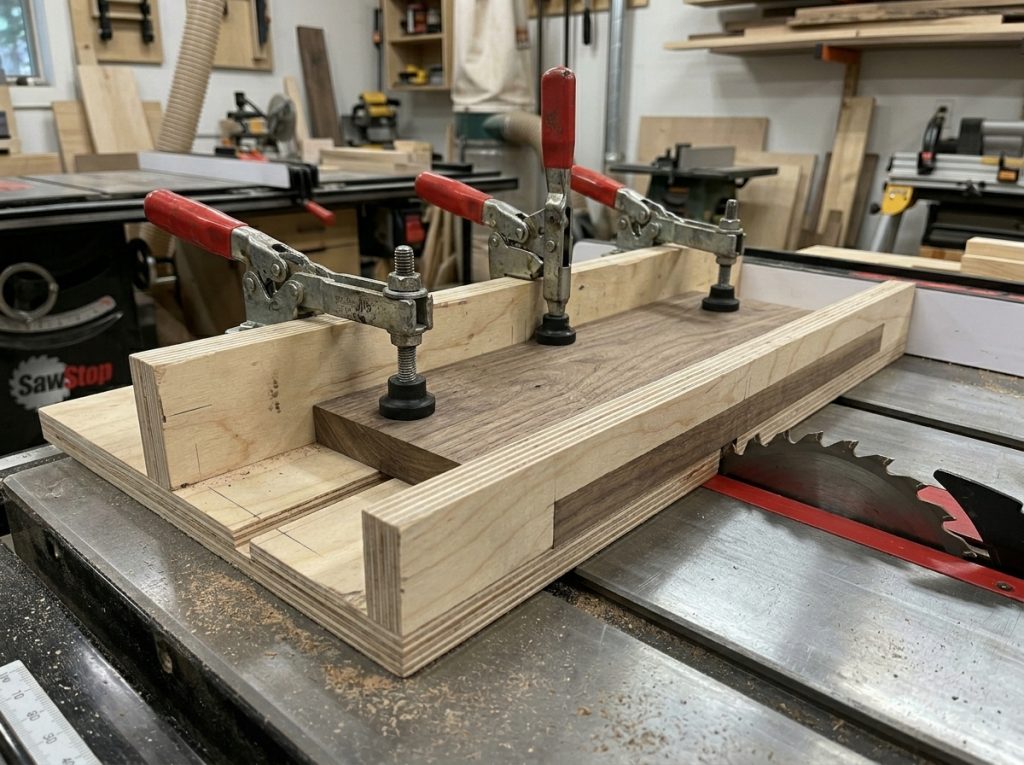
Design 1: The Sled Jig (Most Versatile, Most Recommended)
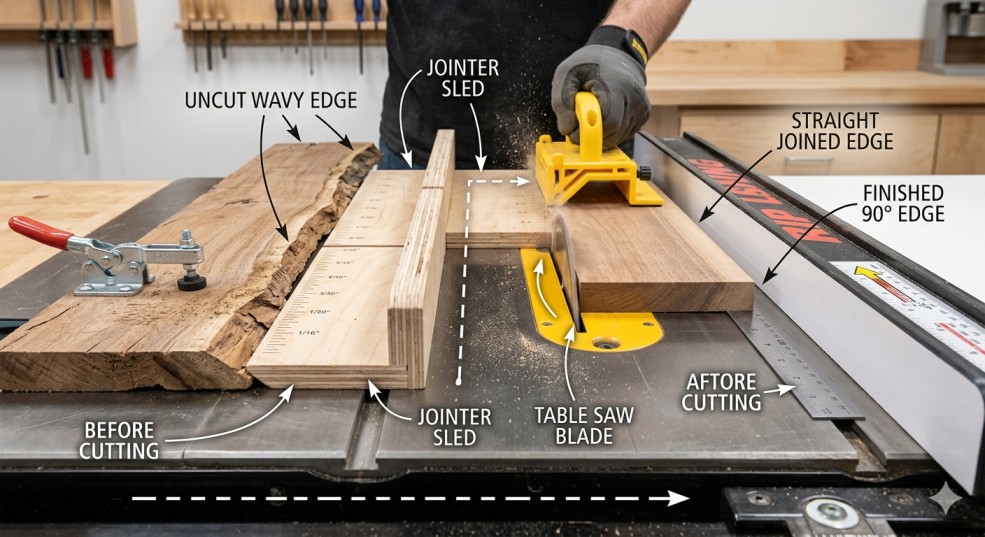
A flat sled with a straight reference face on one side that rides against the rip fence, and a bed on the other side where you clamp the workpiece. The key point: the sled’s reference face is straight and the workpiece position doesn’t matter relative to the sled — you clamp it at whatever angle puts the desired edge over the blade path. The blade removes material until the sled face passes the blade, producing a straight edge regardless of what the board looked like before.
This is the design most experienced woodworkers build and the one that handles the widest range of stock. It works on boards with significant edge wave, boards where neither edge is usable as a reference, and boards where the natural edge is so far from straight that it would be dangerous to run against the fence directly.
Best for: general-purpose jointing, rough lumber, boards with significant edge irregularity, anyone who wants one jig that handles everything.
Design 2: The Offset Fence Saddle
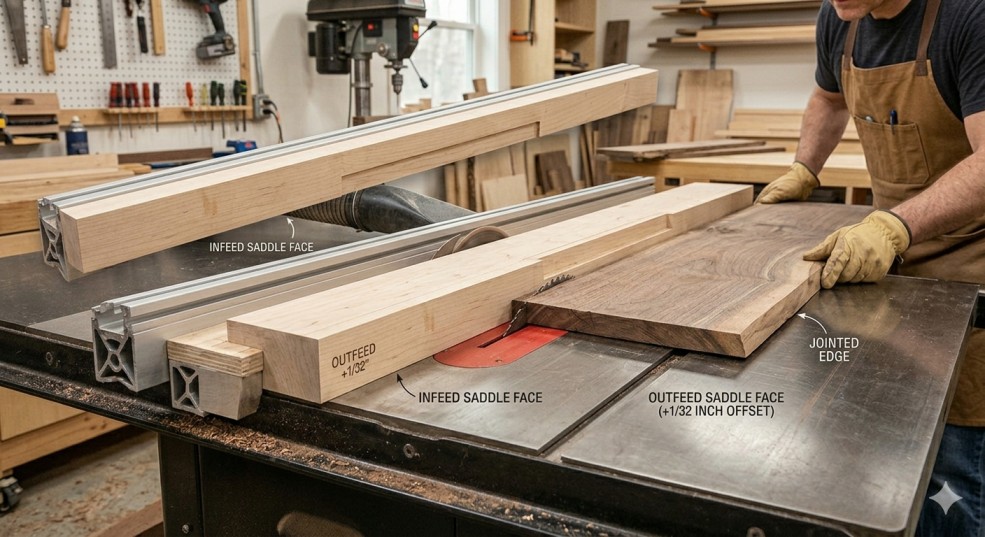
A sacrificial fence that mounts over your table saw’s rip fence, offset by 1/32 inch at the outfeed end. The infeed side of the auxiliary fence is slightly further from the blade; the outfeed side is slightly closer. As the board feeds through, the blade removes just enough to create a straight edge. The technique mirrors how a real jointer works — infeed table slightly lower than outfeed, the blade (or knives) at outfeed height.
This design is simpler to build but has a specific limitation: it works best when the board’s edge is only slightly curved or wavy. For severely distorted stock, the sled design is more reliable because it doesn’t depend on the board’s existing edge shape at all.
Best for: boards with minor edge irregularity, situations where the board is already fairly straight and just needs cleanup, faster setup when you’re doing a batch of similar stock.
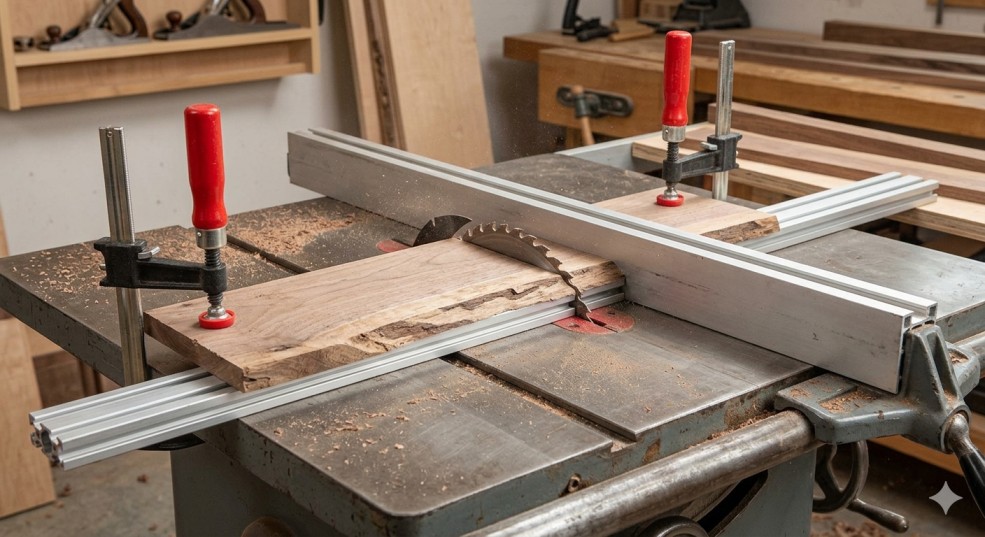
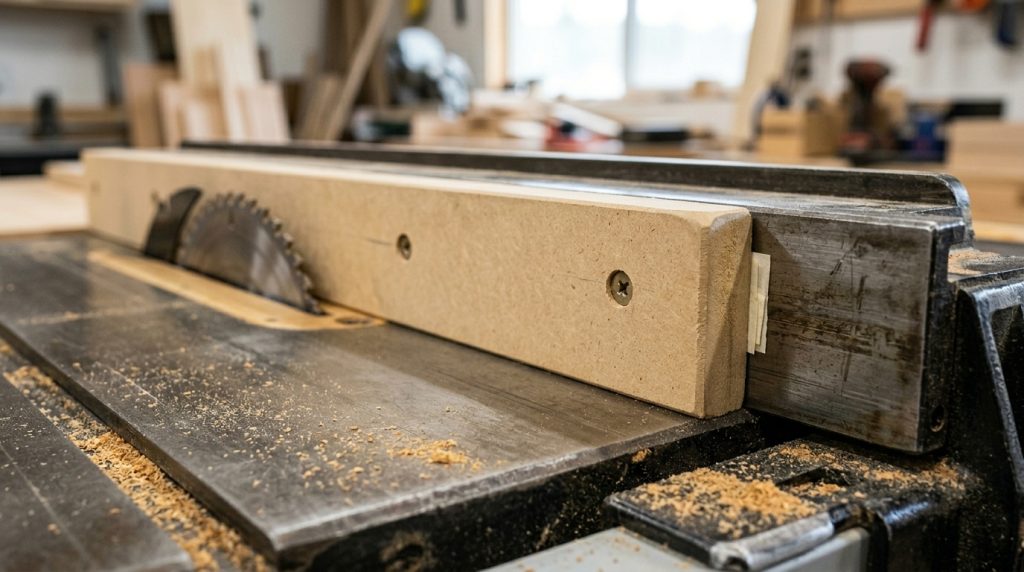
Design 3: The Straight-Edge Clamping Jig (Simplest Build)

The most minimal version: a piece of straight hardwood or aluminum extrusion clamped to the top face of the board, extending past the edges, with the straight edge of the clamping piece hanging over the side that will be jointed. Run this assembly against the fence with the straight clamping piece as the reference, and the blade cuts the board edge flush with the straight piece.
This is the fastest to make and set up, requires no building time to speak of, and works on boards up to the length of your straight-edge reference piece. The limitations: the straight edge you’re using as a reference must be genuinely straight, and for very rough stock with significant edge wave, the setup can be fiddly.
Best for: occasional use, quick setups, situations where you don’t want to build a permanent jig, and when you have a reliable straight-edge reference piece available.
Build Guide: The Sled Jig (Design 1)
This is the version worth building. An afternoon of work, around $15 to $25 in materials, and you have a jig that handles edge jointing for years.
Materials
- 3/4″ MDF or quality plywood for the sled base — MDF is preferred because it’s more stable and stays flatter than most plywoods in shop conditions
- One piece of straight-milled hardwood for the fence face, OR a length of flat aluminum extrusion — the fence face must be genuinely straight; check it with a reliable straightedge before using it
- Woodscrews or bolts for assembly
- Toggle clamps — 2 to 3 for most sled lengths; adjustable arm type preferred
- Non-slip abrasive material or grip tape for the sled bed — keeps the workpiece from shifting
- Optional: T-track and T-bolts for adjustable clamp positioning
Dimensions
Make the sled base as long as the longest boards you expect to joint. 36 to 48 inches covers most hobby and furniture work. Make the base wide enough that the sled overhangs your table saw’s right edge slightly when the fence face is against the rip fence — typically 12 to 16 inches wide depending on your saw.
The fence face height should be 3/4 to 1 inch taller than your thickest stock. You’re clamping workpieces against it; it needs to provide full support against the face.
Step 1: Mill the Sled Base
Cut the MDF or plywood base to dimension. If using MDF, seal the edges with a coat of wood glue thinned with water to reduce moisture absorption over time. Sand the bottom face smooth — it needs to slide along the table saw surface without dragging or catching.
Flatness check: Before proceeding, verify the base is flat by placing it on your table saw surface and checking for rocking. MDF from the sheet goods bin is usually flat but not always. Any rock in the base produces inconsistency in your jointed edges.
Step 2: Make the Fence Face Dead Straight
This is the most important step in the entire build. The fence face is your reference — if it’s not straight, nothing you cut with this jig will be straight either. Joint the fence face material on your table saw first if needed, verify against a reliable straightedge (a good level works, a machinist’s straightedge is better), and don’t attach it until you’re confident it’s true.
If you’re using aluminum extrusion: buy extruded aluminum angle or T-slot from a hardware supplier, check it for straightness before cutting, and use it full length if possible to avoid any inconsistency at joints.
Step 3: Attach the Fence Face
Position the fence face on the sled base so it’s parallel to the long edge and perpendicular to the base surface — it must be square to the table, not angled. Secure with countersunk screws from below, pulling the fence face down tight against the base and into the screw heads. Check square again after fastening. Any twist in the fence face produces bevel on your jointed edges.
Common build mistake: Attaching the fence face at a 1 to 2 degree angle as the old guides suggest. This is incorrect for a sled-style jig. The sled works because the workpiece is clamped to the sled regardless of angle — you don’t need an angled fence to make it work, and an angled fence produces edges that aren’t square to the face. Keep the fence face perpendicular.
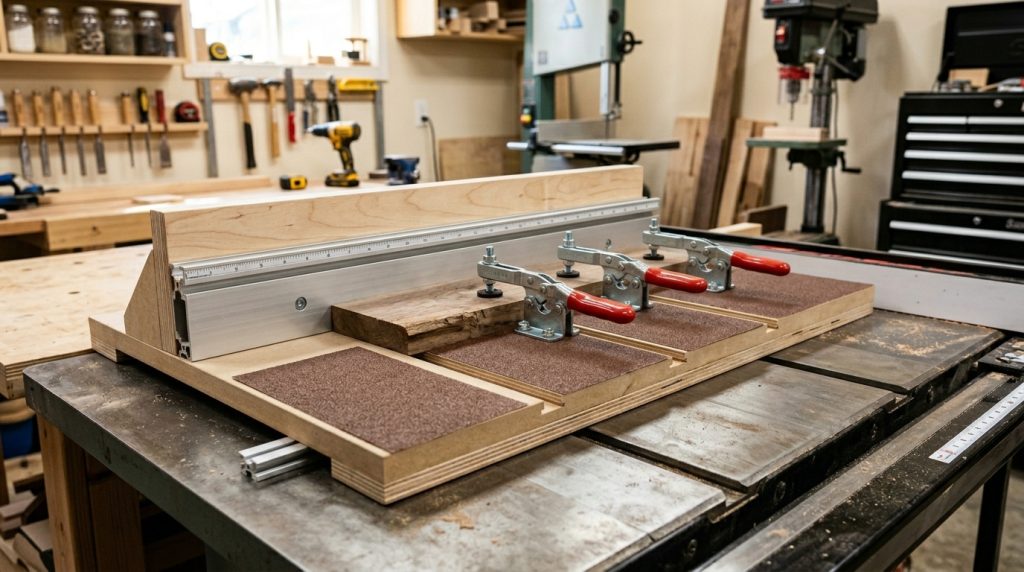
Step 4: Install Toggle Clamps
Position toggle clamps along the sled bed so they cover the length of boards you’ll be jointing. For a 36-inch sled, three clamps positioned at 8 inches, 18 inches, and 28 inches from the infeed end gives good coverage without gaps. The clamp arms should apply pressure downward onto the workpiece face and slightly toward the fence face — not just downward.
If adding T-track: rout the track into the sled bed before installing clamps. This lets you reposition clamps along the length for different board sizes, which is worth doing if your work includes a range of lengths.
Step 5: Add Non-Slip Surfacing
Apply self-adhesive sandpaper (80 or 100 grit) or rubber grip tape to the sled bed between the clamp positions. When you clamp a board down, this material grips the board face and prevents it from sliding longitudinally during the cut — the main cause of inconsistent jointing results on sled-style jigs.
Step 6: Test and Calibrate
Set your rip fence so the fence face of the sled rides against it. Clamp a piece of scrap to the sled with the edge you want to joint hanging past the sled’s edge, slightly beyond the blade path. Make a test cut across the full length of the scrap. Then check:
- Is the cut edge straight? Use a reliable straightedge to check. Any bow or wave means the sled bed isn’t flat or the fence face has inconsistency.
- Is the cut edge square to the face? Check with a reliable square at multiple points along the length. Any consistent bevel means the fence face isn’t perpendicular to the base — adjust.
- Is the surface finish acceptable for glue-up? A 40T flat-top grind rip blade should leave a surface ready for glue-up without additional smoothing. Burn marks mean the blade is dull or you’re feeding too slowly.
Build Guide: The Fence Offset Method (Design 2)
This design is faster to build and appropriate for batches of boards with only minor edge irregularity.
What You’re Building
An auxiliary fence face that clamps or bolts to your rip fence and is shimmed at the outfeed end so it sits 1/32 inch closer to the blade than the infeed end. The infeed end supports the board as you start the cut; the outfeed end references the newly jointed edge as it passes.
Construction
Cut a straight piece of 3/4-inch MDF or hardwood the same height as your rip fence face and at least 24 inches long. This piece becomes your auxiliary fence face. Attach it to your rip fence using clamps or bolts through the existing holes in the fence body if your fence has them.
Before final attachment, place a single layer of paper tape or a 1/32-inch thick shim behind the outfeed end of the auxiliary face, between the face and the metal fence. This offsets the outfeed end by approximately 1/32 inch toward the blade relative to the infeed end. That offset is your cutting depth per pass.
Getting the offset right: 1/32 inch is the standard offset for a light clean-up pass. For significantly wavy edges, increase the offset slightly — up to 1/16 inch. For very fine trimming on near-straight stock, reduce to 1/64 inch using thinner shimming. The offset determines how much material you remove on each pass.
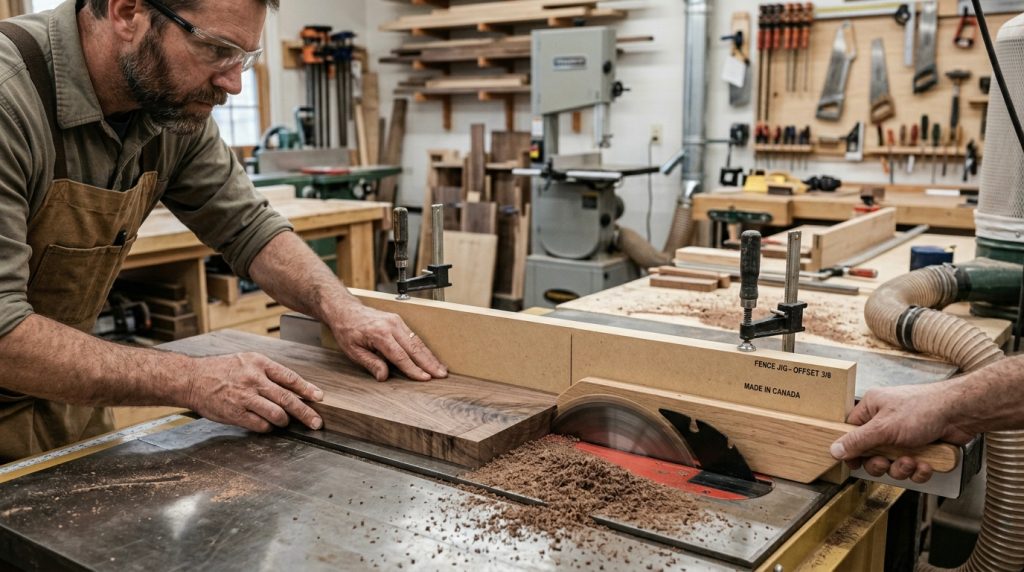
Using the Fence Offset Method
Hold the board with the edge against the infeed side of the auxiliary fence and feed it through. The blade removes the amount set by your offset. For boards with significant irregularity, make multiple passes, repositioning the board slightly between each pass until the full edge length contacts the fence without gaps. Then that edge is your straight reference for all subsequent operations.
Using the Sled Jig — Technique That Gets Results
Step 1: Assess the Board First
Before clamping anything to the jig, look at the board. Is the primary issue edge wave (the board curves along its length when viewed from above)? Is there twist or wind (hold the board at eye level and sight down it)? Is there face cup (the board is curved across its width)?
Edge wave is what the jig fixes directly. Twist and face cup it cannot fix. If the board has significant twist, that’s a face jointing and planing problem — edge jointing a twisted board produces a straight edge that isn’t square to the board’s face. For most boards from a decent lumber yard that have been stickered and dried properly, edge irregularity is the primary issue and the jig handles it well.
Step 2: Position the Board on the Sled
This is where the sled design’s key advantage matters. You don’t need to position the board relative to its own edge. You’re positioning it so the edge you want to joint is hanging off the sled far enough to be cut by the blade — typically 1/8 to 1/4 inch of overhang past the sled edge for the first pass. The rest of the board can be at whatever angle it naturally lies at.
For highly curved boards, the board may be at a pronounced angle on the sled — one end close to the fence face, the other end further away. That’s fine. The sled is the reference, not the board’s existing edge.
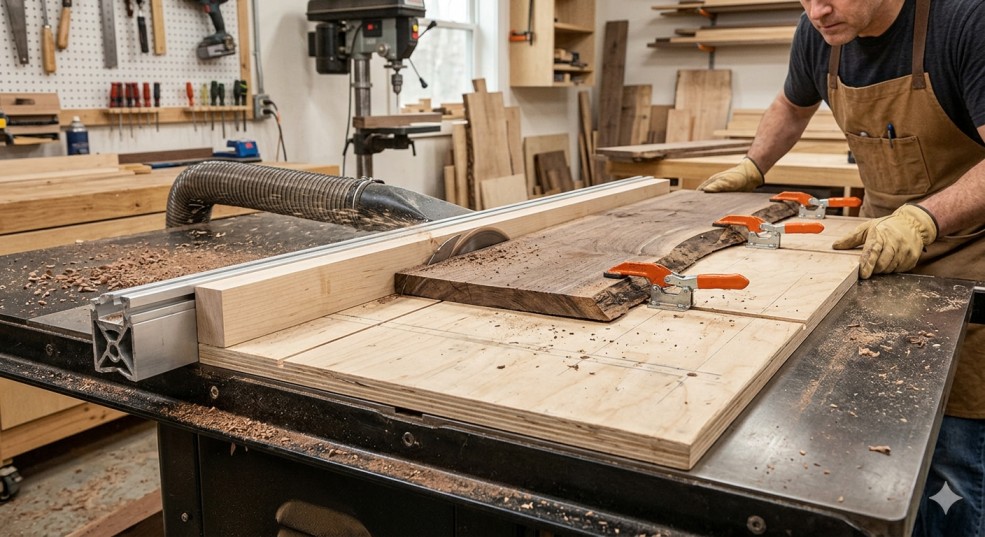
Step 3: Clamp Firmly and Completely
Every clamp needs to be fully engaged before you make the cut. If the board can shift under feed pressure, the edge won’t be straight. Apply enough downward pressure that the board doesn’t rock on the sled bed, and enough inward pressure toward the fence face that the board can’t pivot during the cut.
Test the setup by gripping the board and applying lateral pressure before turning the saw on. It should not move. If it does, add a clamp or reposition the existing clamps.
Step 4: The Cut
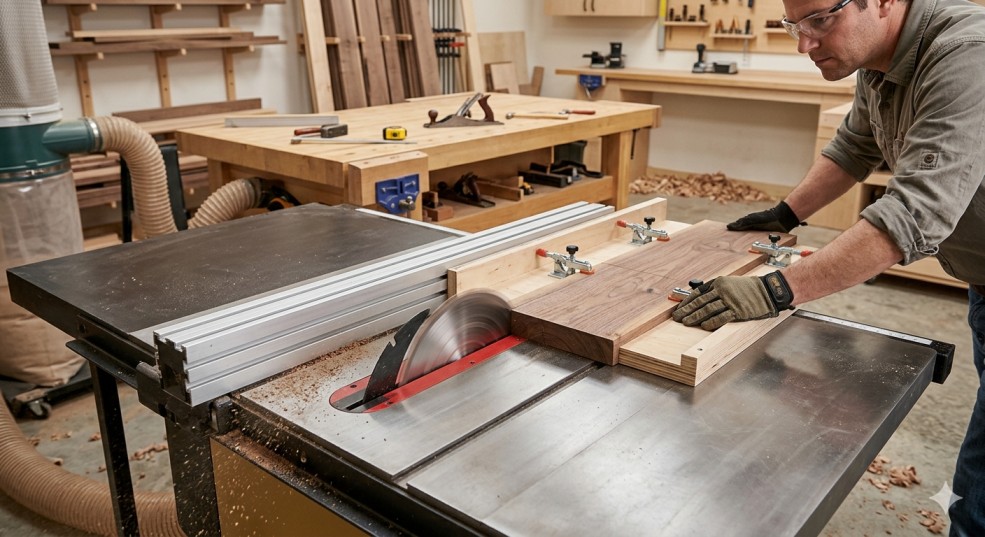
Feed at a steady pace that lets the blade cut without strain. A flat-top grind 40T rip blade at the right feed rate produces an edge that’s ready for glue-up straight off the saw. Too slow and you’ll get burn marks — friction heat from blade contact rather than cutting. Too fast and you’ll get a rougher surface with more tearout.
Keep the sled fence face in contact with the rip fence throughout the entire cut — the full length of the sled from infeed to outfeed. Any gap between the sled face and the fence during the cut produces inconsistency in the jointed edge.
Step 5: The Second Edge
This step is where the workflow pays off. Remove the board from the jig. Place the newly jointed straight edge against the rip fence directly — no jig needed. Set the fence to your desired width and rip the second edge parallel to the first. Now you have two straight, parallel edges and a board with known width that you can process further.
The two-step process: The jig only cuts the first edge. The second edge is a standard rip cut using the first edge as a fence reference. This is why the jig approach works: once you have one reliable straight edge, the table saw fence does the rest.
Blade Choice — This Matters More Than the Jig Design
The edge quality you get from jointing on a table saw depends more on blade selection than on which jig design you use. The wrong blade produces burn marks, a rough surface that needs cleanup, or tearout that means more sanding.
Flat-Top Grind (FTG) Rip Blade — The Right Tool
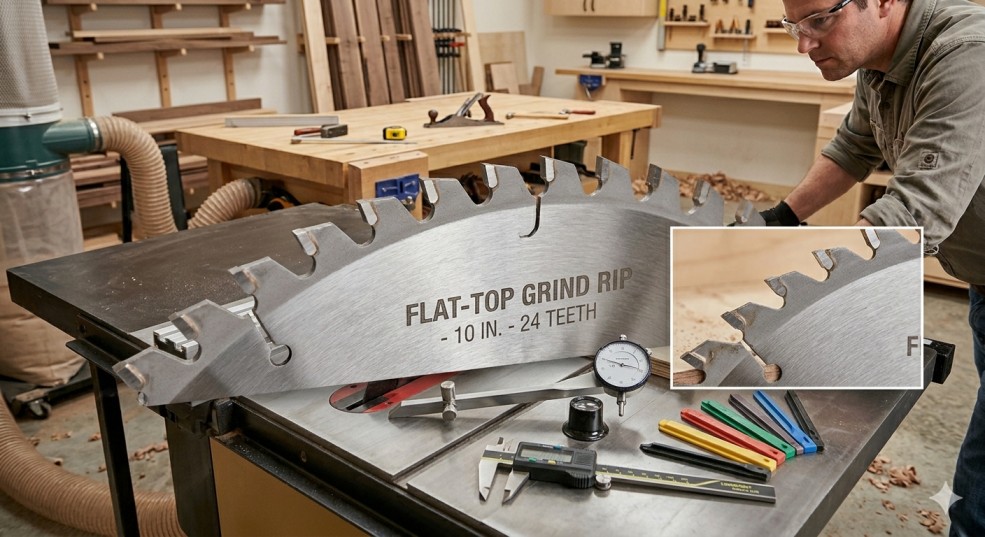
A flat-top grind blade with 24 to 40 teeth is the correct choice for table saw jointing. The FTG tooth geometry produces a flat, clean cut face without the scoring marks that alternate-top-bevel (ATB) teeth leave. Multiple woodworking sources specifically call out the combination of flat-top grind and moderate tooth count (around 30T) as the ideal jointing blade configuration. Jonathan Katz-Moses specifically recommends a blade with alternating triple-chip grind (TCG) and flat-top-grind (FTG) teeth for the smoothest ripping face in his arsenal for glue-up work.
The cut face from a quality FTG rip blade at the right feed rate should be smooth enough that you can glue up directly without running the edges through any further preparation. That’s the target.
What Happens with the Wrong Blade
A crosscut blade with ATB tooth geometry leaves small scoring marks at the bottom of each tooth path — visible as fine parallel lines on the cut face. These are harmless for most uses but for glue joints, they create micro-ridges that reduce glue contact area. An 80T blade cuts smoothly but generates more heat at jointing feed rates and is more prone to burning. The combination blade (40T ATB) is a compromise that works adequately but not as well as a dedicated FTG rip blade.
Blade Maintenance for Jointing
A sharp blade is more important here than in almost any other table saw operation. Pitch and resin buildup on blade teeth is the most common cause of burn marks during jointing — the accumulated buildup increases friction dramatically. Clean the blade with blade cleaner and a brass brush before any jointing session. If you’re getting consistent burn marks despite good technique, clean the blade before assuming your technique is the problem.
Technique Details That Make the Difference
Feed Rate — The Skill You Develop
Edge jointing on the table saw has a narrower feed rate window than standard ripping. Too slow produces burn marks as the blade dwells in contact with the wood. Too fast produces a rougher surface and more risk of deflection on thin boards. The right pace feels like moderate forward pressure — not pushing hard, not barely moving. You’ll develop a feel for it within the first few boards.
A useful check: immediately after the cut, run your finger along the freshly jointed edge. A correctly fed cut is smooth and clean. Slight ridges or visible tooth marks mean slightly faster feed is needed. Burn marks mean slower feed or a dirty blade.
Removing Only What’s Necessary
The jig’s job is removing the minimum material needed to establish a straight edge. Position the board on the sled so the minimum of the edge is hanging past the blade path — 1/8 inch is enough for the first pass on most boards. You’re not trying to take the edge down to finished width in one pass; you’re creating a reference edge. Multiple light passes with the board repositioned slightly closer to the blade each time produce better results than one aggressive pass.
Working with Cupped Boards
If the board has face cup (curved across the width), clamping it to the sled with the cup facing down means the board rocks. Clamping it with cup facing up means the middle is high. Either way, the board isn’t flat against the sled and the jointed edge won’t be square to the face.
The community guidance on this is consistent: if the faces of the board are cupped, bowed, or twisted, it’s probably not a good candidate for this type of jointing. Face flattening needs to happen first — either with a hand plane, a jointer, or a planer sled. Once the faces are flat, edge jointing on the table saw works cleanly.
Supporting Long Boards
For boards over 5 feet, outfeed support is essential. A board that tips down at the outfeed end at the end of the cut breaks contact between the sled and the fence, producing a tapered edge that’s not straight. Use a roller stand positioned at the outfeed end, set exactly to the height of the table saw surface. Check the roller height carefully — too high and it lifts the board off the table during the cut.
Grain Direction
Feed in the direction the grain runs. On most boards this means feeding from the end where the grain slopes upward into the cut face — the direction you’d plane with a hand plane. Feeding against the grain produces more tearout. This matters more on figured or interlocked grain than on straight-grained stock, but it’s a habit worth building.
Buying a Jig Instead of Building One
If building a sled isn’t the right call for your situation, a few commercial options do the job adequately.
POWERTEC 71395 Taper and Straight-Line Jig (~$90)

POWERTEC 71395 Taper & Straight Line Jig
A practical table saw jig designed for accurate taper cuts and straight line ripping. Great for woodworking projects where precision and repeatability matter.
Check Price on AmazonThe POWERTEC jig serves primarily as a taper-cutting jig and secondarily as a straight-line ripping jig. The 32-inch MDF base with melamine coating, adjustable fence, toggle clamps, and grip strips handle most edge jointing tasks without any building required. The adjustable fence makes it versatile for taper cuts as well, which gives it utility beyond pure jointing work.
Where it falls short compared to a shop-built sled: the 32-inch length limits it on longer boards, the adjustable fence introduces potential for play that a fixed straight fence doesn’t have, and at $90 the cost savings over building aren’t as significant as they’d seem. For a woodworker who doesn’t want to build anything and needs occasional jointing capability, it works. For anyone who processes rough lumber regularly, the shop-built sled is worth the afternoon.
Peachtree Thin Rip Jig (~$18)

Repetitive Narrow Strip Jig for Router Tables
A useful woodworking accessory designed to help create consistent narrow strips with better control and repeatability. Ideal for accurate routing projects and shop setups.
Check Price on AmazonNot a jointer jig per se, but a roller guide that positions itself behind the blade to support thin rip cuts and keep narrow strips from deflecting into the blade. It addresses a different problem — the safety and accuracy of cutting thin strips — but it’s worth mentioning because it’s a cheap, useful accessory for the same general category of table saw accuracy work. It has compatibility limitations on certain saw models (reported as too short for DeWalt jobsite saws), worth checking before ordering.
Jointer Jig vs. Dedicated Jointer vs. Hand Planes
| Jointer Jig (Table Saw) | Dedicated Jointer | Hand Planes | |
| Cost | $15–25 shop-built / $90 bought | $300–1,000+ | $50–$500+ for quality planes |
| Space | Zero extra footprint | Requires own floor space + clearance | None |
| Edge jointing | Yes — glue-ready results | Yes — benchmark standard | Yes — exceptional results with skill |
| Face flattening | No | Yes — primary purpose | Yes — the traditional approach |
| Works on twisted boards | Edges only, not faces | Yes for both edges and faces | Yes with skill |
| Skill required | Low to medium | Low once set up | Medium to high |
| Noise | Same as table saw | Loud | Silent |
| Best for | Edge jointing, glue-ups, small shop | Regular milling of rough stock | Quiet work, fitting joints, figured grain |
The honest assessment: if you need to flatten faces regularly, the jointer jig doesn’t help you and a dedicated jointer is the right tool. If your primary need is straight edges for glue-ups and dimensioning, the jig handles it perfectly and the space and cost savings are real. If you have a thickness planer and build a face-flattening sled for it, the combination of that sled plus the table saw jointing jig covers essentially everything a dedicated jointer does for most furniture and cabinet work.
Troubleshooting — When the Edges Aren’t Coming Out Right
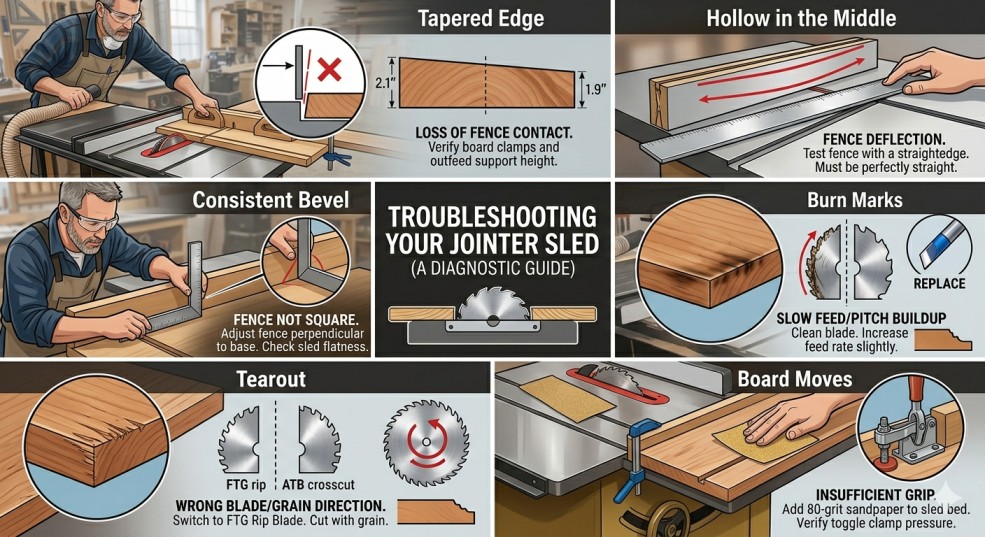
Tapered Edge (Wider at One End Than the Other)
The sled fence face lost contact with the rip fence during the cut. This happens when the board being clamped shifts during feeding, or when outfeed support isn’t keeping the trailing end of the sled at table height. Recheck that the board is fully clamped with no movement, verify outfeed support height, and re-run the cut.
Edge Has a Slight Hollow in the Middle
Fence deflection during the cut or the rip fence isn’t perfectly straight. Test your fence with a straightedge — if the fence itself has a bow, no jig will correct for it. Adjust the fence until it’s straight, then retest.
Consistent Bevel on the Jointed Edge
The fence face on the sled isn’t perpendicular to the sled base. Check with a reliable square at multiple points along the fence face. Loosen and reposition the fence face until it reads square, then refasten. Alternatively, the sled base isn’t flat — verify it’s not rocking on the table.
Burn Marks on the Jointed Edge
Feed rate is too slow, blade needs cleaning, or both. Clean the blade with blade cleaner and brass brush first — pitch buildup is the most common burn cause. If burns persist after cleaning, increase feed rate slightly. If the blade shows blue coloring (heat damage), it’s time to replace it.
Tearout on the Jointed Edge
Feeding against grain direction, blade is dull, or using an ATB crosscut blade instead of an FTG rip blade. Check grain direction and feed accordingly. Inspect the blade for dull carbide tips — a dull blade tears rather than cuts. Switch to an FTG rip blade for edge jointing work.
Board Moves During Cut Despite Being Clamped
The grip surface on the sled bed isn’t doing its job, or the clamp pressure is insufficient. Add self-adhesive 80-grit sandpaper to the sled bed. Verify the toggle clamps are applying full downward pressure, not just holding the board away from lifting. On very smooth surfaced boards (S4S lumber), the grip surface makes a bigger difference than on rough-sawn stock.
Safety Considerations
Running boards through the table saw on a jig doesn’t change the fundamental table saw safety requirements, but a few specific points apply to jointing operations.
- Never start a cut with the board already contacting the blade. Position the jig and workpiece, verify clamp security, then turn on the saw and allow it to reach full speed before feeding.
- Keep both hands on the sled — one at the rear pushing forward, one on the side maintaining contact with the fence. Neither hand should be in the blade path or close enough to reach the blade if something shifts.
- Featherboards help on the fence offset method (Design 2) by keeping the board pressed against the auxiliary fence face throughout the cut. Position a featherboard against the board face, angled slightly toward the infeed direction.
- On the sled design, the clamps do the featherboard’s job. But verify the sled fence face is in contact with the rip fence throughout the cut — don’t let the sled drift away from the fence.
- For very bowed boards with extreme edge curve, the high points of the edge may contact the blade before the sled is fully engaged. Let the blade reach those high spots gradually at the start of the cut by easing in rather than feeding at full pace from the start.
- Kickback risk increases when the cut width narrows at the end of the board. If the jointing cut ends with only a thin sliver being removed, that sliver can get caught between the blade and the fence. Either remove it by hand before making the final pass or ensure it falls clear rather than getting pinched.
Frequently Asked Questions
Can I use a jointer jig to replace a dedicated jointer entirely?
For edge jointing only, yes. The results are indistinguishable from a machine jointer for glue-up purposes when you have a quality blade and consistent technique. What the jig cannot do is flatten the face of cupped or twisted boards. If you combine the table saw jointing jig with a planer sled (for face flattening on the thickness planer), you cover the main functions of a jointer without owning one.
Does the jig work on plywood edges?
Yes, and it’s one of the most common applications. Jointing plywood edges before gluing up panels or joining cabinet parts is a standard use. Use a 40 or 50-tooth blade rather than a rip blade for plywood to minimize edge tearout on the face veneer layers. The sled design with clamps works well for plywood sheets cut to rough width.
How much material should I remove per pass?
For the sled design, position the board so approximately 1/8 inch of the edge overhangs the blade path for the first pass. This removes the minimum needed to establish a reference line. For the fence offset method, the 1/32-inch shim sets your removal per pass automatically. Light passes produce cleaner results and give you more control over final board width.
What’s the best blade for table saw jointing?
A flat-top grind (FTG) rip blade with 30 to 40 teeth. The FTG tooth geometry produces the cleanest, flattest cut face suitable for glue-up without additional work. Standard ATB combination blades work adequately but leave faint scoring marks that FTG blades don’t. A blade with alternating TCG and FTG teeth (as recommended for glue-ready surfaces) is the premium option. Whatever blade you use: clean it before jointing sessions.
Can I joint the face of a board with this jig?
No. Face jointing — flattening the wide face of a board — requires a jointer, a router sled, a planer sled, or hand planes. The table saw jointing jig addresses edges only. If the faces of your boards are cupped or twisted, address that first before edge jointing.
How long does it take to build the sled jig?
Realistically, two to three hours including material preparation and test cuts to verify calibration. If you have the materials on hand, the build time is primarily the fence face preparation (getting it genuinely straight), clamp installation, and calibration cuts. It’s an afternoon project, not a weekend one.
Should I build a jig or buy the POWERTEC?
Build it. The shop-built sled at $15 to $25 in materials outperforms the POWERTEC jig in length (you make it as long as your longest boards), fence rigidity (a fixed straight fence beats an adjustable one for pure jointing accuracy), and grip system (you can customize the clamping to your boards). The POWERTEC is reasonable if you genuinely don’t want to spend the shop time building, but for anyone comfortable with basic table saw work, the shop-built version is better.
Final Thoughts
The table saw jointer jig is one of the highest-value shop projects you can build. An afternoon of work, $15 to $25 in materials, and you have a jig that handles edge jointing for glue-ups, panel making, and lumber dimensioning as well as a dedicated jointer for those purposes — without the floor space, cost, or maintenance of a separate machine.
Build the sled design. Make the fence face genuinely straight before attaching it. Use a flat-top grind rip blade. Feed at a pace that produces clean cuts without burning. And accept the limitation honestly: this jig joints edges. For face flattening, you need either a jointer, a planer with a sled, or hand planes. Know what problem you’re solving and the jig solves it well.
The workflow in practice: clamp rough board to sled, joint first edge, remove from jig, first jointed edge against fence, rip second edge to width, square ends with miter gauge or miter saw. Start to finish, two passes through the table saw and you have a dimensioned board ready for your project.
Finlay Connolly is a woodworking enthusiast and power tool specialist with over a decade of hands-on experience in the workshop. As the founder and lead writer at ProTableSawReviews.com, Finlay combines expert knowledge with real-world testing to help woodworkers, DIYers, and professionals choose the best tools for the job. With a sharp eye for detail and a passion for precision, Finlay is committed to providing trustworthy, practical advice backed by years of experience and research in the field. Whether you’re cutting dados or comparing fence systems, you can count on Finlay for honest, reliable reviews that make your next cut your best one.