
I wasted two years making terrible crosscuts before I built my first table saw sled. The miter gauge that came with my saw wobbled in its slot. Boards would shift mid-cut. My picture frames had gaps you could see from across the room. I blamed my skills, my saw, even the wood itself. Then a furniture maker showed me his crosscut sled, and everything changed.
That moment—watching perfectly square cuts happen effortlessly, repeatably, every single time—convinced me that a good sled isn’t just a jig. It’s the difference between fighting your tools and actually enjoying woodworking. I’ve built probably twenty different sleds over the past decade, each iteration teaching me something about what works and what doesn’t. Some of those early attempts were disasters. But the knowledge I gained transformed how I approach precision cutting.
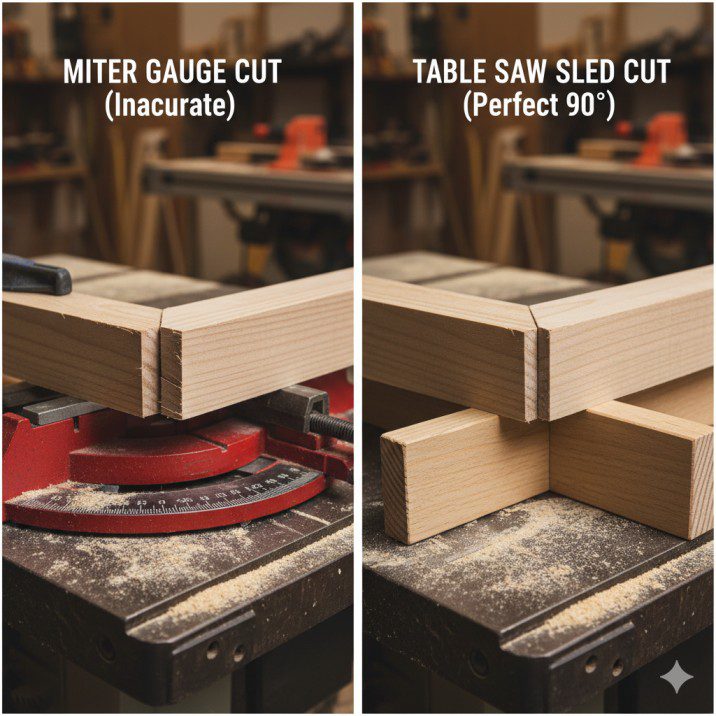
Here’s what most beginners don’t understand: your table saw’s miter gauge is designed to be adequate for basic cuts. A well-built sled is designed to be excellent for everything from picture frames to large panels. The difference isn’t subtle. When you need perfectly square crosscuts, consistent repeatability, or safe handling of small pieces, a miter gauge simply can’t compete. A sled turns your table saw into a precision crosscutting machine that rivals dedicated miter saws for accuracy.
This guide covers everything I’ve learned building and using sleds in professional and home workshops. We’ll walk through the design principles that make sleds work, the construction process that ensures accuracy, and the advanced techniques that unlock your table saw’s full potential. Whether you’re building your first sled or refining your approach, you’ll find practical insights that immediately improve your woodworking.
What Is a Table Saw Sled?
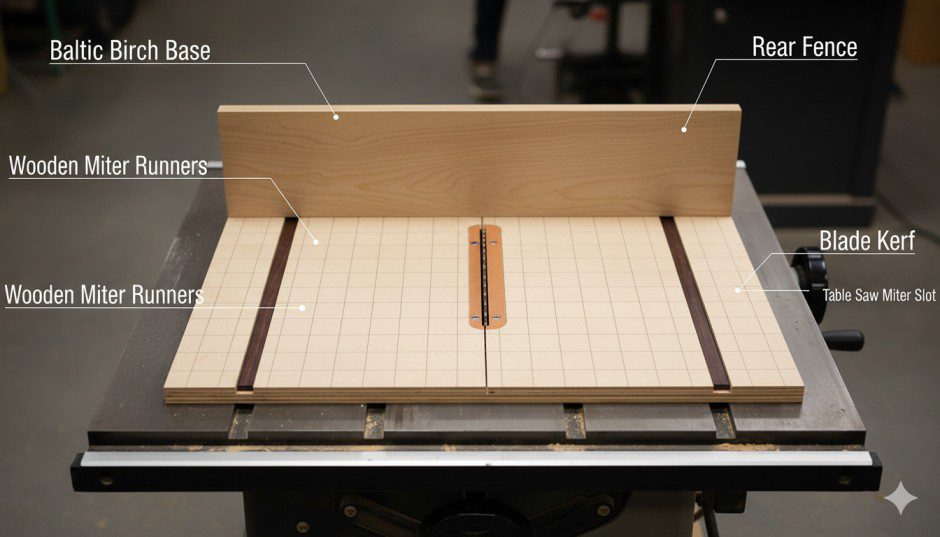
A table saw sled is a shop-made jig that slides along your saw’s miter slots, carrying workpieces across the blade for precise crosscuts. Think of it as a guided platform that eliminates the variables that cause inaccurate cuts—blade misalignment, workpiece movement, fence deflection, and operator error.
The basic anatomy includes a flat base that rides in the miter slots via wooden or metal runners, a rear fence perpendicular to the blade, and sometimes a front fence for support. As you push the sled forward, the blade cuts through a kerf (slot) in the base, and the workpiece—secured against the rear fence—receives a perfectly square cut.
What makes sleds superior to miter gauges is their stability and reference surface. A miter gauge contacts your workpiece at a single narrow strip. A sled supports the entire piece against a tall, stable fence. This massive increase in reference area means workpieces can’t shift, twist, or deflect during the cut. The result is accuracy that’s difficult to achieve any other way.
Sleds come in various configurations for different tasks, but the fundamental principle remains constant: you’re creating a mobile cutting station that moves with precision through the blade, carrying your work safely and accurately. The sled’s fence geometry—not your careful alignment of each piece—determines cut accuracy. Build the sled square once, and every subsequent cut is square automatically.
Why Every Woodworker Needs a Crosscut Sled
Over ten years of teaching woodworking, I’ve never met an experienced furniture maker or cabinetmaker who doesn’t use crosscut sleds extensively. There’s a reason: the benefits are transformative.
Accuracy That Actually Matters:
When you’re cutting components for boxes, frames, or cabinets, being “close” to square isn’t good enough. A cut that’s off by one degree produces gaps that accumulate with each joint. Four sides of a picture frame, each cut one degree off, creates a frame that won’t close properly. A properly built sled eliminates this problem completely. Every cut references the same perfectly square fence, so every piece matches perfectly.
I’ve tested this rigorously—cuts from a well-calibrated sled measure 90.0 degrees consistently, within the accuracy limits of my measuring tools. That’s cabinet-grade precision from a shop-made jig.
Safety for Small Pieces:
Try crosscutting a 3-inch piece of wood using just a miter gauge. Your hands end up dangerously close to the blade, and the small piece can catch and kick back. A sled keeps your hands well away from the blade while the sled’s base prevents the cutoff from contacting the blade after separation. This isn’t just convenient—it’s the difference between safe and dangerous cutting.
Repeatable Cuts Without Measuring:
Need twenty pieces exactly 8 inches long? Set up a stop block on your sled, and every piece comes out identical. No measuring tape, no marking, no accumulating error. Production work that would take hours with individual measurements happens in minutes with perfect consistency.
Large Panel Support:
Crosscutting a 24-inch wide panel with a miter gauge is awkward and inaccurate. The panel overhangs the small miter gauge surface, creating leverage that deflects your reference. A sled with a 30-inch fence supports the entire panel across its width, keeping it stable and square throughout the cut.
✅ Key Benefits:
- Eliminates miter gauge slop and play
- Supports workpieces across their entire width
- Enables safe cutting of small pieces
- Provides repeatable cuts with stop blocks
- Handles large panels that overpower miter gauges
- Creates perfectly square cuts automatically
- Reduces setup time for precision work
- Increases confidence in cut accuracy
For woodworkers serious about joinery, frame building, or cabinetry, a crosscut sled isn’t optional equipment. It’s the tool that makes precision work achievable without fighting your equipment. If you’re considering expanding your table saw capabilities, our Table Saw Accessories guide covers other essential additions.
Types of Table Saw Sleds Explained

Rockler Small Parts Crosscut Sled – Table Saw Sled Kit Includes Blade Guard, Miter Track Stop – 900 Angle Small Moldings Crosscut
- Crosscut Sled For Table Saw: This miniature cross cut sled lets you use your table saw to cut small parts to length. Our crosscut sled includes a miter track stop that limits the forward travel of the sled.
- Table Saw Crosscut Sled is Great for? Our table saw fence system is great for cutting dowels, tenon stock, and small moldings at a precise 90° angle, with little to no tear-out.
- Zero-Clearance Support: This sled system features zero-clearance support, which reduces the chance of small pieces getting stuck between the blade and throat plate, or falling through entirely.
New starting from: 109.99
Go to AmazonNot all sleds serve the same purpose. Understanding the different types helps you build the right sled for your most common work.
Basic Crosscut Sled:
This is where everyone starts—a simple rectangular base with a rear fence set at 90 degrees to the blade. Dimensions typically range from 24-30 inches wide by 18-24 inches deep. This handles most crosscutting tasks for boards up to the sled’s width. I use my basic crosscut sled more than any other jig in my shop.
Small Parts Sled:
A compact version measuring around 12×12 inches, specifically designed for safely cutting small pieces that would be dangerous to hold near the blade. Features a lower fence and sometimes a clamping mechanism. Essential for detailed work like jewelry boxes or small component production.
Miter Sled:
Incorporates adjustable fences set at common angles—typically 45 degrees for picture frame miters, but some include multiple angle options. More complex to build accurately, but invaluable for frame work. The key challenge is ensuring both fences are precisely angled so mitered pieces actually fit together.
Panel Cutting Sled:
Oversized sled designed for breaking down large sheet goods. May extend 40+ inches wide to support half a plywood sheet. Often includes extension supports and may sacrifice some features for capacity. Heavy but incredibly useful if you work with plywood regularly.
Tenoning Sled:
Vertical sled that holds workpieces upright for cutting tenon cheeks or other vertical cuts. Completely different design from crosscut sleds—the workpiece clamps vertically, and the sled moves it past a blade set at specific height. Specialized but essential for hand-tool style joinery.
Spline Jig:
Purpose-built for cutting slots in mitered corners to accept reinforcing splines. Features angled supports that hold mitered assemblies at specific angles relative to the blade. Specialized use, but solves a specific problem elegantly.
Taper Jig:
Adjustable sled for cutting consistent tapers on table legs or other components. Features a hinged fence that sets specific angles. Not technically a “sled” in the crosscut sense, but follows similar design principles.
🛠 Which Sled Should You Build First?
Start with a basic crosscut sled sized appropriately for your most common work. If you typically work with boards under 20 inches wide, a 24×20-inch sled handles 90% of your crosscutting needs. Once you’ve mastered basic sled construction and use, add specialized sleds as specific needs arise. I built my first sled ten years ago and only added specialized versions as I encountered tasks that justified them.
Essential Design Principles for Accurate Sleds
The difference between a sled that works and one that frustrates comes down to understanding these fundamental principles:
Principle 1: The Base Must Be Flat and Stable
Your sled’s accuracy depends entirely on the base remaining flat. Any twist, bow, or warp translates directly to cut inaccuracy. This means material selection matters enormously. I use 3/4-inch Baltic birch plywood for bases—it’s dimensionally stable, stays flat, and machines cleanly. MDF works but is heavier and more fragile. Regular plywood often warps. Sheet goods designed for cabinetry work best.
Principle 2: Runners Must Fit Snugly Without Binding
The wooden or metal runners that slide in your miter slots determine how smoothly the sled moves. Too loose, and the sled has play that ruins accuracy. Too tight, and the sled binds and becomes frustrating to use. The ideal fit slides smoothly with minimal side-to-side play—approximately 0.002-0.005 inches of clearance per side.
I use hardwood runners (maple or oak) sized to fit my saw’s specific miter slots. Every table saw has slightly different slot dimensions, so you need to custom-fit runners to your machine. This is where many beginner sleds fail—generic dimensions don’t work.
Principle 3: The Fence Must Be Perpendicular and Tall
A fence that’s not precisely 90 degrees to the blade produces cuts that are off square. Even one degree of error is visible in joinery. The fence must also be tall enough to support workpieces adequately—I typically use 3-inch tall fences minimum, sometimes 4 inches for better stability.
The fence needs structure to resist deflection. A thin board will flex when you press workpieces against it, compromising accuracy. I build fences from 3/4-inch hardwood backed with a reinforcing cleat or use thicker material like 1-1/2 inch hardwood.
Principle 4: The Blade Kerf Must Be Clean and Perpendicular
The slot where the blade cuts through the sled’s base should be clean and exactly perpendicular to the fence. This kerf provides zero-clearance support for wood fibers, reducing tearout. As the kerf widens from blade wobble or multiple blades, cut quality decreases. Many woodworkers build sleds with replaceable base inserts so you can refresh the kerf without rebuilding the entire sled.
Principle 5: Weight and Balance Matter
A sled needs enough mass to move smoothly without tipping or lifting. Too light, and it’s tippy and hard to control. Too heavy, and you won’t want to use it. My 24-inch crosscut sled weighs about 12 pounds—heavy enough for stability, light enough to handle comfortably. Larger sleds naturally weigh more; that’s acceptable if it matches their intended use.
Principle 6: Safety Features Are Non-Negotiable
Every sled needs a handle or grip area that keeps hands away from the blade path. The rear fence should extend past the blade on both sides to prevent hands from crossing the blade line. I also include a blade guard on sleds I use frequently—just a simple piece of clear acrylic that covers the blade between the fences prevents accidental contact.
These principles guide every design decision. Ignore them, and you’ll build a sled that looks right but performs poorly. Follow them, and your sled will deliver years of accurate service.
Materials and Tools Required
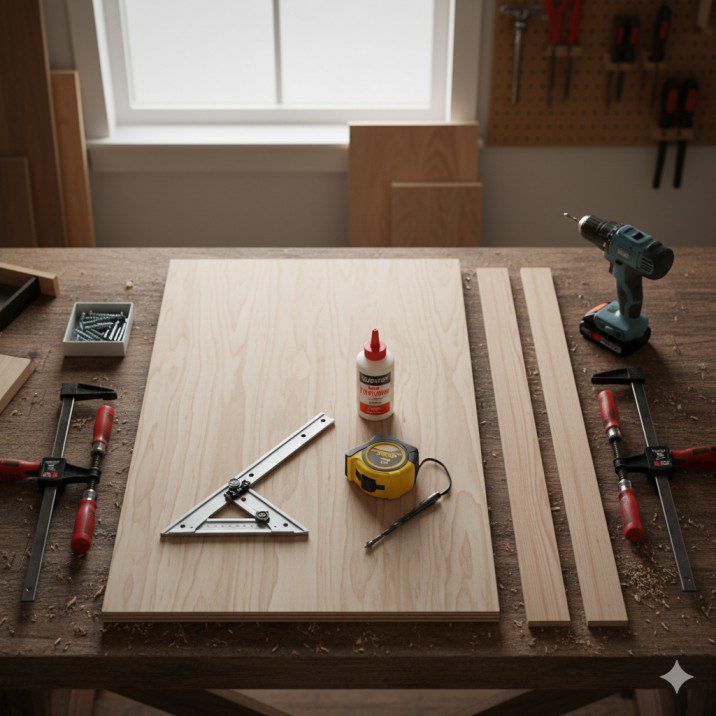
Building a quality sled doesn’t require exotic materials or specialized tools. Here’s what you actually need:
Materials for Basic Crosscut Sled:
✔ Base: 3/4-inch Baltic birch plywood, 24×20 inches (adjust to your needs)
✔ Fence: 3/4-inch hardwood (maple, oak, or similar), 3-4 inches tall, length matches base width
✔ Runners: Hardwood strips sized to fit your miter slots (approximately 3/4 x 3/8 inches for most saws)
✔ Reinforcement: Additional hardwood for fence backing
✔ Hardware: Wood screws (#8 x 1-1/4 inch), wood glue ✔ Finish: Paste wax for smooth operation
Essential Tools:
- Table saw (obviously)
- Combination square or machinist square
- Drill and bits
- Countersink bit
- Clamps (at least four)
- Measuring tape
- Pencil
- Sandpaper or sanding block
- Straightedge (24+ inches)
Accuracy Tools:
These separate good sleds from mediocre ones:
- Precision square (Woodpeckers or similar) or dial indicator
- 5-cut squaring method understanding (free, most accurate)
- Framing square for initial setup
🛠 Material Selection Details:
Base Material: Baltic birch is worth the premium over regular plywood. It stays flat, has void-free cores that hold screws better, and machines without chipout. A 5×5-foot sheet costs $60-80 and makes multiple sleds. MDF is cheaper but heavier and breaks down when wet. Avoid regular construction plywood—it warps.
Runner Material: Hard maple runners wear well and slide smoothly. Cut them slightly oversized, then plane or sand to perfect fit. Some woodworkers use UHMW plastic runners or aluminum T-track. These work well but cost more and require different installation methods.
Fence Material: Hardwood resists deflection better than softwood. Maple or oak work excellently. Make sure it’s straight—sight down the edge before buying. A warped fence guarantees an inaccurate sled.
Total material cost for a well-built crosscut sled runs $30-50 if you buy materials specifically for the project. If you have scrap Baltic birch and hardwood in your shop, cost drops significantly. Compare this to commercial sleds that cost $100-200 but often don’t fit your saw perfectly or meet your specific needs.
Step-by-Step: Building Your First Crosscut Sled
This process takes 2-3 hours working carefully. Rushing produces mediocre results. Take your time, and you’ll build a tool that serves you for decades.
Step 1: Prepare the Base (15 minutes)
Cut your Baltic birch base to size—24×20 inches works well for most applications. Sand all edges smooth, especially the front and rear edges that you’ll handle frequently. Check the base for flatness by placing it on your table saw’s surface and looking for gaps. If it rocks, you need flatter material.
Mark the center line front to back where the blade will cut through. This helps with alignment in later steps.
Step 2: Cut and Fit Runners (30 minutes)
This step determines how well your sled performs, so take it seriously. Measure your table saw’s miter slots carefully—width, depth, and along the full length. Slots aren’t always consistent.
Cut hardwood strips approximately 1/16 inch wider and 1/16 inch deeper than your miter slot dimensions. Test fit—they won’t slide in the slots yet, which is correct. Now gradually reduce dimensions by sanding or planing until the runners slide smoothly with minimal play. This trial-and-error fitting is critical. Check fit frequently.
The ideal fit slides smoothly without wobbling side to side. If the runner binds at any point along the slot, you need to reduce its dimensions slightly at that location. Mark binding points and remove material carefully.
Step 3: Attach Runners to Base (20 minutes)
This is where accuracy begins. Place the runners in your miter slots. Apply a thin layer of glue to the top of each runner (glue keeps them from shifting during screw installation). Position your base on top of the runners, centered over the blade path you marked earlier.
Use clamps or heavy objects to hold the base firmly against the runners. Drill pilot holes through the base into the runners—space screws every 6 inches. Countersink the holes so screw heads sit below the surface. Drive screws carefully, checking after each screw that the base hasn’t shifted.
Let glue dry completely (minimum 2 hours). Don’t rush this—sliding the sled before glue cures can shift the runners and ruin alignment.
Step 4: Cut Initial Blade Kerf (5 minutes)
Once glue is fully cured, carefully slide the sled onto your table saw. Raise the blade to about 1 inch above the table. With the saw off, position the sled so the blade will cut approximately through the center line you marked.
Turn on the saw and very slowly push the sled forward, cutting a kerf through the base. Push completely through, creating a slot from front to back. This kerf is where the blade passes through during use.
Step 5: Prepare and Attach Rear Fence (30 minutes)
Cut your fence material to length—it should span the full width of your base. Make it 3-4 inches tall for good support. Sand smooth, especially the face that will contact workpieces.
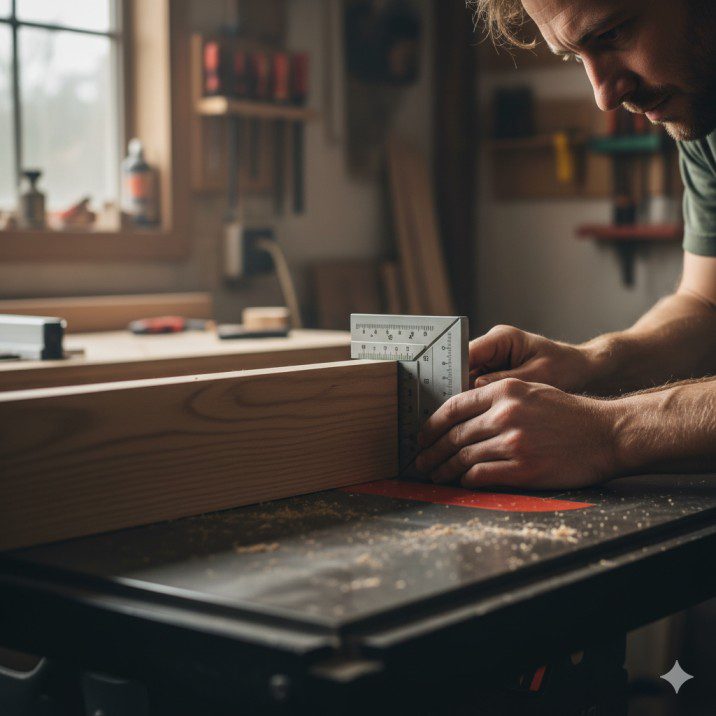
Here’s the critical part: the fence must be exactly perpendicular to the blade kerf. Don’t trust measuring tools for this initial positioning—use the 5-cut method for final calibration, but start with careful square positioning.
Place a reliable square in the blade kerf, extending perpendicular to it. Position the fence against the square. Clamp the fence in position—use at least four clamps to prevent any shift. Double-check squareness before proceeding.
Drill pilot holes through the base into the fence bottom edge. Countersink and drive screws. Add reinforcement if desired—a cleat screwed to both the base and fence back adds rigidity.
Step 6: Add Front Fence or Handle (15 minutes)
The front fence is optional but helpful. It provides reference for positioning workpieces and gives you a safe place to grip the sled. Cut a piece of 3/4-inch material 2-3 inches tall, same length as the rear fence.
Position it 2-3 inches from the front edge of the base. Secure with glue and screws from underneath. Alternatively, attach a simple handle to the front for pushing the sled. I prefer a front fence because it serves double duty.
Step 7: Sand and Finish (15 minutes)
Sand all surfaces smooth, especially the base bottom and fence faces. Apply paste wax to the base bottom and runners—this dramatically improves how smoothly the sled slides. Buff the wax to a shine.
Add any desired labels or markings—I mark the direction of blade rotation and note “KEEP HANDS CLEAR” on the base.
Step 8: Calibrate for Perfect Squareness (45 minutes)
This is the most important step, covered in detail in the next section. Don’t skip calibration—an uncalibrated sled is just expensive scrap wood.
The sled is now built and ready for calibration. The construction process is straightforward; the accuracy comes from patient fitting and precise calibration. For more detailed woodworking techniques and jig-building, check our Table Saw How To Guide.
Calibrating Your Sled for Perfect 90-Degree Cuts
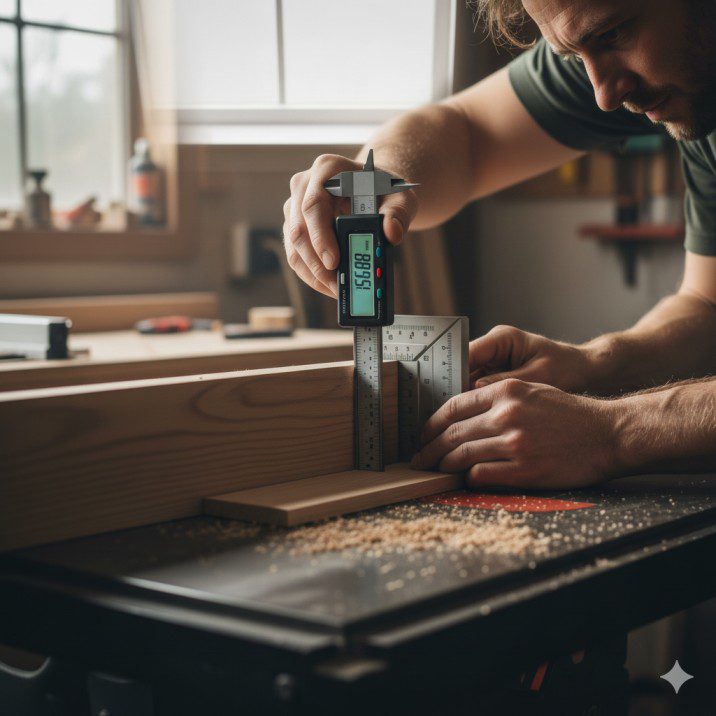
An uncalibrated sled might look perfect but cuts at 89.5 degrees—close enough to fool your eye but disastrous for joinery. Proper calibration using the 5-cut method reveals and corrects even tiny errors.
The 5-Cut Method Explained:
This brilliant technique amplifies small errors into easily measurable amounts. Here’s how it works:
- Cut a strip of wood approximately 6 inches wide and 30 inches long
- Crosscut one end square using your sled
- Rotate the board 180 degrees and crosscut the opposite end
- Measure the width at both ends of the resulting piece
- The difference between measurements indicates fence error
Why This Works:
If your fence is perfectly square, both ends of the board will measure identically. If the fence is off by even 0.5 degrees, one end will be wider than the other. The beauty is that this small angular error creates a measurable linear difference across the width of your board.
Performing the Calibration:
Start with a straight piece of scrap at least 24 inches long and 6 inches wide. MDF works perfectly for this. Mark one face and keep that face against the fence for all cuts.
Make your first cut, squaring one end. Rotate the board 180 degrees (marked face still against fence) and crosscut the opposite end. Measure both ends carefully with calipers or an accurate ruler.
If the measurements match, your fence is square—congratulations! More likely, there’s a difference. For example:
- Left end: 6.00 inches
- Right end: 6.03 inches
- Difference: 0.03 inches
This 0.03-inch difference indicates your fence is out of square. The question is: which direction?
Look at your cuts. The narrow end indicates the direction the fence needs to move. If the left end is narrower, the left side of your fence needs to move away from the blade slightly, or the right side needs to move toward the blade.
Making Adjustments:
Loosen the screws holding your fence (don’t remove them). Tap the fence gently in the correct direction—usually just a few thousandths of an inch. A light hammer tap on one end moves it slightly. Retighten screws and retest.
Repeat the 5-cut method. Your measurements should be closer. Continue this process until measurements match within 0.005 inches or less across a 6-inch board. This represents essentially perfect squareness for woodworking purposes.
Advanced Calibration:
Some woodworkers add adjustment screws to their fences—bolts that press against the base, allowing fine adjustment without loosening fence screws. This is overkill for most sleds, but if you’re building a premium sled for precision furniture, it’s worth considering.
Verification:
Once calibrated, verify by cutting actual project pieces. Cut components for a simple box and assemble them. If joints fit perfectly square, your calibration succeeded. This real-world test confirms your sled performs in practice, not just in theory.
Calibration takes patience, but it’s a one-time process that determines your sled’s accuracy forever. Spend an hour getting it right, and the sled serves you perfectly for years.
Advanced Sled Features and Modifications
Once you’ve mastered basic sled construction, these features enhance functionality:
Replaceable Base Inserts:
The blade kerf widens over time as blades wobble or you use different blades. A wide kerf reduces zero-clearance benefits. Solution: Build your sled with a replaceable center section. Cut a shallow dado across the base where the blade kerf will be, then insert a piece of 1/4-inch material that’s replaceable. When the kerf gets sloppy, pop out the insert and install a fresh one.
Construction: Cut a 3-inch wide dado 1/4 inch deep centered on your blade path. Cut matching inserts from 1/4-inch Baltic birch or MDF. Secure with screws from underneath. When needed, remove screws, pop out old insert, install new one, and cut fresh kerf.
T-Track and Stop Blocks:
For repeatable cuts, nothing beats an adjustable stop block. Rout a channel in your fence and install T-track (aluminum extrusion with a T-shaped slot). Stop blocks with T-bolts slide and lock anywhere along the fence.
Make stop blocks from hardwood with a T-bolt attached. Add a clamping mechanism or simply tighten the T-bolt to lock position. For production work, this feature transforms your sled into a precision cutting station.
Measuring Scale:
Add an adhesive measuring tape along your fence to quickly position stop blocks without separate measurements. Align the zero point with your blade kerf. Now you can set stop blocks to specific measurements by reading the scale directly.
Use self-adhesive measuring tapes designed for woodworking. They’re more accurate than hardware store measuring tapes and designed to stick to wood surfaces permanently.
Blade Guard:
A clear acrylic shield mounted over the blade between the fences prevents accidental contact with the spinning blade. Cut 1/4-inch clear acrylic to size and mount it to blocks attached to each fence, creating an arch over the blade. You can still see through it, but your hands can’t accidentally touch the blade.
Particularly valuable if others use your sled or you teach workshops. The guard provides peace of mind without compromising visibility.
Hold-Down Clamps:
For small or awkwardly shaped pieces, toggle clamps mounted to the sled fence secure workpieces firmly. This keeps your hands completely clear of the blade path. Mount clamps to the fence face or top edge, positioned to avoid the blade path.
De-Sta-Co makes excellent toggle clamps in various sizes. For most work, a vertical toggle clamp with 300-500 pound clamping force works perfectly.
Angled Fences:
Add secondary fences at 45 degrees for repetitive miter cuts. These can be permanent (for a dedicated miter sled) or removable (for a multi-purpose sled). The challenge is getting the angle precisely correct—even 0.5 degrees off creates gaps in mitered joints.
Build angle fences the same way as the main fence: attach carefully, then calibrate using the 5-cut method on mitered test pieces. Check that mitered pieces form a 90-degree corner when assembled.
Sacrificial Backing Board:
For cutting plywood or veneer without bottom surface tearout, attach a thin sacrificial backing board behind your workpiece. This backing supports wood fibers as the blade exits the cut, preventing chipout. Simple solution: attach a strip of 1/8-inch hardboard behind your fence at base level. Replace when damaged.
🛠 Which Features Matter Most?
T-track and stop blocks provide the most practical value for everyday work. Replaceable inserts extend sled life significantly. Other features add convenience but aren’t essential. Start simple, then add features as specific needs arise.
Safety Considerations When Using Sleds
Sleds are generally safer than using a miter gauge, but they introduce specific risks that require attention:
Hand Position:
Your hands push the sled’s front fence or handle, never the workpiece directly. This keeps hands away from the blade. Maintain this discipline—never reach over the blade to support the workpiece or catch cutoffs. Let cutoffs fall or remain on the sled until the blade stops.
Through Cuts Only:
Sleds work exclusively for through cuts where the blade cuts completely through the workpiece. Never use a sled for non-through cuts like dados or rabbets. The sled base prevents blade guards from functioning properly on partial cuts, creating danger.
Secure Workpieces Properly:
Press workpieces firmly against the fence before and during cuts. Pieces that shift mid-cut can bind, kick back, or produce inaccurate cuts. For small or awkwardly shaped pieces, use clamps or hold-downs rather than hand pressure alone.
Mind the Cutoff:
The small piece cut off by the blade (the waste piece) can be dangerous if trapped between the blade and fence. For very narrow cutoffs (under 3 inches), the piece may lift and contact the rising blade teeth behind the blade, causing kickback. Solution: Let narrow cutoffs remain on the sled until the blade stops. Don’t try to grab them while the blade spins.
Sled Speed:
Feed sleds at moderate speed—neither rushed nor extremely slow. Rushing causes loss of control. Too-slow feeding burns wood and can cause blade binding. A steady, controlled pace works best.
Blade Height:
Set the blade height so teeth extend approximately 1/4 inch above your workpiece thickness. Higher blade exposure increases danger without improving cuts. Lower blade height means teeth that are cutting are more perpendicular to the wood, which can cause burning.
✅ Safety Checklist:
- Keep hands on sled frame, never reaching past fence line
- Ensure workpiece sits firmly against fence before cutting
- Let cutoffs remain on sled until blade stops
- Wear safety glasses (sawdust and particles fly)
- Use hearing protection (table saws are loud)
- Keep blade guard on when possible (some sleds accommodate guards)
- Never use sled for non-through cuts
- Maintain clean sled surface (sawdust causes slipping)
- Check that runners fit properly before each use
- Disconnect power before adjusting or cleaning near blade
Sleds dramatically improve safety for crosscutting, but they require the same fundamental respect for spinning blades as any table saw operation. Stay focused, maintain proper technique, and the sled provides years of safe, accurate service.
Common Mistakes and How to Avoid Them
I’ve seen these errors repeatedly in woodworking classes and online forums. Learn from others’ mistakes:
Mistake 1: Using Warped Base Material
A warped base guarantees inaccurate cuts. The base must be flat for the sled to work. Testing: Place the base on a flat surface and check for rocking or gaps. Any flex or twist will translate to cut inaccuracy.
✔ Solution: Invest in quality Baltic birch plywood or other cabinet-grade sheet goods. Store material flat and check flatness before construction. If you must use suspect material, orient it best-side-down so any warp works against the table saw surface rather than affecting the cutting action.
Mistake 2: Sloppy Runner Fit
Runners that fit loosely allow side-to-side play, ruining accuracy. Runners that bind make the sled frustrating to use and can be dangerous if the sled suddenly releases from binding.
✔ Solution: Take time fitting runners properly. The right fit slides smoothly with minimal perceptible play (0.002-0.005 inches per side). Test along the full length of miter slots—slots aren’t always uniform. Custom-fit each runner to your specific table saw.
Mistake 3: Skipping Calibration
Building a sled and immediately using it without calibration almost guarantees cuts that aren’t square. Even careful construction needs verification and adjustment.
✔ Solution: Always perform the 5-cut calibration test. It takes 30 minutes and ensures your sled cuts accurately. Recheck calibration periodically—impacts during storage can shift the fence.
Mistake 4: Weak Fence Construction
A thin or poorly supported fence flexes when you press workpieces against it, compromising accuracy. I’ve seen sleds with fences made from 1/2-inch plywood or 1x material without backing—these invariably perform poorly.
✔ Solution: Use 3/4-inch hardwood minimum for fences. Add backing cleats or build thicker fences. The fence must resist deflection from reasonable workpiece pressure.
Mistake 5: Placing Screws in the Blade Path
Driving screws through your base without considering blade position can result in the blade hitting screw heads—spectacular and dangerous. Mark your blade path clearly before installing any hardware.
✔ Solution: Before drilling pilot holes, place the sled on your saw with the blade raised and verify screw locations won’t intersect the blade path. Add at least 1/2 inch clearance on either side of the kerf.
Mistake 6: Ignoring Grain Direction
Wood expands and contracts across the grain, not along it. If you orient your fence so its width (the dimension perpendicular to the base) runs cross-grain, seasonal expansion can cause the fence to bow or push away from the base.
✔ Solution: Orient fence grain so expansion/contraction happens in the height direction (perpendicular to base), not the width direction. This keeps the fence face flat and parallel to the kerf.
Mistake 7: Over-Tightening Screws
Screws driven too tight can strip holes in plywood or crack hardwood fences. More concerning, over-tightening can distort thin base material, introducing flex that affects accuracy.
✔ Solution: Drill proper pilot holes and drive screws snug, not extremely tight. Use enough screws that each individual screw doesn’t need to be torqued excessively. For critical joints, glue does most of the work—screws just clamp while glue dries.
Mistake 8: Wrong Blade Choice:
Using a ripping blade (fewer teeth, aggressive hook angle) on your sled produces rough crosscuts with tearout. Crosscutting requires more teeth and different geometry.
✔ Solution: Keep a dedicated crosscut or combination blade for sled use. Minimum 40 teeth for clean crosscuts in solid wood, 60+ teeth for plywood and other sheet goods.
Maintenance and Long-Term Care
A well-maintained sled lasts decades. I’m still using the third sled I ever built—it’s twelve years old and cuts as accurately as the day I calibrated it.
Regular Cleaning:
Sawdust accumulates on the sled base, in the blade kerf, and under the runners. This debris affects how smoothly the sled operates and can interfere with accuracy. Clean your sled after every few uses, more often if cutting resinous woods like pine.
Use a brush and shop vacuum to remove sawdust. Avoid blowing dust with compressed air—you’ll just spread it around your shop. For sticky resin buildup, use mineral spirits on a cloth.
Waxing:
Paste wax on the sled base and runners dramatically improves sliding action. Apply thin coats every few months, buffing to a smooth finish. Johnson’s paste wax works perfectly—the same stuff you’d use on furniture. Avoid silicone-based products, which can contaminate wood and interfere with glue and finish adhesion on your projects.
Runner Inspection:
Check runners periodically for wear. Hardwood runners slowly wear from friction against miter slot walls. If your sled develops noticeable play over time, the runners have worn and need replacement or shimming.
For minor wear, add thin shims (veneer or tape) to the runner sides. For significant wear, replace runners entirely—unbolt the old ones, fit new ones using the same process as initial construction, and reattach. No need to rebuild the entire sled.
Frequently Asked Questions
Q: What size should I make my crosscut sled?
Size your sled for your most common work. A 24-inch wide by 20-inch deep sled handles most projects—it crosscuts boards up to 24 inches wide and provides sufficient depth for control. Smaller sleds (18×16 inches) work for compact shops with limited storage but sacrifice capacity. Larger sleds (30×24 inches) handle bigger work but become unwieldy and require more storage space. Consider what you cut most frequently—if you rarely work with boards over 18 inches wide, a smaller sled makes sense. For plywood projects, larger is better.
Q: Can I use MDF instead of Baltic birch for the base?
MDF works but has drawbacks. It’s heavier than plywood (which reduces portability), and it deteriorates when exposed to moisture. The edges are also more fragile—repeated impacts can chip MDF edges. However, MDF is cheaper and extremely flat, making it acceptable for shop-only sleds that won’t see rough treatment. I prefer Baltic birch for durability and weight, but I’ve built functional MDF sleds that perform well if you accept the limitations.
Q: How do I cut miter slots if my table saw doesn’t have them?
Most table saws include miter slots, but if yours doesn’t (or they’re damaged), you have options. You can rout slots into a substrate that attaches to your table saw’s surface, effectively creating slots. Alternatively, use a different guidance system—some sleds ride on the table saw fence rails rather than miter slots. This requires different design but works. For saws completely lacking miter accommodation, consider whether a sled is the best solution—dedicated crosscut sleds may work better on miter saw stands or as standalone jigs.
Conclusion: Building Your Path to Precision
The table saw sled represents more than a shop jig—it’s the tool that unlocks precision you didn’t know your saw could achieve. I’ve watched beginners transform their woodworking after building their first sled, suddenly able to produce tight joinery and square assemblies that previously frustrated them. The accuracy isn’t magic; it’s geometry and craftsmanship working together.
What makes sleds special is their combination of simplicity and effectiveness. You’re building a shop-made jig from basic materials, yet it outperforms many commercial solutions costing hundreds of dollars. The process teaches fundamental woodworking principles: flatness, squareness, calibration, and the importance of reference surfaces. These lessons transfer to every other aspect of woodworking.
This table saw sled guide has covered everything from basic concepts to advanced techniques, but the real learning happens when you build your first sled. You’ll make mistakes—everyone does. Maybe your runners won’t fit perfectly on the first try. Perhaps your calibration takes longer than expected. These challenges are part of the process. Each problem you solve deepens your understanding of how precision tools function and how to create them.

Finlay Connolly is a woodworking enthusiast and power tool specialist with over a decade of hands-on experience in the workshop. As the founder and lead writer at ProTableSawReviews.com, Finlay combines expert knowledge with real-world testing to help woodworkers, DIYers, and professionals choose the best tools for the job. With a sharp eye for detail and a passion for precision, Finlay is committed to providing trustworthy, practical advice backed by years of experience and research in the field. Whether you’re cutting dados or comparing fence systems, you can count on Finlay for honest, reliable reviews that make your next cut your best one.