

How to Align a Table Saw
(And the Best Tools to Do It)
There are four things to align on a table saw, in this exact order: blade parallel to the miter slot → fence parallel to the miter slot → blade square at 90° → blade square at 45°. Do them in that order every time. Skip step one and everything else you adjust is built on a crooked foundation. The whole job takes about 30–45 minutes and most woodworkers only need to do it when they first set up a saw, after moving it, or after a hard impact.
I set up my first table saw wrong. I squared the fence to the blade, felt good about it, made a few test cuts, and spent the next six months wondering why my rip cuts had a slight drift and occasional burning on one side. Turned out I’d done everything backwards — I’d aligned the fence before I’d aligned the blade, which meant I was chasing a moving target the whole time.
That’s the mistake most people make. So in this guide I’m going to walk you through the correct sequence from scratch, explain what tools actually do the job well (including the free method that works almost as accurately as a $150 gauge), and point out where each saw type — cabinet, contractor, hybrid, jobsite — is different.
By the end of this you’ll have a properly dialed-in saw that cuts straight, doesn’t burn, and won’t surprise you with kickback.
Why Table Saw Alignment Actually Matters
Most woodworkers know misalignment causes burn marks and drift, but it goes deeper than that. When your blade isn’t parallel to the miter slot, several things happen at once:
- The wood contacts the back of the blade after the cut, creating friction, heat, and scorch marks
- The miter gauge pushes wood at an angle to the blade rather than straight through — so your crosscuts are never quite square
- The wood gets pinched, especially toward the end of the cut, which is one of the most common causes of kickback
- You’re constantly fighting the cut rather than just guiding it
A properly aligned saw, on the other hand, just works. The wood feeds smoothly, the cut is clean, and you’re not working against the machine. It’s one of those adjustments that fundamentally changes how the saw feels to use.
The good news is that once you’ve aligned a table saw properly, it usually stays that way for months or years — unless you move it, have a hard kickback event, or do something that physically shifts the trunnions. You don’t need to do this every week. But you do need to do it right at least once.
Misalignment is the #1 cause of kickback. Once your saw is aligned, read our full guide on how to prevent table saw kickback — the other half of safe operation.
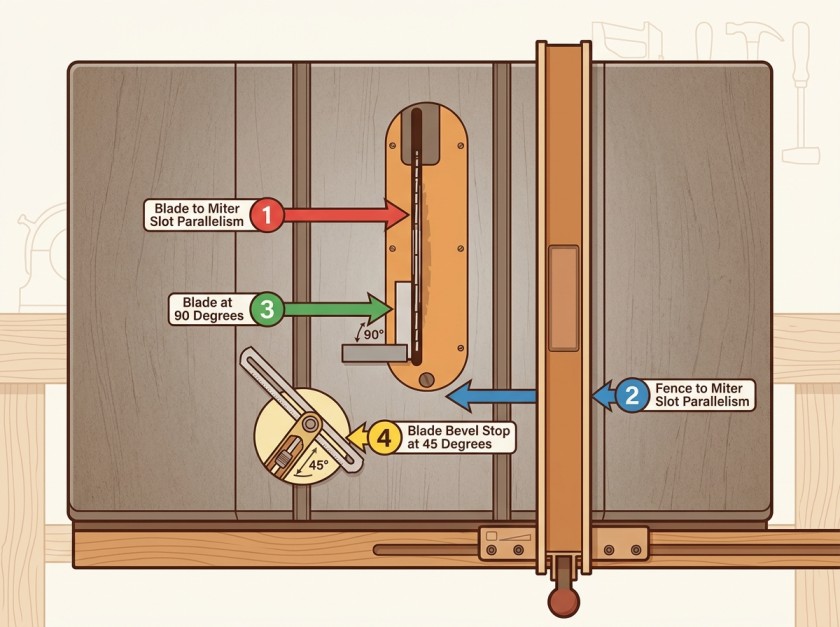
The four alignment points on a table saw — blade to miter slot must always be done first.
What Tools You Need (Free Method vs. Proper Tools)
Here’s something most alignment guides don’t tell you upfront: you can do a perfectly acceptable table saw alignment with tools you probably already own. You don’t need to buy anything. But there are dedicated alignment tools that make the job faster, easier, and more precise — and a few of them are genuinely worth the money if you use a table saw regularly.
The Free Method — Combination Square + Marked Tooth
A good combination square is all you actually need to check blade-to-miter-slot alignment. You mark one tooth with a permanent marker, set the square in the miter slot, extend the ruler until it just touches that tooth at the front, lock it — then slide to the rear and check the same tooth. If the ruler touches equally at both ends, you’re parallel. If there’s a gap at one end, that’s your measurement.
The limitation is that you’re relying on the feel of the ruler touching the tooth, which introduces human error, and the miter slot-to-blade distance on most saws is only 5–6 inches, which means a small misalignment produces a very small measurement. A 0.003-inch error across 5 inches is almost invisible to the naked eye. It works, but it takes patience and careful hands.
Dedicated Alignment Tools Worth Knowing About
If you want to do this faster or more precisely, there are three categories of tools worth knowing about:
This is what most serious woodworkers use. A bar slides in the miter slot, a dial indicator mounts to it and touches the blade face, and you read the deviation directly in thousandths of an inch as you slide the assembly front to rear. No guessing, no feel — the needle tells you exactly what’s happening.
Budget options like the iGaging EZ Align (~$40) and generic aluminum bar gauges on Amazon ($25–$35) all do the job adequately for hobby use. The key feature to look for is a miter bar with some form of tension adjustment — a bar that’s sloppy in the slot will give you false readings.
At the higher end, the Woodpeckers Saw Gauge (~$100–$130) uses three precision-ground steel pins that self-adjust to the slot width, which means a consistently snug fit without shimming or fiddling. It’s significantly more repeatable than the budget options.
The easiest alignment gauge for most woodworkers. Drop the bar in your miter slot, touch the dial indicator to the blade tooth, and read your deviation in thousandths. No guesswork. Works on any standard 3/4″ miter slot.
- Reads to 0.001″ — far more precise than a combination square
- Compatible with all standard 3/4″ miter slots
- Solid build quality for the price
- Setup takes under 2 minutes
The dial indicator gives you a precise number rather than a feel — even a 0.002″ deviation shows clearly on the needle.
This is a different approach. Instead of touching the blade teeth, you remove the blade entirely and mount a precision-ground steel plate on the arbor in its place. The plate is ground flat to 0.002-inch tolerance and extends about 12 inches front-to-rear — much more than the 5–6 inch tooth-to-tooth distance on a standard blade, which makes small misalignments much easier to detect.
If you’re doing a full tune-up and want the most accurate possible result, this system is hard to beat. It’s also the tool that professional setup technicians reach for. The downside: you have to remove your blade every time you use it.
The system professional setup technicians use. Mounts a precision-ground plate on the arbor instead of measuring off blade teeth, giving you a 12″ reference surface instead of just 5–6″ between teeth. Significantly more accurate for full machine tune-ups.
- 12″ reference surface vs. 5–6″ tooth-to-tooth measurement
- Precision-ground to 0.002″ — more accurate than any blade measurement
- Best choice for cabinet saws and serious shop setups
- Built to last — this is a buy-once tool
A small digital angle gauge placed flat against the blade face reads the exact bevel angle in tenths of a degree. It’s the fastest possible way to set and verify your 90° and 45° bevel stops — and it’s far more reliable than a try square alone for the 45° setting, which most saws have slightly off from the factory.
The cheap ones from Amazon work perfectly well for this — you just want something with 0.1° resolution and a magnetic base so it stays put against the blade.
The one I keep on my bench specifically for setting bevel stops. Magnetic base sticks to the blade face while you turn the stop screw. Reads in 0.1° increments — precise enough to catch the 0.3–0.5° factory errors that ruin miter joints.
- 0.1° resolution — catches factory errors on 45° stops
- Magnetic base stays on the blade hands-free
- Works for jointer, bandsaw, and miter saw bevel settings too
- Best $20 you’ll spend on your shop
Tool Comparison at a Glance
| Tool / Method | Accuracy | Speed | Cost | Best For |
|---|---|---|---|---|
| Combination square + marked tooth | ~0.005″ | Slow | Free | First-time / occasional use |
| Budget dial indicator gauge ($25–$40) | 0.001″ | Fast | $25–$40 | Most hobby woodworkers |
| Woodpeckers Saw Gauge | 0.001″ | Very fast | $100–$130 | Regular use, professional shops |
| Woodpeckers Align-A-Saw System | 0.002″ plate | Moderate | $120–$180 | Full tune-ups, cabinet saws |
| Digital angle gauge | 0.1° | Very fast | $15–$35 | Bevel stop adjustment only |
My honest recommendation: a $35 dial indicator gauge from Amazon plus a $20 digital angle gauge covers 95% of table saw alignment needs for about $55 total. You don’t need the Woodpeckers system unless you’re doing this on multiple machines regularly or you’re the kind of person who wants the best tool for every job.
If your blade is the issue rather than the alignment, see our guide to the best table saw blades — a dull or low-quality blade causes burn marks and drift even on a perfectly aligned saw.
How to Align a Table Saw — The Complete Step-by-Step
Work through these four alignments in order. Each one depends on the previous one being correct first.
Step 1 — Blade Parallel to the Miter Slot
This is the foundation. Every other alignment reference on your saw — the fence, the miter gauge, the crosscut sled — ultimately traces back to the miter slot. So the blade has to be parallel to the slot before you touch anything else.
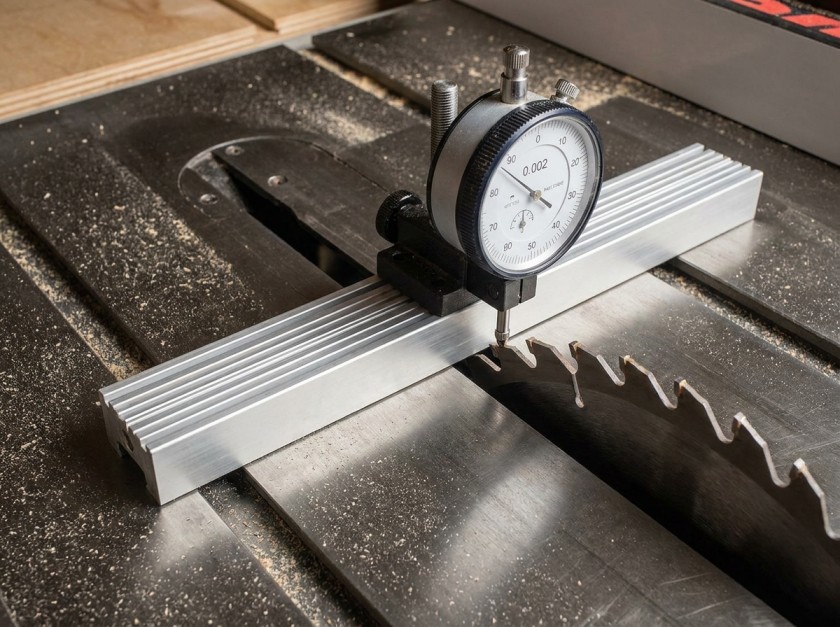
Raise the blade to its full height. Pick one carbide tooth and mark it with a permanent marker. You’ll be rotating the blade throughout this process and you need to always measure from this same tooth to eliminate blade runout from your readings.
- 1Place your dial indicator gauge (or combination square) in the miter slot closest to the blade. Slide it until the probe just touches your marked tooth at the front of the blade. Zero the dial indicator — or note the combination square position.
- 2Rotate the blade by hand so the marked tooth is now at the rear. Slide the gauge to the rear and take the reading from the same tooth. If the reading is zero (or the square sits identically), the blade is parallel. If not, note how much the deviation is and which direction.
- 3The target is less than 0.003 inches difference front to rear. Some woodworkers prefer 0.001–0.002 inches with the rear of the blade very slightly further from the slot (called “splayed out”) — this gives the back of the blade a tiny amount of clearance. It is never acceptable to have the rear of the blade closer to the slot than the front (called “toed in”) — that causes burning and kickback.
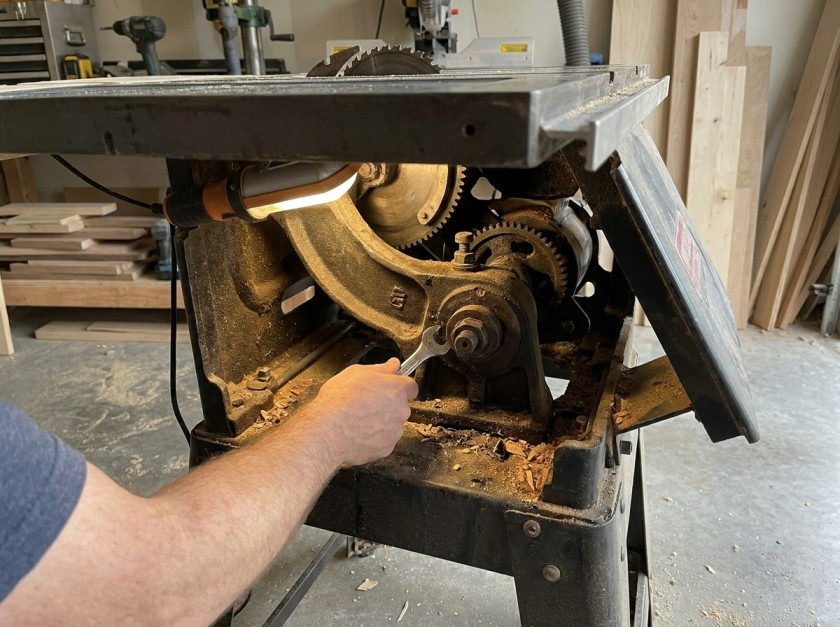
- 4If an adjustment is needed, consult your saw’s manual to locate the adjustment mechanism. On cabinet saws, you loosen the four table mounting bolts and shift the table top itself. On contractor and hybrid saws, you loosen the trunnion bolts and tap the trunnion sideways with a dead blow hammer. On jobsite saws, check your manual as some are not adjustable at all.
- 5Make small adjustments and recheck each time. Retighten the bolts and verify the measurement didn’t shift during tightening — it often does. This step can take 10–15 minutes of iterating.
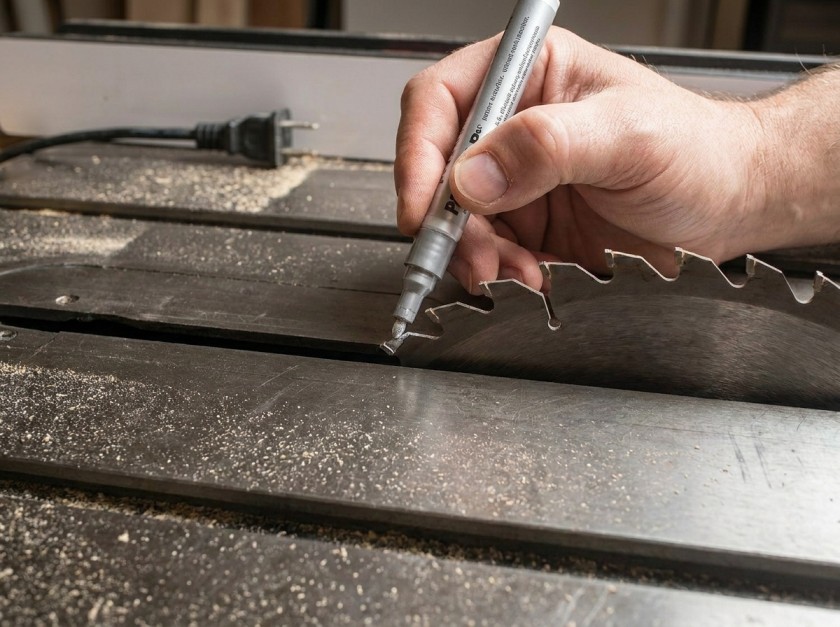
Mark one tooth clearly before you start — this lets you rotate the blade and always measure from the exact same reference point.
Step 2 — Fence Parallel to the Miter Slot (and Blade)
Once the blade is parallel to the slot, aligning the fence is simple — because the fence just needs to match the slot, and the slot is now parallel to the blade.
- 1Lock the fence at a convenient distance from the blade — 6 inches works well. Measure the distance from the miter slot to the fence face at the front of the saw.
- 2Slide to the rear and measure the same distance. The two readings should be equal.
- 3The fence should be either dead parallel or very slightly open at the rear — meaning the rear of the fence is 0.001–0.003 inches further from the slot than the front. Never set the fence so it toes in toward the blade at the rear.
- 4Most fences adjust via a cam or set screw on the front guide mechanism. Adjust, lock, and recheck. This usually takes just a few minutes.
Need a better fence entirely? See our roundup of the best table saw fences — an aftermarket fence upgrade is often the single biggest accuracy improvement you can make to a mid-range saw.
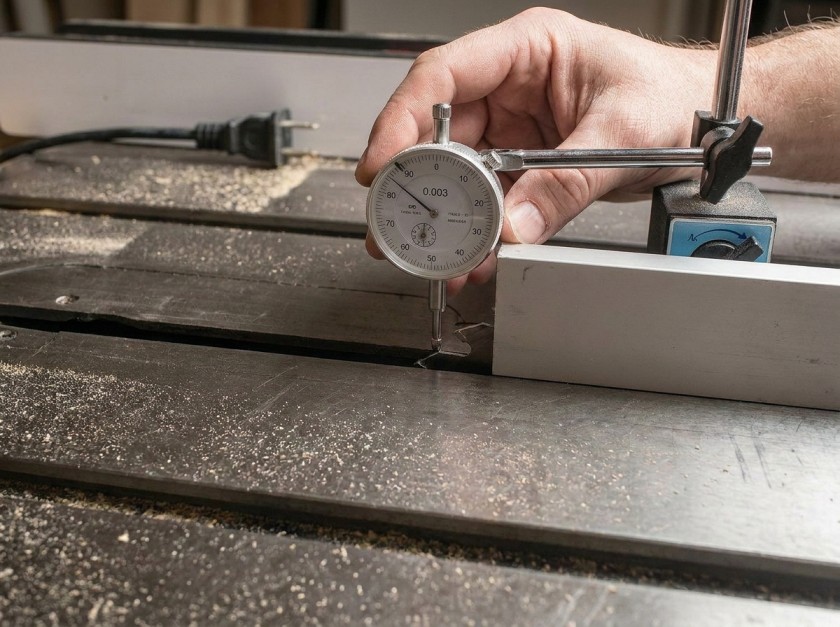
Checking fence alignment at both front and rear — the rear should be equal or a hair more open than the front reading.
Step 3 — Blade Square at 90°
With the blade parallel to the miter slot, now check the blade is perfectly vertical — 90° to the table surface. This is what governs whether your rip cuts come out square or slightly beveled.
- 1Set the bevel adjustment to 0° and lower the blade so about 1 inch of blade clears the table surface — less blade height means less flex when you push the square against it.
- 2Place a reliable square or digital angle gauge flat against the blade body (not the teeth) and check if it reads exactly 90°.
- 3If there’s any deviation, adjust the 90° bevel stop according to your saw’s manual. This is usually a small set screw that limits the blade travel at the vertical position.
- 4Make a test crosscut on scrap, then check the cut face with a square. The cut face should be perfectly vertical.
Step 4 — Blade Square at 45°
The 45° bevel stop is, in my experience, almost always slightly off from the factory — even on quality saws. Most people never check it. If you’ve ever cut miter joints that were close but didn’t close perfectly, this is likely why.
- 1Tilt the blade to the 45° position and place a digital angle gauge or drafting triangle against the blade face. Read the angle precisely.
- 2Adjust the 45° bevel stop screw until the blade reads exactly 45.0°. This is a separate screw from the 90° stop — consult your manual for its location.
- 3Verify by cutting two pieces of scrap at 45° and placing the cut faces together — they should form a perfect 90° angle with no gap.
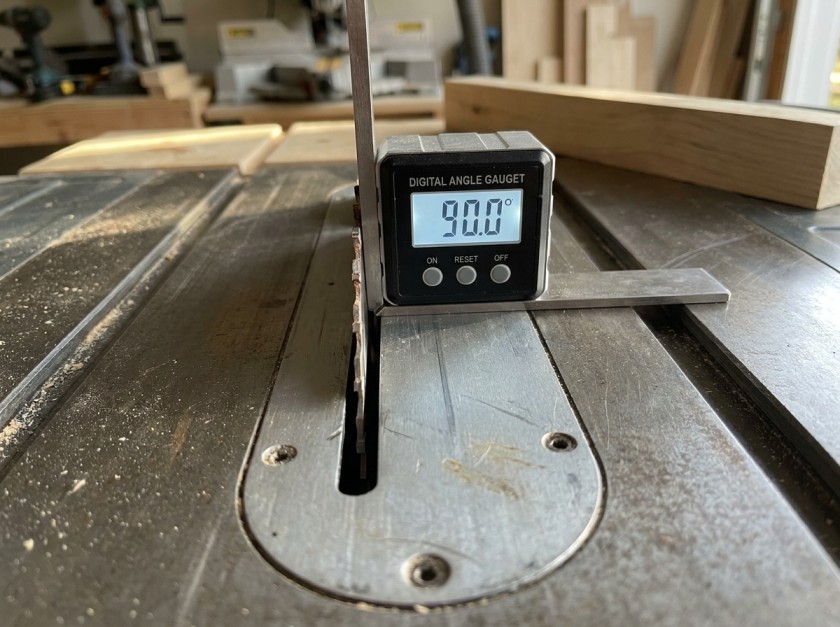
A digital angle gauge reads in tenths of a degree — far more reliable than a square alone for setting bevel stops precisely.
How It Differs by Saw Type
The alignment process is the same across all table saw types, but the physical adjustment mechanism is completely different depending on your saw. If you adjust the wrong part, at best nothing happens — at worst you make things worse.
Cabinet Saws
The trunnions are bolted directly to the heavy steel cabinet base. The table top sits on top and can be shifted relative to the cabinet. To align blade-to-miter-slot, you loosen the four table mounting bolts about half a turn, tap the table edge gently with a dead blow hammer in the needed direction, and retighten. The table itself moves; the blade assembly stays fixed. This is actually the easiest type to align because the adjustment is very controllable.
Looking to upgrade? See our full guide to the best cabinet table saws — these are easier to align and hold that alignment far longer than contractor or hybrid saws.
Contractor and Hybrid Saws
Here the trunnions are bolted to the underside of the table — so the table and the motor move together as one unit. To align the blade to the miter slot, you loosen the trunnion bolts and tap the trunnion sideways with a hammer and drift punch. This is trickier because the trunnion isn’t easy to get at and small taps can move it more than you expect. Some hybrid saws have accessible adjustment screws — check your manual before assuming you need a hammer.
Jobsite and Contractor Portable Saws
Many lighter portable saws have the arbor assembly attached to the table. On these saws, the blade is permanently aligned with the miter slots and there’s nothing to adjust. What CAN be out of alignment is the fence (always adjustable) and the bevel stops (usually adjustable). If you have a jobsite saw that cuts with a consistent drift, it’s almost certainly a fence alignment issue, not a blade issue.
On contractor and hybrid saws the trunnion bolts are under the table — you’ll need to reach under or tip the saw to access them.
Own a jobsite saw? Read our guide to the best portable table saws or our comparison of portable vs jobsite table saws to understand the trade-offs between these saw types.
When Does a Table Saw Need Realigning?
A lot of woodworkers over-think this. A cast iron cabinet saw that hasn’t been moved in three years almost certainly doesn’t need realigning. But there are specific events that can shift a saw out of alignment:
- Moving the saw. Even rolling it across the shop floor can be enough to shift alignment slightly on lighter contractor or jobsite saws. After any move, spend 5 minutes doing a quick check.
- Hard kickback events. A significant kickback puts a lot of force on the arbor and table. Afterwards, check your blade-to-miter-slot alignment before continuing.
- After replacing the blade or arbor. New components can have slightly different dimensions. Always verify after installing a new blade.
- When cuts start drifting or burning appears on one side only. These are the diagnostic signs. Don’t assume it’s operator error before checking alignment.
- When you first set up a saw. Factory alignment is often close but rarely perfect. Do a full alignment before your first real project cut.
- Annually, as a maintenance check. Even if nothing obvious has changed, a once-a-year 15-minute check keeps you from gradually developing drift you’ve learned to compensate for without realizing it.
Once you’ve done a full alignment and it’s right, it usually stays right. The only exception is jobsite saws that get transported frequently — those should be checked every time they’re set up at a new location.
Alignment is one part of saw maintenance. For the full routine — cleaning, waxing the table, checking the arbor, and more — see our complete guide to cleaning and maintaining a table saw.
FAQ — Table Saw Alignment
Always: (1) blade parallel to miter slot, (2) fence parallel to miter slot, (3) blade at 90°, (4) blade at 45°. The miter slot is the fixed reference everything else is measured against. If you align the fence before the blade, you’re building on a crooked foundation and will need to redo the fence after you fix the blade anyway.
No — a quality combination square and a marked tooth can get you within 0.005 inches, which is acceptable for most hobby woodworking. That said, a dial indicator gauge is genuinely easier and faster, and you can get a functional one for $25–$40. The improvement in speed and readability is worth the money if you’re doing this more than once or twice.
On a cabinet saw, the trunnion assembly is bolted to the base cabinet and the table top moves independently. To adjust, loosen the four table mounting bolts (typically in the corners, under the table) about half a turn. Gently tap the table edge with a dead blow hammer in the direction needed to close or widen the gap. Recheck, and tighten once the reading is correct. Always recheck after tightening — the table can shift slightly as the bolts seat.
Slightly open at the rear — meaning the rear of the fence is 0.001 to 0.003 inches further from the blade than the front. This tiny outward angle gives the wood a touch of clearance from the back of the blade as it exits the cut, which reduces burning and the risk of binding. The fence should never be toed in (rear closer to the blade than the front) — that’s the configuration that causes one-sided burning and kickback.
If the cut drifts away from the fence line, the blade is probably not parallel to the miter slot. The fence can be perfectly aligned to the slot, but if the slot isn’t parallel to the blade, your rip cuts will drift. Check blade-to-miter-slot alignment first. On some saws (especially older ones or saws that have been bumped), this is the only thing wrong.
A heavy cabinet saw that stays in one place typically only needs checking about once a year, unless issues start to appear. With a lighter contractor or hybrid saw used in a busy shop, inspecting it every 3–6 months makes sense. If you’re using a jobsite saw that gets moved often, check it each time you relocate it. The real trigger is any change in cut quality: drifting, burning on one side, or crosscuts that aren’t quite square.
It depends on your usage. If you have a serious shop and do full machine setups regularly — table saw, bandsaw, jointer — the Woodpeckers Saw Gauge is genuinely worth it. The self-adjusting pin system eliminates the biggest frustration with budget gauges (miter bar slop), and the fit-and-finish is excellent. If you’re a hobbyist who aligns your one table saw once a year, a $35 dial indicator gauge does the same job adequately for a quarter of the price.
Wrapping Up
Table saw alignment isn’t complicated once you understand the order and the logic. The miter slot is your fixed reference. The blade aligns to the slot first. The fence aligns to the slot second. The bevel stops are last. Everything else on the saw — your miter gauge, your crosscut sled, your fence measurements — is downstream from those four points being correct.
For most woodworkers, a $35 dial indicator gauge and a $20 digital angle gauge is all the tooling they’ll ever need. The free combination square method works too, just takes more patience. And the Woodpeckers system is genuinely excellent if you want the best and use it often enough to justify it.
If you’ve just gone through this process and found a badly misaligned saw that you couldn’t fully correct — especially if the trunnion adjustments are bottomed out with the blade still not reaching parallel — drop your saw model in the comments and I’ll help you figure out whether that’s what you’re dealing with.
Related Reading
If alignment fixed your issue — or you found a different underlying problem — these guides cover the next likely steps.

Finlay Connolly is a woodworking enthusiast and power tool specialist with over a decade of hands-on experience in the workshop. As the founder and lead writer at ProTableSawReviews.com, Finlay combines expert knowledge with real-world testing to help woodworkers, DIYers, and professionals choose the best tools for the job. With a sharp eye for detail and a passion for precision, Finlay is committed to providing trustworthy, practical advice backed by years of experience and research in the field. Whether you’re cutting dados or comparing fence systems, you can count on Finlay for honest, reliable reviews that make your next cut your best one.