Table Saw with Router Table: Complete Setup Guide from a Professional Workshop (2026)
The Complete Setup Guide for Small Shop Woodworkers
By Finlay Connolly | Updated 2026
Extension Wing Setup • Router Lifts • Fence Systems • Standalone vs. Integrated • Safety • Recommended Gear
What This Guide Actually Covers
Most articles on this topic treat a ‘table saw with router combo’ as if it’s a single product you buy off a shelf. It isn’t. What you’re actually deciding is whether to integrate a router table into your existing table saw setup — and if so, how to do it properly without creating a workflow nightmare or a safety problem.
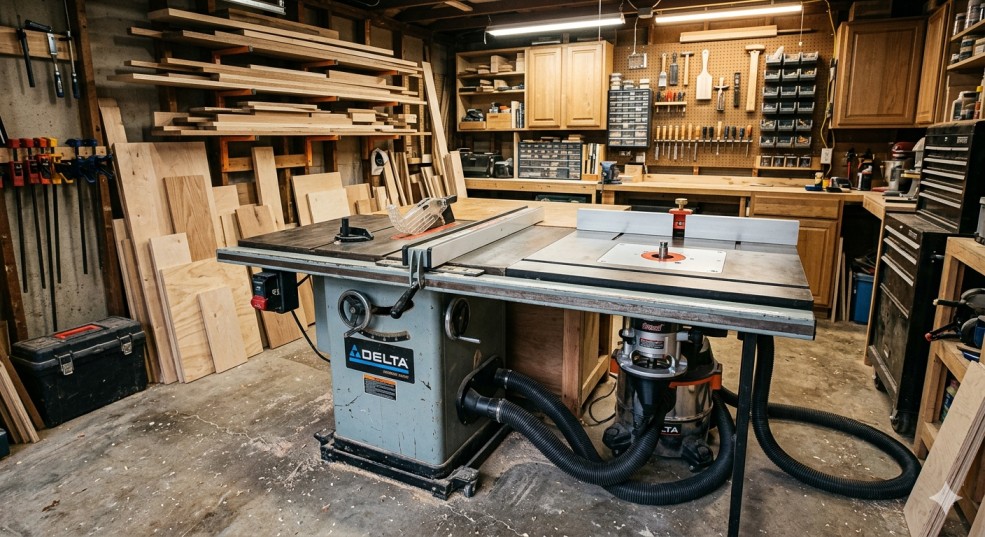
I’ve run a router table mounted in the right-side extension wing of my table saw for several years. Before that I had a standalone router table occupying floor space I didn’t have. The wing-mounted setup genuinely changed how I work — but only after I sorted out the fence situation, the dust collection, and the dangerous habit of reaching for the wrong switch. All of those problems are real and most guides skip them.
This article covers everything the topic actually requires: why the integrated approach works (and when it doesn’t), the four main setup configurations, the router lift options and which ones earn the price, the fence situation — which is more complicated than it looks — real safety issues that come up in practice, recommended products at each budget level, and how to set the whole thing up correctly from the start.
One thing this guide is not: a list of ‘router table saws’ as if they’re a product category with dedicated models. They aren’t. What exists are table saws, router tables, router lifts, extension wings, and fence systems — and the craft is knowing how to combine them intelligently.
Why Combine a Table Saw and Router Table?
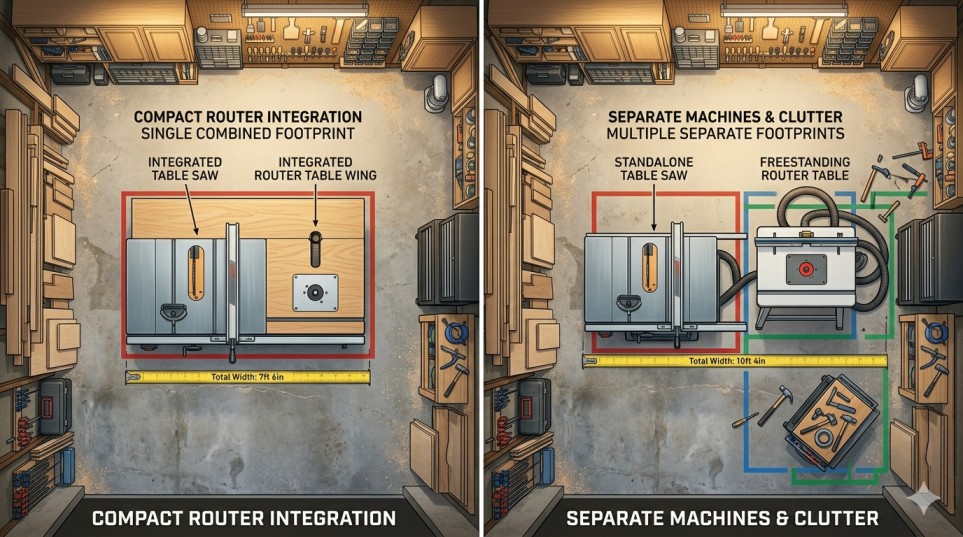
The practical case is straightforward: floor space and workflow efficiency. A cabinet saw with an extension wing router table takes up no more floor space than the saw alone. A standalone router table occupying its own footprint is typically 3 to 4 square feet you need to find somewhere in a workshop that probably doesn’t have it to spare.
Beyond the space argument, there’s a workflow argument. In furniture and cabinet work, you frequently move between ripping parts to width on the table saw and profiling edges on the router table. When both operations are on the same machine, you don’t walk across the shop between them. You don’t reset the outfeed roller stand. You don’t re-establish reference edges on a different surface. The transition between operations is a step rather than a journey.
The shared fence argument is real but comes with caveats I’ll cover in detail later. The short version: using your table saw’s T-square fence as a reference for router operations is genuinely useful when it works, and a workflow problem when it doesn’t.
When a Standalone Router Table Makes More Sense
- Your table saw is a jobsite saw or portable model — the wings aren’t deep enough to mount a router properly and the whole assembly moves too much
- You do router-heavy work (raised panel doors, complex moulding runs) where a dedicated router table fence and outfeed system makes more sense than a shared setup
- Your shop actually has the floor space and you want each tool optimized separately
- You’re sharing tools with others and the switch confusion risk isn’t worth it (covered in safety section)
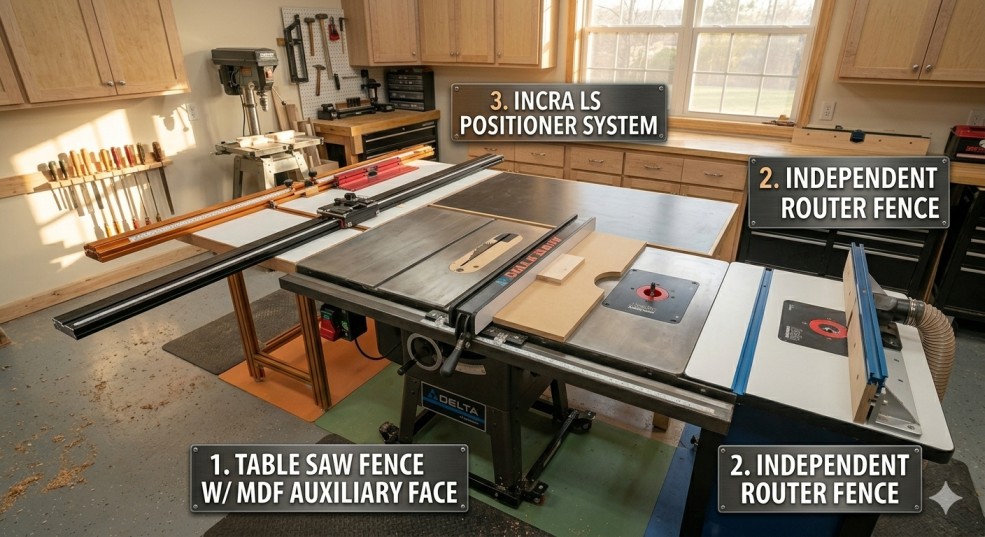
The Four Main Configurations
The combination of a table saw and router can take four distinct forms. Which one is right for you depends on your saw, your budget, and how much router work you do.
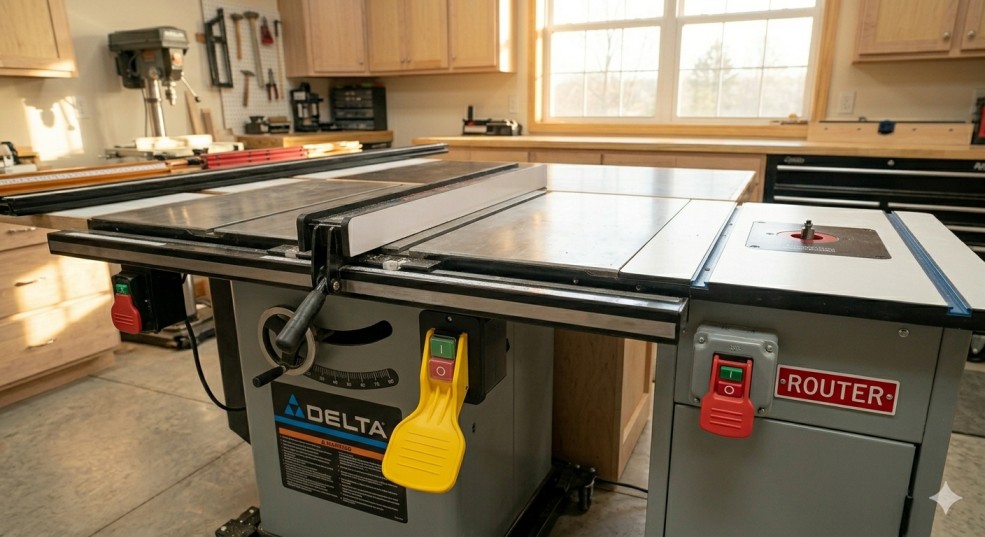
1. Extension Wing Replacement — The Best Integrated Setup
This is what most serious small-shop woodworkers end up with. You remove one of your table saw’s extension wings — typically the right side on a right-tilt saw, left side on left-tilt — and replace it with a router table top. The router mounts through an insert plate in that top, and the whole assembly sits flush with your table saw surface.
The result is a continuous work surface from your main saw table through the router area. You can share the table saw fence for basic router operations. The router’s weight actually adds stability to the saw. And the footprint is identical to a table saw with a standard extension wing.
The requirement: your table saw needs to have a cast iron or cast aluminum extension wing system with rails that support a wing replacement. Most contractor, hybrid, and cabinet saws qualify. Portable jobsite saws generally don’t — the wing attachment system isn’t robust enough and the saw moves during routing operations.
Best for: Hobbyist and semi-professional woodworkers with a stationary contractor, hybrid, or cabinet saw doing both ripping and router work regularly. This is the configuration this guide focuses on most heavily.
2. Outboard Router Table — Right of the Fence Rails
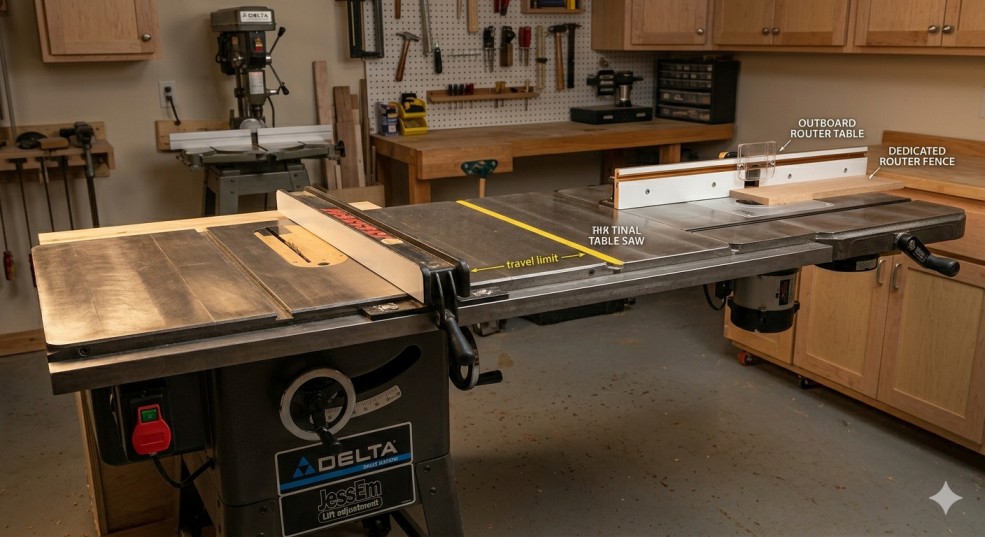
Rather than replacing an extension wing, you extend your fence rails to the right and mount a router table beyond the main fence travel. This gives you a completely separate fence for the router while keeping your extension wings intact.
The advantage is independence — your router fence and table saw fence never interfere with each other. The disadvantage is that you need longer fence rails (often a separate purchase) and the router table extends further right than a wing replacement, requiring more floor clearance on that side.
Best for: Woodworkers who do heavy router work and want a dedicated router fence setup, or those who have plenty of right-side clearance in their shop.
3. Shop-Built Router Table Cabinet — Under the Saw Extension
Some woodworkers build a router table cabinet that sits independently but is positioned tight against the right side of their table saw, creating a continuous surface. The router table has its own base, its own fence, and its own dust collection — but the combined footprint is similar to an integrated setup.
This approach requires building skill and time, but gives you the most control over the final setup. You can optimize the router table height independently of the saw, build in dedicated storage, and use whatever router lift plate system you want without worrying about compatibility with a specific extension wing.
4. Benchtop Router Table Alongside — The Budget Starting Point
A benchtop router table (Skil SRT1039, POWERTEC 71402, etc.) sitting on a workbench or its own stand next to the table saw. Not integrated, no shared surface, no shared fence — but it gets you operational quickly for under $200 and takes up minimal space when stored.
This is where most people start. It works well for occasional router use. The limitations become apparent when you’re doing production work — repositioning workpieces between the saw and the benchtop table, separate fence setups for each, and the constant stepping between stations gets old faster than you expect.
Honest assessment: If you’re buying your first router table, starting with a benchtop model is reasonable. But if you know router work is going to be a regular part of your process, budget for the extension wing setup from the start rather than buying a benchtop that you’ll outgrow.
What Your Table Saw Needs to Support a Router Wing
Before buying anything, verify your table saw can actually accept a router wing replacement. There are several requirements that aren’t always obvious.
Table Depth of at Least 27 Inches
The Bench Dog ProMAX — the most commonly recommended cast iron extension — requires a saw with a table at least 27 inches deep and 1-1/2 inches thick. Most contractor and cabinet saws meet this. Some older bench-top contractor hybrids don’t. Measure your actual table before ordering.
Extension Wing Mounting System Compatibility
The extension wing mounts via bolts to the table saw’s wing mounting holes. The challenge is that mounting hole patterns vary between manufacturers. Bench Dog publishes their ProMAX mounting hole pattern in their technical downloads — verify it matches at least three holes on your saw, or that you can drill additional holes if needed. Woodpeckers extension wings come in model-specific versions for common saws (SawStop, Powermatic, etc.) which eliminates the compatibility question.
Motor Clearance — Critical for Left-Side Installations

On right-tilt cabinet saws, the motor protrudes to the left. This means you cannot install a router wing on the left side without the motor being in the way. Install on the right side instead. On left-tilt cabinet saws, the reverse applies. Contractor saws usually have a motor that hangs off the back and don’t have this constraint, but check before assuming.
Fence Rail Length
If you’re using the table saw’s T-square fence for router operations, your fence rails need to extend far enough right to cover the router area. Many saws with 30-inch rip capacity have rails that extend to the right of the blade roughly 30 inches — enough to reach a right-side wing replacement. If your rails don’t extend far enough, you either use an independent router fence or purchase longer replacement rails.
Extension Wing Options — What to Actually Buy
Bench Dog ProMAX (40-102) — Cast Iron, ~$250

Router Table Fence System 40-120
Heavy-duty router table fence system designed for precise woodworking, smooth alignment, and stable control during routing operations.
- Precision fence alignment for accurate cuts
- Compatible with router lift systems
- Heavy-duty stable construction
- Ideal for professional woodworking setups
*As an Amazon Associate, we may earn from qualifying purchases.
The most widely recommended cast iron extension for the money. It includes a 28-inch ProFence, a miter gauge track, and dual fence slots so you can work from either side of the router. The cast iron top reduces vibration, adds stability to the saw, and stays flat. It mounts in place of the extension wing and shares the table saw fence rails.
The compatibility caveat: you need to verify the mounting hole pattern against your saw. The ProMAX also cannot be installed as a left extension replacement on left-tilt cabinet saws due to motor clearance — read the product notes carefully before ordering.
Woodpeckers Router Table Extension Wing — ~$400–$550
Model-specific versions for SawStop, Powermatic PM66/PM2000, Jet, Grizzly, and others. The advantage of going model-specific is guaranteed fit with no drilling, shimming, or guesswork. The Woodpeckers version also accommodates their own router plates and the Incra Wonder Fence if you want the positioner system. More expensive than the Bench Dog but the fit quality difference is meaningful on premium saws.
SawStop Router Wing — ~$300–$350

SawStop RT-TGP In-Line Router Table Assembly
Heavy-duty cast iron in-line router table designed for precision woodworking, smooth routing control, and professional stability when working on cabinet or contractor saw setups.
- 27″ x 16″ cast iron work surface
- Precision 27″ adjustable fence system
- Heavy-duty support legs for stability
- Compatible with professional SawStop saw systems
*As an Amazon Associate, we may earn from qualifying purchases.
If you have a SawStop, buy SawStop’s own router wing. It’s designed specifically for their saws, integrates cleanly with the SawStop fence system, and the fit is exact. SawStop users who’ve tried Bench Dog or third-party wings on their saws generally agree the SawStop wing is worth the price difference given how well it fits.
Shop-Built MDF/Phenolic Top — $30–$80 in Materials
A surprising number of experienced woodworkers build their own router table tops from 3/4-inch MDF or phenolic sheet material and mount a standard router lift plate in them. The cost is minimal, you can size it exactly to your saw’s rail system, and you can incorporate whatever router plate size you’re using. The downside is that MDF isn’t as flat or stable as cast iron over time in varying humidity environments — but for a climate-controlled shop it works well for years.
Router Lifts — The Component That Makes or Breaks the Setup
The router lift is the mechanism that holds your router motor below the table surface and allows you to adjust bit height from above the table. It’s the difference between a frustrating setup where you’re reaching under a hot motor to loosen a collet and one where you crank a handle from above and the bit rises precisely to where you need it.
There are three brands that dominate the serious end of this market: JessEm, Woodpeckers, and Incra (who sources their lift from JessEm with some modifications). Below these are budget options from Rockler and Kreg. The quality gap between tiers is significant and the community consensus on this is unusually consistent.
JessEm Mast-R-Lift II — ~$350
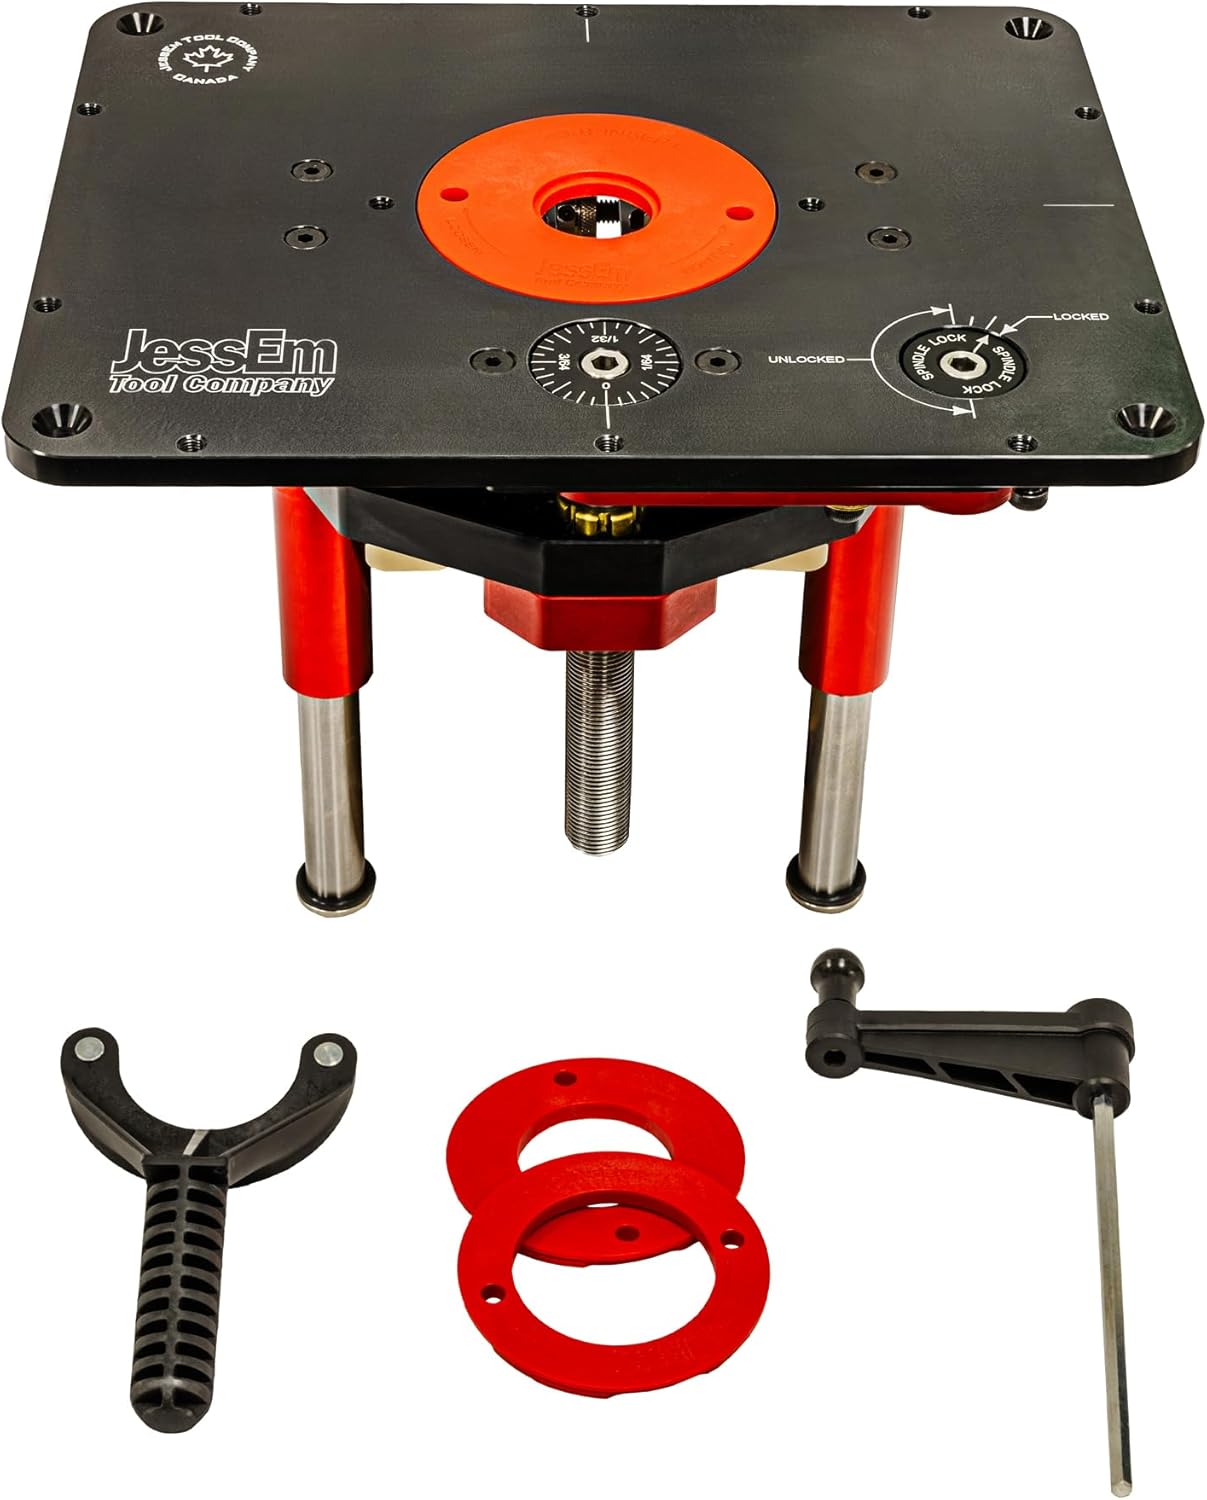
JessEm Mast-R-Lift II 02120 Router Lift
Professional-grade router lift designed for ultra-precise height adjustment, smooth operation, and heavy-duty woodworking performance in router table setups.
- Precision height adjustment with crank system
- Heavy-duty CNC machined aluminum plate
- Double sealed ball-bearing system
- Compatible with multiple router motors
*As an Amazon Associate, we may earn from qualifying purchases.
The most frequently recommended lift for a table saw extension wing installation. It accepts motors up to 4.2 inches in diameter (covers most fixed-base router motors including the Porter Cable 7518 and Milwaukee 5625), the anodized aluminum plate is flat and durable, and the lift mechanism is smooth and repeatable. The Incra version of this lift adds the MagnaLOCK reducing ring system which lets insert rings swap by hand rather than requiring tools — most users who’ve tried it consider it worth the extra $50 to $75 over the standard JessEm.
From the Sawmill Creek community: “I wouldn’t trade my Mast-R-Lift. It was easy to install, works well and the lifting mechanism is accurate and repeatable.” The consistent praise across forums over many years suggests the reputation is earned.
Woodpeckers PRL-V2 — ~$550–$700

Woodpeckers PRL-V2-420 Precision Router Lift
Professional-grade precision router lift designed for ultra-fine height adjustments, smooth operation, and high-accuracy woodworking in router table setups.
- Micro-height adjustment for precision routing
- Heavy-duty machined aluminum construction
- Stable locking system for zero movement
- Designed for professional router table use
*As an Amazon Associate, we may earn from qualifying purchases.
The premium option. Spring-loaded motor raise/lower and a thumb wheel for micro-adjustments are the standout features. The ball-bearing system minimizes slop for fractional-inch accuracy that matters on inlay work and precision moulding. The weakness others have noted is a nylon fine-adjust gear that can wear out — Woodpeckers covers this under their lifetime warranty but the return process involves shipping the whole lift, which is inconvenient. For most hobbyist and semi-professional setups, the JessEm is the better value. The Woodpeckers lift earns its price in production environments where precision and speed both matter.
Budget Lifts (Kreg, Rockler) — ~$100–$180
Functional but noticeably less precise than the JessEm or Woodpeckers. If you’re starting out and need to get operational before the budget allows a quality lift, these work. The micro-adjustment on budget lifts tends to have more backlash, bit height is less repeatable between sessions, and the plate flatness is less consistent. Plan to upgrade when the budget allows.
Router Motor Choice
The lift holds the motor — the motor you pair it with matters. For a table-mounted setup, a fixed-base motor rather than a full plunge router is the right choice. The Porter Cable 7518 (15 amp, variable speed) remains the community favorite after many years — it’s powerful enough for raised panel bits and large profile bits, fits the JessEm and most quality lifts, and the collet is reliable. Milwaukee 5625 is an alternative. Bosch 1617 and 1619 are popular in smaller setups. Avoid mounting a full plunge router in a table lift — the plunge mechanism adds unnecessary complexity and the base dimensions often don’t match lift compatibility specs.
Rule of thumb on router motor power: For profile work, edge shaping, and dadoes — a 2 HP motor is plenty. For large raised panel bits, crown moulding profiles, and heavy material removal — 3 HP is the right floor. Don’t underbuy the motor just to save money. Running a large bit on an underpowered motor produces chatter, burning, and poor results.
The Fence Situation — More Complicated Than It Looks
The fence is where most integrated setups either work elegantly or frustrate you constantly. There are three approaches, each with real trade-offs.
Sharing the Table Saw’s T-Square Fence
Using your table saw’s rip fence for router operations is attractive because it’s already there, already calibrated, and the measurement scale reads the same way for both operations. In practice it works well for straightforward edge profiling where you set the fence once and run a batch of parts.
The problems emerge in actual use. If your router is mounted to the right of the blade and you need to make a wide table saw rip cut, you may need to drop the router bit below the table to move the fence far enough right — losing your router setup. If you’re using an Incra positioner system that reads from a specific reference point, dropping and resetting precisely is harder than it sounds.
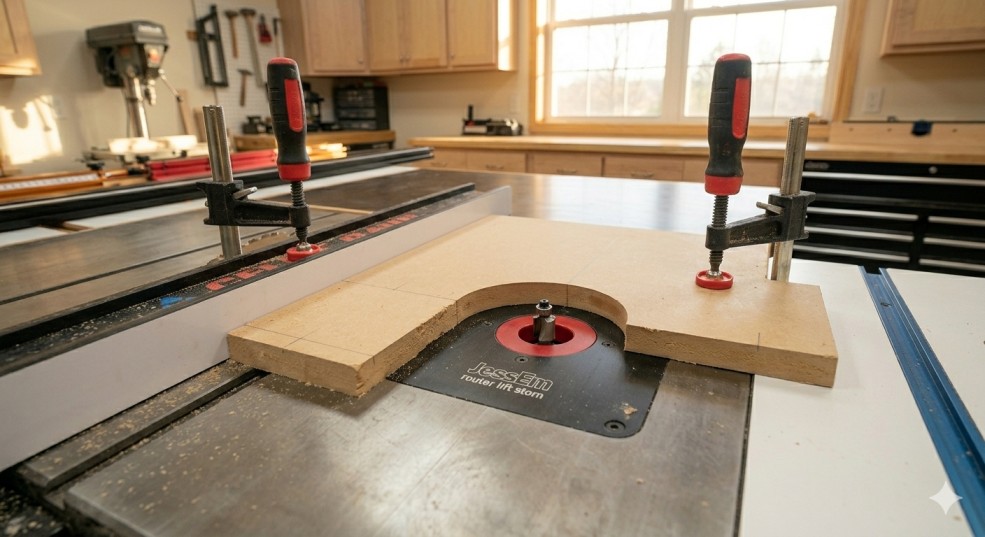
The table saw fence also doesn’t have a hole for the router bit — you need to make a slip-on auxiliary fence face with the appropriate cutout to allow the bit to spin. This is a straightforward shop project (MDF, 20 minutes) but it’s something guides consistently fail to mention.
Dedicated Router Fence on the Wing
A separate fence attached to the router table extension itself, independent of the table saw fence. The Bench Dog ProFence (included with the ProMAX) and the Woodpeckers fence are both good examples. You adjust the router fence independently of the saw fence, which means you never lose a table saw setup to do router work and vice versa.
The tradeoff: two fences to maintain, calibrate, and store. The fence face needs to be flush with or slightly behind the bit centerline for edge profiling, which is a different reference than a straight rip fence — understanding this distinction matters for clean results.
Incra LS Positioner System — ~$300–$500
The most precise approach but also the most expensive and the most setup-intensive. The Incra LS Positioner allows fence position to be set with exceptional repeatability — you can return to a previously established position within thousandths of an inch, which matters for production runs of identical parts.
The Woodpeckers community and SawStop router wing users who’ve set up the Incra system on their table saw extensions consistently praise it for the accuracy it brings to repeated operations. One user from the Festool community described it as enabling him to cut 12 raised panel doors in 72 minutes versus 2 hours previously.
For occasional router use, this is overkill. For anyone doing production cabinet work or running matched moulding profiles, it’s worth every dollar.
The switch confusion problem: This is real and it has genuinely hurt people. One Woodworking Talk user shared that early in their integrated setup, they reached under the table to turn the router on and instinctively triggered the table saw switch instead — with their hand near the partially raised blade. The lesson: table saw and router switches must be physically separated, visually distinct, and operationally clear. Never position them near each other. A dedicated router on/off paddle switch at the front of the extension wing, clearly different from the saw’s switch, is not optional — it’s a safety requirement.
Dust Collection for Integrated Setups
Routing generates a different type of waste than sawing — more fine dust, more of it airborne, and it comes from a different direction. A setup that handles table saw dust acceptably may not handle router dust well, and you need to address both.
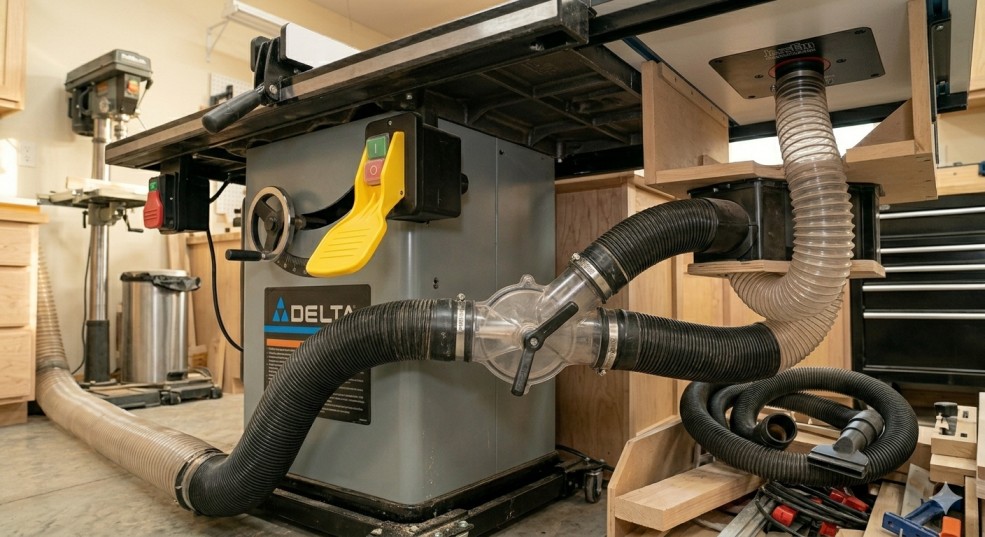
Below-Table Collection
Every router lift should have a dust port below the table that connects to your dust collector or shop vac. The router motor housing directs chips down and out through this port. Connect a dedicated hose with a blast gate so you can switch between saw dust collection and router dust collection without moving hoses. On a stationary saw with proper ducting, you can branch a single 4-inch line with a blast gate to each tool.
Above-Table Collection at the Fence
The router fence should include a dust port at the back that catches chips thrown forward and sideways by the bit. The Bench Dog ProFence and most quality router fences have this built in. If yours doesn’t, attaching a shop vac hose to the fence face with a purpose-built port is a straightforward shop modification. The combination of below-table and at-fence collection gets you to 80 to 85 percent capture — acceptable for a shop with overhead air filtration running simultaneously.
Above-Table Dust Hood
For operations where the bit is exposed above the fence (edge profiling without a fence, template routing), an overhead dust hood positioned close to the bit captures the remaining airborne fraction. These can be shop-made or purchased from suppliers like Woodpeckers. The incremental improvement in capture rate is meaningful if you’re doing extended routing sessions.
Router dust is different: Fine router dust is more hazardous than coarse saw chips. The particle size is smaller and stays airborne longer. If you’re going to run router operations for extended sessions, an overhead ambient air filtration system (not just point-of-source collection) is worth adding to the shop — a 1-micron filter unit in the $150 to $250 range captures what dust collection misses.
Recommended Setups by Budget and Situation
Setup A: Budget Integration (~$300–$400 Total Add-On Cost)
This gets you operational with reasonable results for occasional to moderate router use.
- Router table top: Bench Dog ProMAX 40-102 (~$250) — cast iron, proven compatibility across most contractor and cabinet saws
- Router lift: Kreg Precision Router Table Lift (~$130) or JessEm Rout-R-Lift II (~$180) — functional starting point
- Router motor: Bosch 1617 fixed-base motor (~$100–$130) if you don’t already own one
- Fence: Use the included Bench Dog ProFence for router operations, keep table saw fence for table saw cuts
- Dust: Shop vac hose to router fence port; connect to below-table port if your lift has one
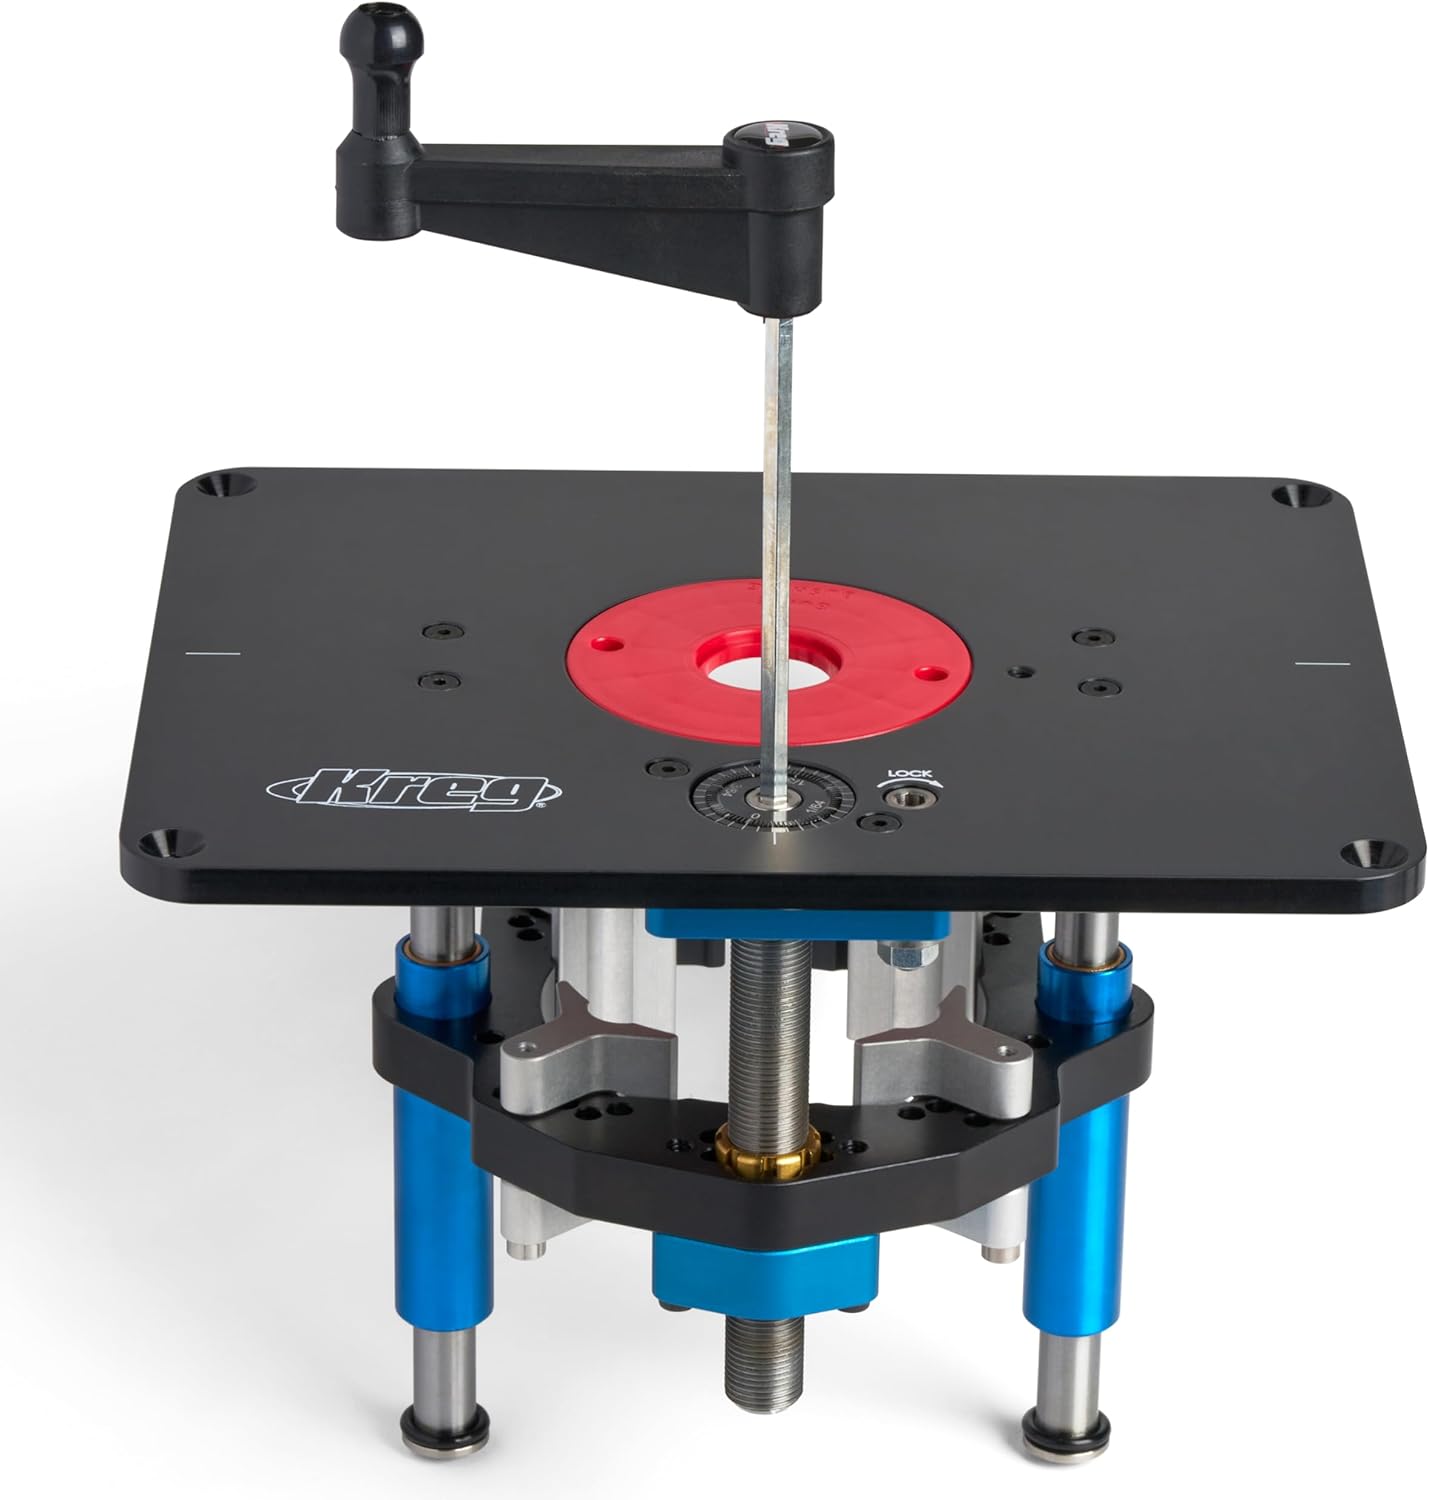
Kreg PRS5000 Precision Router Lift
High-precision router lift designed for smooth above-table adjustments, ultra-accurate bit height control, and professional woodworking performance.
- Micro-adjust height control for precision routing
- Compatible with 20+ router models
- Above-table bit changes for convenience
- Heavy-duty aluminum plate construction
*As an Amazon Associate, we may earn from qualifying purchases.
Upgrade path: When budget allows, swap the budget lift for a JessEm Mast-R-Lift II with Incra MagnaLOCK rings. This is the single upgrade that makes the biggest quality-of-life difference in day-to-day use.
Setup B: Mid-Range Integration (~$600–$900 Total Add-On Cost)
The configuration most experienced small-shop woodworkers end up with after a few years. Capable of production-level router work.
- Router table top: Woodpeckers saw-specific extension wing (~$400–$550) or Bench Dog ProMAX with shimmed fit
- Router lift: JessEm Mast-R-Lift II with Incra MagnaLOCK rings (~$350–$400)
- Router motor: Porter Cable 7518 fixed-base motor (~$280) or Milwaukee 5625 (~$250)
- Fence: Dedicated router fence on the extension + table saw fence for saw operations independently
- Dust: Dedicated 4″ line from dust collector with blast gate at router wing; second connection at router fence face
Setup C: Premium Integration (~$1,200–$2,000+ Add-On Cost)
For cabinet makers, furniture builders, and anyone doing production router work where repeatability and speed are worth paying for.
- Router table top: SawStop Router Wing (SawStop owners) or Woodpeckers model-specific extension (~$400–$550)
- Router lift: JessEm Excel II package with integrated table and fence (~$700–$1,500) or Woodpeckers PRL-V2 (~$550–$700)
- Router motor: Porter Cable 7518 or 7519 motor unit — 15 amp variable speed (~$280–$320)
- Fence system: Incra LS Positioner with Wonder Fence (~$300–$500)
- Dust: Dedicated 4″ branch line from central dust collector with blast gate; Woodpeckers dust box at router table
Benchtop Router Tables — The Starting Point Option
If you’re not ready for the extension wing commitment — whether due to having a portable table saw, limited budget, or uncertainty about how much router work you’ll actually do — benchtop router tables are a legitimate starting point.
Skil RT1323-01 Router Table and Router Kit — ~$200
10-amp, 2.0 HP motor and router table in one package. Setup takes about 15 minutes. Quick-change bit system is convenient. The table surface is modest in size and the fence system isn’t precision-grade, but for learning router techniques and occasional edge profiling, it gets the job done. Dust collection needs improvement over the stock setup.

SKIL RT1323-01 Router Table & 10 Amp Router Kit
All-in-one router table and 10-amp fixed base router combo designed for smooth, precise, and powerful woodworking performance—ideal for beginners and DIY workshops.
- 10 Amp powerful motor for smooth cutting
- Integrated router table for stability & precision
- Above-table adjustment for easy control
- Featherboards & safety accessories included
*As an Amazon Associate, we may earn from qualifying purchases.
POWERTEC 71402 Benchtop Router Table — ~$130 (table only)
The 24×16-inch laminated MDF top is flat and large enough for most hobby work. The 2.5-inch dust port handles chips reasonably with a shop vac connected. Add your own router with a compatible plate insert — this approach lets you use a quality router you may already own rather than a bundled motor. The fence system is adjustable and adequate for standard work.
Skil SRT1039 Portable Router Table — ~$150
Above-table router lift for quick bit access is the standout feature here — changing bits without reaching under the table is a real convenience improvement over basic designs. Dual-sided bit storage is a thoughtful detail. The aluminum fence at 24 inches wide handles taller stock well. Compact and portable — stores on a shelf when not in use. A reasonable choice for a hobbyist who needs router capability without committing to a permanent extension wing setup.
Setting Up a Router Wing Extension — Step by Step
This covers the extension wing replacement approach (Setup A or B above) on a standard contractor or cabinet saw.
Step 1: Verify Fit Before Buying
Before ordering a router table wing, measure your saw’s table depth (front to back) and confirm it’s at least 27 inches. Download the mounting hole pattern for the Bench Dog ProMAX or your chosen wing and compare it to your saw’s extension wing bolt pattern. Confirm motor clearance on the installation side.
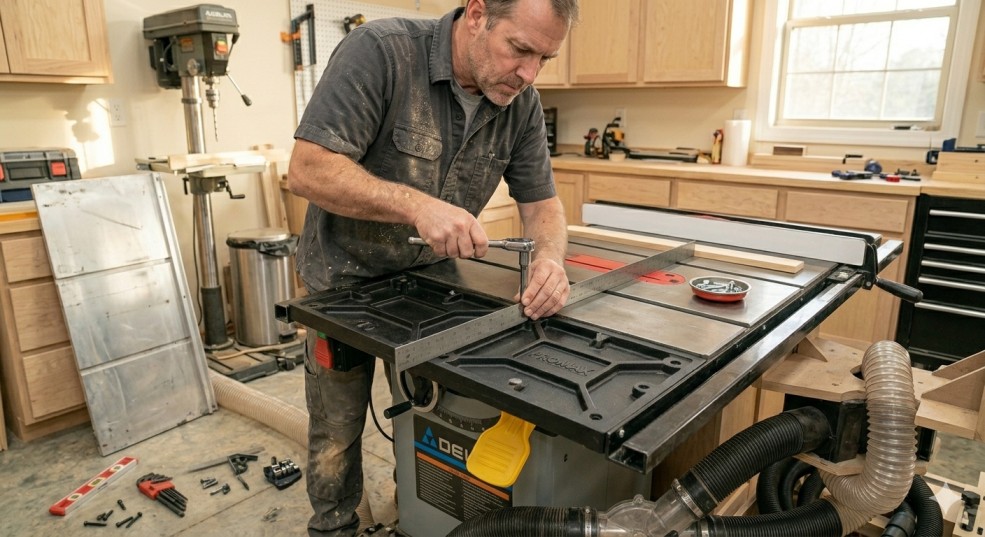
Step 2: Remove the Existing Extension Wing
Disconnect any auxiliary fence pieces or outfeed supports attached to the wing. Remove the bolts holding the wing to the table (typically 4 to 6 bolts). Lift the wing off. Keep the bolts — the replacement wing typically uses the same hardware.
Step 3: Install the Router Wing
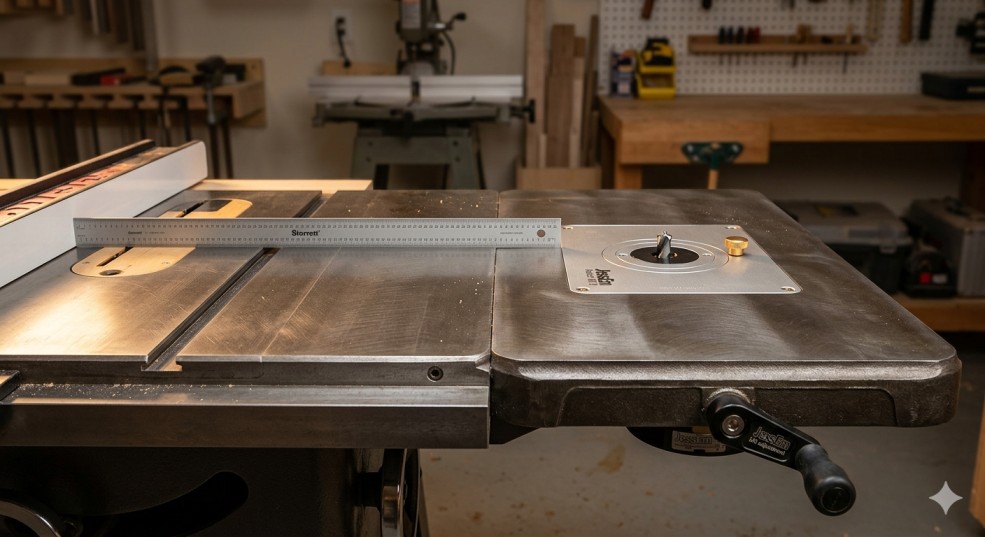
Position the new router table top against the table. Thread the mounting bolts loosely — don’t tighten yet. Check that the router table surface is flush with the main table surface using a straightedge across both. If it’s high or low, shim accordingly (thin aluminum or steel shim stock between the wing and the table). Once flush, tighten the bolts evenly.
Critical alignment step: The router table must be dead flush with the main saw table. A step up or down at the joint creates a catch point that pulls workpieces as they cross from table to wing or vice versa. Take the time to get this right — it’s the most important setup step in the whole process.
Step 4: Install the Router Lift and Motor
Drop the router lift plate into the router table insert opening. Verify it sits flush with the table surface — adjust the leveling screws on the plate if the lift comes with them. Mount the router motor in the lift according to the lift manufacturer’s instructions. Connect dust collection to the below-table port if your lift has one.
Step 5: Set Up the Fence
If using a dedicated router fence on the wing: mount it per the fence instructions, verify it’s parallel to the miter slot (use a dial indicator or precision square), and connect dust collection to the fence port. If sharing the table saw fence: make an auxiliary fence face from MDF with a cutout positioned over the router bit location, and attach it to the table saw fence body with clamps or T-bolts.
Step 6: Electrical — Do This Right
Install a dedicated on/off switch for the router that is physically separate from the table saw switch. Mounting a paddle-style power strip on the front face of the router wing extension — clearly labeled, visually distinct from the saw’s switch — is the standard approach. The cord should route cleanly away from the blade area. Never run the router’s power cord where it crosses the table saw blade path.
Step 7: Initial Calibration
Install a straight bit in the router. Set the fence parallel to the miter slot — use a dial indicator to verify within 0.005 inches. Check that the bit is centered in the fence opening. Run a test profile on scrap — verify the depth is consistent edge to edge. Adjust the router lift until the bit height produces the correct profile depth. Document this setting for future reference.
Safety — The Things That Actually Matter
Router tables are involved in a meaningful number of workshop injuries, and integrated setups add some specific risks that standalone setups don’t have. Here’s what actually matters.
Switch Separation — Non-Negotiable
As noted earlier, the table saw and router must have clearly separated, visually distinct switches that cannot be confused under any circumstances. If a woodworker with years of experience reached for the router switch and hit the table saw instead, a beginner in a hurry absolutely will. This is a design requirement, not a preference.
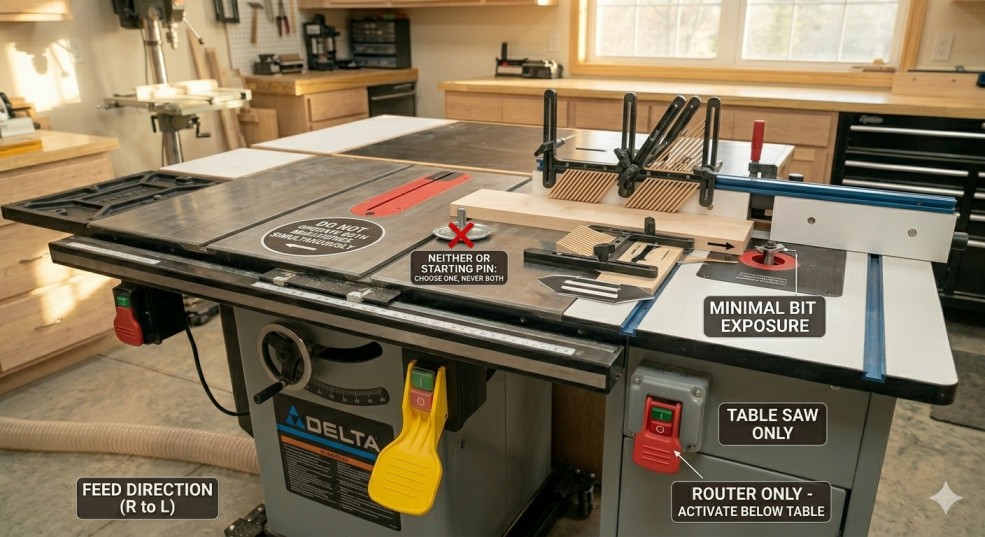
Router Bit Height Above Table — Keep It Minimal
Expose only as much bit as the cut requires. A raised panel bit with 1-1/2 inches of cutting height exposed and no material in contact is a serious hazard. Set bit height for the cut, run the batch, lower the bit. Leaving a large bit exposed while doing other operations at the saw is bad practice.
Never Use a Fence and a Starting Pin Simultaneously
A starting pin (a small post used to support the workpiece when feeding into an unfenced router bit) and a fence are two different approaches to controlling workpiece position. Using both simultaneously creates a pinch point. Choose one approach per operation.
Feed Direction Matters
For most router table operations, feed from right to left when facing the fence — this feeds into the bit rotation rather than with it. Climb cutting (feeding in the opposite direction) can grab the workpiece and throw it. There are specific situations where a light climb cut is appropriate for tearout reduction, but they’re the exception and require controlled technique.
Featherboards for Production Runs
When running a batch of identical parts, featherboards hold the workpiece against the fence consistently and prevent the workpiece from drifting mid-cut. Most router table fences include T-tracks for featherboard attachment. Use them. The consistency benefit alone justifies the setup time, and they prevent the workpiece from pulling away from the fence if you hesitate mid-cut.
Router Bit Selection and Speed
Large-diameter bits (raised panel bits, large cove bits) must be run at lower RPM than small bits. A 3-1/2-inch raised panel bit running at 22,000 RPM has a rim speed that creates a genuine projectile risk if the bit or collet fails. Variable speed routers with a speed guide are essential for large bit work. General rule: bits under 1 inch — 22,000 to 24,000 RPM; bits 1 to 2 inches — 18,000 to 22,000 RPM; bits 2 to 3 inches — 12,000 to 16,000 RPM; bits over 3 inches — 8,000 to 12,000 RPM.
Mistakes That Cause Problems
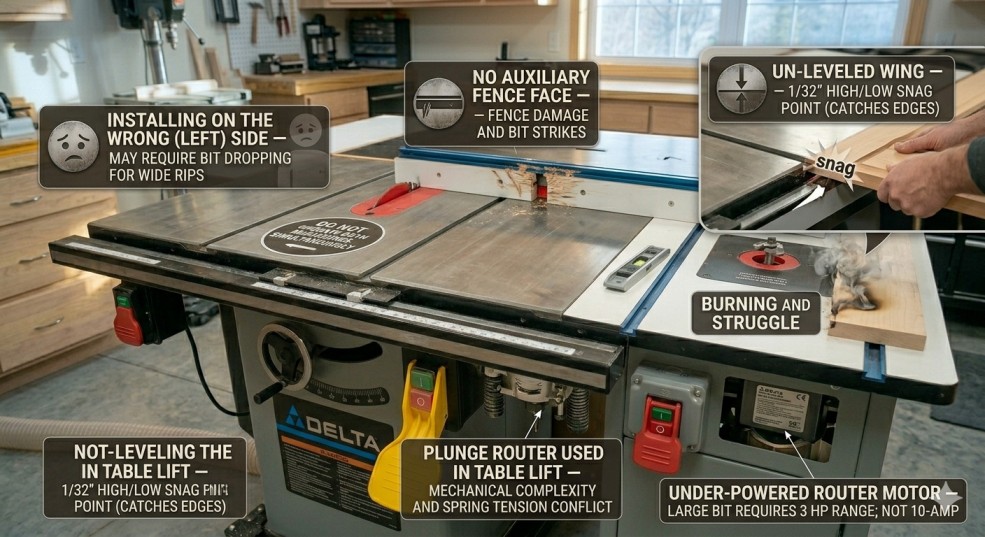
Installing on the Wrong Side of the Saw
On a right-tilt saw, router on the right means you don’t have to lower the table saw blade to use the router fence — the blade is to the left of the router and doesn’t interfere. Router on the left of the blade means whenever you need to move the fence far right for a wide rip cut, you may need to drop the router bit first. Many users who installed on the left side regret it.
Sharing the Fence Without an Auxiliary Face
The table saw fence doesn’t have an opening for the router bit. Running a router operation with the table saw fence flush against the bit results in the fence face being cut or the bit hitting the metal fence. Always use an auxiliary MDF fence face with the appropriate slot or opening positioned over the bit when sharing the table saw fence.
Not Leveling the Extension Wing Flush
A router wing that’s even 1/32-inch high or low at the joint with the main table creates a snag point that catches workpiece edges. The first time you’re feeding a door stile across the joint and it catches, you’ll wish you’d spent the extra ten minutes shimming it properly.
Running a Plunge Router in a Table Lift
Plunge routers have spring-loaded columns that want to extend upward when not locked. Mounting a plunge router inverted in a table lift fights this spring tension and the plunge mechanism adds mechanical complexity to bit height adjustment. Fixed-base motors are the correct choice for table mounting. If you only own a plunge router and can’t currently buy a dedicated table motor, lock the plunge columns fully before mounting — but plan to replace it with a fixed-base motor.
Under-Powering for Large Bits
A 10-amp benchtop router running a large raised panel bit is going to struggle, burn wood, and produce poor results. Large bits need motors in the 3 HP range. If your router table work involves doors, moulding profiles, and large architectural details — the motor choice matters as much as the table and lift.
Frequently Asked Questions
Can I use any router in a router table extension?
No. The router needs a fixed base (not plunge, or plunge with a separate fixed base) and the base diameter needs to match the router lift’s clamp system. JessEm and Woodpeckers lifts accommodate most motors up to about 4.2 inches diameter — check the specific lift’s motor compatibility list before buying. Porter Cable 7518, Milwaukee 5625, Bosch 1617 and 1619, and Makita RP2301FC are all commonly compatible with quality lifts. The router also needs variable speed for safe operation with large bits.
Do I need a router table if I already have a table saw?
They do different things. A table saw rips and crosscuts. A router table profiles edges, cuts dadoes and rabbets, creates mouldings, makes raised panels, and handles joinery like box joints and dovetails with appropriate jigs. If your work is primarily structural — framing, cases, simple furniture — you can do much of the router table’s work with hand tools and the table saw. If you’re building cabinet doors, moulded furniture, or anything with shaped profiles, a router table changes what’s possible.
Which side of the table saw should the router go on?
Right side on a right-tilt saw, left side on a left-tilt saw — meaning on the opposite side from where the motor protrudes. Beyond that, right side of the blade (with the blade to the left of the router) means you can use the full table saw fence travel without the router interfering. Most experienced woodworkers who’ve tried both prefer router-right-of-blade on right-tilt saws.
Can I share the table saw fence for routing?
Yes, with qualifications. You need an auxiliary fence face with a bit opening to attach to the table saw fence for router operations. Sharing works well for batches of identical parts where you set the fence once and run the parts through. It becomes annoying when you frequently switch between table saw and router operations in the same session, because moving the fence far right for a wide rip cut requires dropping the router bit first. A dedicated router fence on the extension eliminates this friction.
How flat does the router table top need to be?
Flat enough that a workpiece doesn’t rock when placed on it. Cast iron surfaces are typically ground to within 0.005 to 0.010 inches across the full surface — more than adequate. MDF surfaces can be flat at time of construction but change with humidity. For a climate-controlled shop, MDF works. For an unheated garage workshop with seasonal humidity swings, cast iron or phenolic is worth the investment.
Do I need a router lift or can I mount the router directly?
You can mount a router directly in a fixed plate without a lift mechanism. The result is that every bit height adjustment requires reaching under the table to loosen the router’s depth adjustment, changing the setting, and re-tightening. On a new bit installation this is manageable. During a session where you’re making multiple height passes or frequently changing bits, it’s slow and frustrating enough that most woodworkers who start without a lift end up buying one within a year. Buy the lift first if budget allows.
What’s the best router for table use in 2026?
For a fixed table installation: the Porter Cable 7518 (15-amp, variable speed, widely available) remains the community standard after many years. The Milwaukee 5625 is an alternative with a strong following. For a smaller, lighter setup: the Bosch 1617 is capable and well-suited to a 2-1/4 HP application. For a premium setup with above-table speed control: the JessEm Excel II lift package includes a compatible motor unit. What to avoid: budget router combos sold with entry-level tables — the motor quality rarely matches what you’d want for sustained production use.
Final Thoughts
The integrated table saw and router table setup is one of the highest-leverage changes you can make to a small shop. It takes two tools that individually feel like they’re fighting for floor space and turns them into a continuous workflow station that makes both better.
The extension wing approach — a cast iron router table top replacing one extension wing, a quality router lift, and thoughtful fence and dust collection setup — is what I’d recommend to any woodworker with a stationary contractor, hybrid, or cabinet saw who does any meaningful amount of router work. The Bench Dog ProMAX entry point at around $250 for the wing plus $350 for a JessEm Mast-R-Lift II is the budget at which the setup becomes genuinely productive rather than just functional.
The things most people underestimate going in: the fence situation takes more thought than expected, the switch separation safety requirement is non-negotiable, and the dust collection for router operations needs to be addressed separately from the table saw’s existing dust collection. Sort all three from the start and the setup works well for years.
Start here: Bench Dog ProMAX 40-102 wing + JessEm Mast-R-Lift II with Incra MagnaLOCK rings + Porter Cable 7518 motor + dedicated router fence + separate router power switch. That’s the setup that makes sense for most small-shop woodworkers, and the configuration I’d build again if starting over.
Finlay Connolly is a woodworking enthusiast and power tool specialist with over a decade of hands-on experience in the workshop. As the founder and lead writer at ProTableSawReviews.com, Finlay combines expert knowledge with real-world testing to help woodworkers, DIYers, and professionals choose the best tools for the job. With a sharp eye for detail and a passion for precision, Finlay is committed to providing trustworthy, practical advice backed by years of experience and research in the field. Whether you’re cutting dados or comparing fence systems, you can count on Finlay for honest, reliable reviews that make your next cut your best one.