
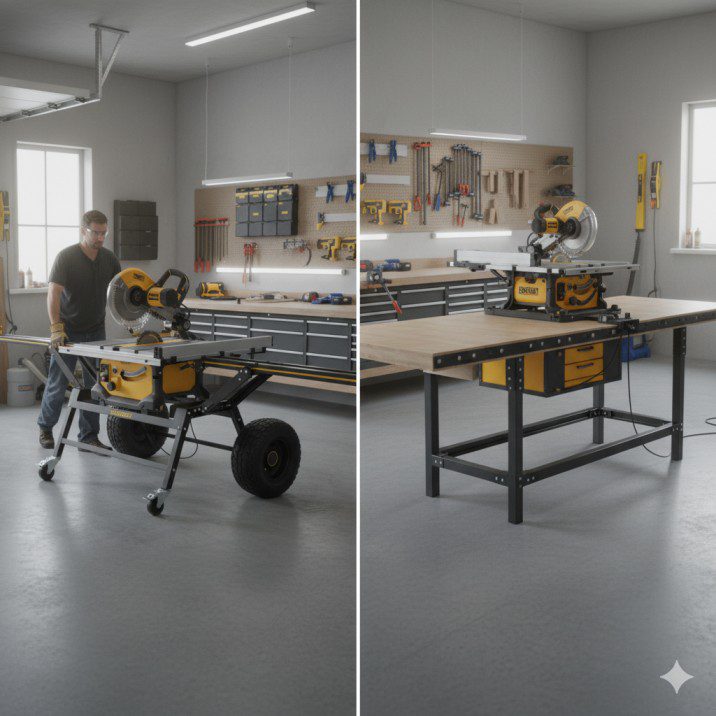
I still remember the day I nearly dropped my contractor saw while moving it across the shop floor. My back was screaming, sweat was dripping into my eyes, and I was cursing myself for not investing in a proper table saw stand years earlier. That moment changed everything about how I approach workshop mobility and organization.
After a decade of working with virtually every type of portable and stationary saw setup imaginable, I’ve learned that your stand choice matters just as much as the saw itself. A quality stand transforms a stationary beast into a mobile workstation, turns cramped spaces into efficient workshops, and saves your body from unnecessary strain. Yet I’ve watched countless woodworkers—both beginners and seasoned pros—struggle with wobbly, inadequate stands that compromise their work quality and safety.
The table saw stand landscape has evolved dramatically over recent years. What once meant choosing between a flimsy folding contraption or building your own from scratch now includes sophisticated rolling systems, precision-engineered supports, and hybrid designs that blend portability with rock-solid stability. In 2025, the options are better than ever, but that also means the decision is more complex.
In this comprehensive guide, I’ll walk you through everything I’ve learned about selecting, using, and maximizing table saw stands. Whether you’re setting up your first workshop, upgrading your mobile setup, or finally addressing that back pain from lugging equipment around, this guide will help you make the right choice. No marketing fluff—just honest insights from someone who’s actually used these tools day in and day out
What Is a Table Saw Stand and Why Do You Need One?
A table saw stand serves as the foundation and support system for your table saw, elevating it to a comfortable working height while providing stability during operation. Think of it as the chassis of a car—it’s not the engine, but without a solid chassis, even the most powerful engine is useless.
The Real Purpose Beyond Just Holding Your Saw
When I first started woodworking professionally, I made the mistake of thinking a stand was just a “nice-to-have” accessory. I bolted my jobsite saw to a makeshift plywood table and figured I was set. Three months and several ruined cuts later, I understood why experienced woodworkers invest in proper stands.
A quality table saw stand model does four critical things:
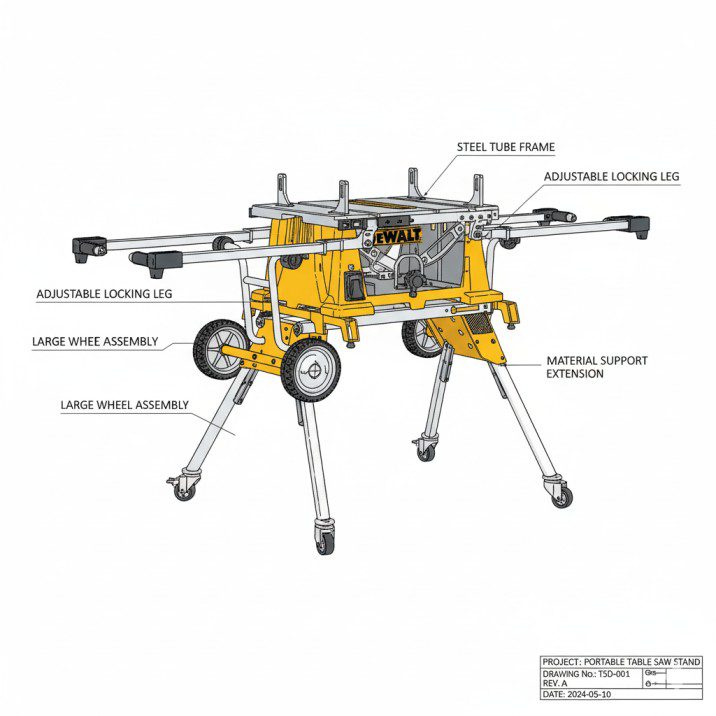
Stability during operation – Your saw vibrates, especially when ripping thick hardwoods or making dado cuts. A proper stand absorbs and dampens these vibrations, keeping your workpiece tracking true through the blade.
Ergonomic working height – Most stands position the saw table between 34-36 inches off the ground. This height reduces back strain during extended sessions and allows you to see your cut line clearly without hunching over.
Portability when needed – Even if you have a dedicated workshop, you’ll eventually need to move equipment for maintenance, reorganization, or taking work to a job site. A good stand makes this possible without requiring a forklift and three buddies.
Extended work support – Many modern stands incorporate extensions or attachment points for outfeed tables and side supports, turning your basic saw into a complete cutting station.
When You Absolutely Need a Dedicated Stand
Not every situation demands a specialized stand. If you’re mounting a cabinet saw in a permanent location with a concrete floor and dedicated outfeed table, you might skip the stand entirely. But most of us need the flexibility a stand provides.
You definitely need a dedicated stand if you’re working with portable or jobsite saws, operate in a garage that doubles as living space, take your equipment to job sites, or have a small workshop where every square foot counts. I’ve also found stands invaluable when teaching woodworking classes—being able to reconfigure the workspace quickly between students is worth its weight in gold.
Types of Table Saw Stands Explained
The table saw stand market has matured significantly, and today’s options break down into several distinct categories. Each type serves specific needs, and understanding these differences will save you from buyer’s remorse.
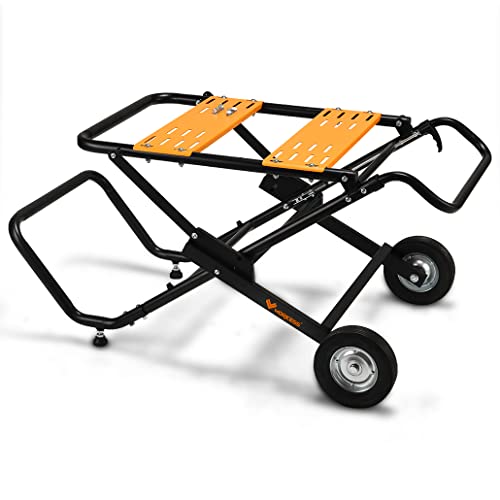
Rolling Stands: Mobility Meets Functionality
WORKESS Portable Table Saw Stand, 330 Lbs Load Capacity Rolling Foldable Table Saw Table with 8 Inch Wheels, Heavy Duty Construction for Easy Storage, Universal for Most Brands of Table Saws
- 【WORK ANYWHERE, ANYTIME】This is an essential feature for a professional craftsman that you may need to carry the table saw to the work site at anytime. We designed the non-slip 8 inch rubber wheels to make it as easy and relaxing as traveling when carrying the table saw.
- 【STURDY AND STABLE ENOUGH】The heavy-duty steel structure and sturdy connection fittings form a very stable frame that is so well balanced that you can completely ignore the table saw stand when you are cutting large woods because its rock-solid stability will not let you perceive the shaking.
- 【THE BEST CHOICE FOR MINI WORKSHOP】WORKESS foldable table saw has a compact structure. We also designed a convenient full folding system. lmagine how pleasant it is to put a professional table saw stand into a small space. In fact, you can do it by just pulling the release pin lever.
New starting from: 149.99
Go to AmazonRolling stands feature wheels (usually four) that allow you to move your saw around the workshop or transport it to job sites. I use a DEWALT rolling stand for my jobsite saw, and it’s been a game-changer for both on-site work and shop reorganization.
✅ Best for: Contractors, mobile woodworkers, multi-purpose garage workshops
✅ Typical weight capacity: 200-330 pounds
✅ Setup time: 2-5 minutes
The key advantage is versatility. When I’m working on cabinet installations, I roll my saw right up to the work area, make my cuts, and move on. Back in the shop, I can position it wherever I need maximum space for assembly work.
However, rolling stands demand attention to wheel quality. Cheap plastic wheels bog down on uneven surfaces and can develop flat spots. Look for pneumatic or heavy-duty rubber wheels with at least 8-inch diameter for job sites, or solid rubber wheels for smooth shop floors.
Folding Stands: Compact Storage Champions
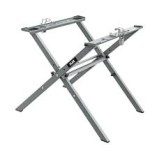
Folding stands collapse down for storage and transport but sacrifice some rigidity compared to other types. I’ll be honest—I’ve had a love-hate relationship with folding stands over the years.
The best folding stands use robust tube steel construction with positive locking mechanisms at every joint. Budget models with too many pivot points tend to develop play over time, which translates to micro-movements during cutting that affect accuracy.
🛠 Where folding stands excel: Weekend warriors with limited storage, woodworkers who keep their saw in a vehicle, anyone working in shared spaces where equipment must be cleared daily.
Stationary/Fixed Stands: Maximum Stability
These stands don’t move once positioned. They’re typically heavier, feature more substantial construction, and provide the most stable platform possible. Some include leveling feet to compensate for uneven floors—a feature I consider essential after dealing with a sloped garage floor for two years.
Fixed stands work beautifully for dedicated workshops where you’ve optimized your workflow around permanent equipment placement. If you’re investing in quality table saw accessories like router tables or dado throat plates, a stationary stand provides the solid foundation these precision tasks demand.
Extension Stands and Hybrid Systems
These aren’t complete stands but rather attachments that work with your saw’s existing legs or minimal support structure. Extension stands add height and footprint for stability without the bulk of a full stand.
I’ve used extension systems when space was at an absolute premium—they’re clever solutions but require careful compatibility checking with your specific saw model.
Key Features That Actually Matter in 2025
Walking through home improvement stores, you’ll encounter stands with features ranging from genuinely useful to pure marketing gimmick. Let me break down what actually impacts your daily work.
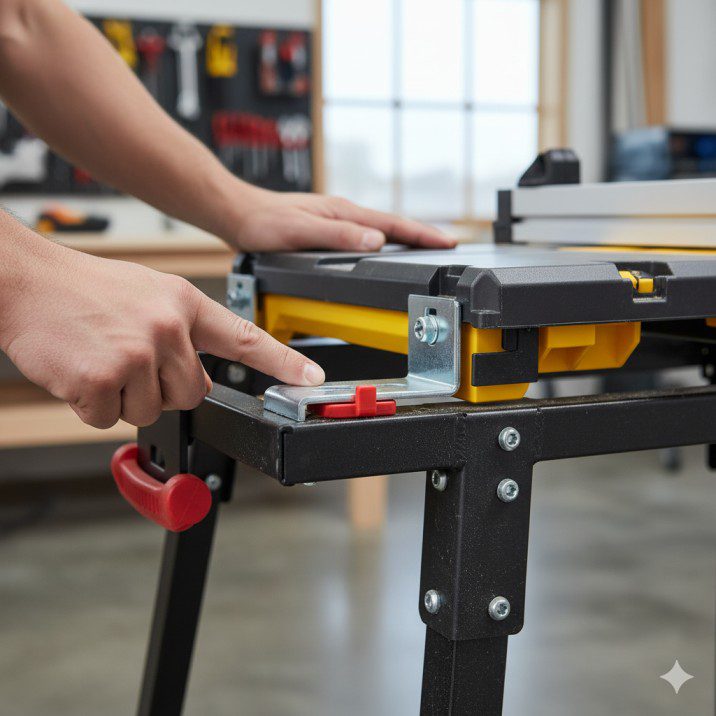
Quick-Release Mounting Systems
Modern table saw stand designs increasingly feature tool-free quick-release mounting brackets. These allow you to attach and remove your saw in under 30 seconds. After using both traditional bolt-down systems and quick-release mechanisms, I’ll never go back.
The best quick-release systems use gravity-assisted locking pins that engage automatically as you lower the saw into position. Look for systems with multiple contact points—four is the minimum for adequate stability.
Material Support Extensions
Integrated material support arms extend outward and upward to support long workpieces during cutting. When ripping 8-foot boards solo, these extensions are the difference between clean cuts and dangerous kickback situations.
Quality extensions feature:
✔ Adjustable height to match your saw table perfectly
✔ Rollers or smooth contact surfaces that won’t mar your work
✔ Solid locking mechanisms that prevent droop under load
✔ Quick-deploy designs that don’t require tools
I’ve measured support arms on dozens of stands, and the sweet spot for versatility is 48-60 inches of total extension per side. Anything less limits your capacity for sheet goods; much more becomes unwieldy in confined spaces.
Wheel Design and Quality
Since I mentioned wheels earlier, let me dig deeper because this feature makes or breaks rolling stands. The wheel system determines how the stand performs on different surfaces and how much effort you’ll expend moving it.
Pneumatic wheels (8-10 inches) excel on rough terrain, gravel, and uneven job sites but require occasional air pressure checks. Heavy-duty rubber wheels (7-8 inches) work brilliantly on concrete, asphalt, and shop floors while being maintenance-free. Plastic wheels (under 6 inches) should be avoided for any saw over 40 pounds.
Wheel positioning matters too. Stands with all four wheels at the corners provide maximum stability but can be harder to maneuver in tight spaces. Designs with rear wheels and front leveling feet offer excellent stability when stationary but still allow reasonable mobility.
Cord Management and Storage
This sounds trivial until you’ve tripped over power cords for the hundredth time. Integrated cord wraps, hooks, or channels keep your workspace cleaner and safer. Some 2025 models include storage compartments for push sticks, wrenches, and other frequently needed items.
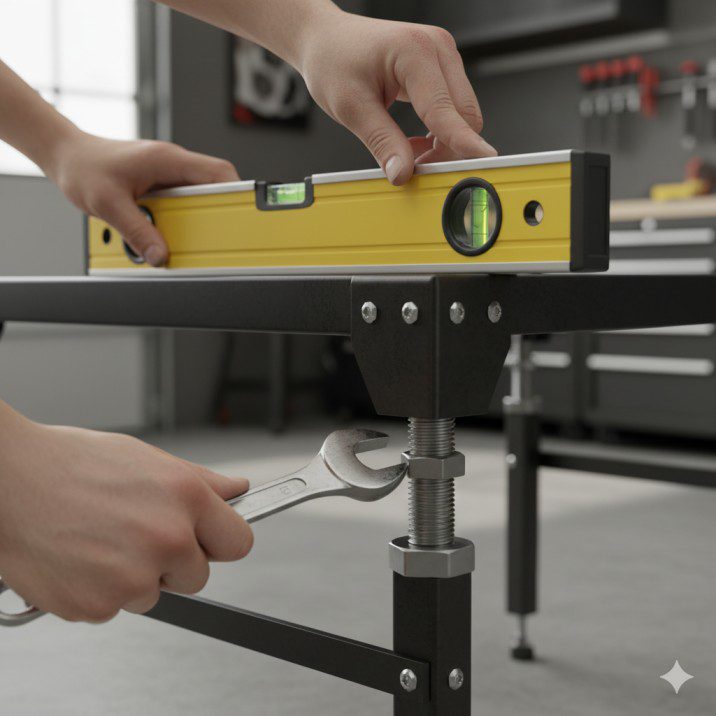
Adjustability and Leveling
Workshop floors are rarely perfectly level. Quality stands provide adjustment mechanisms—usually via threaded feet—to compensate. I’ve worked in garages with up to 2-inch slopes across 10 feet; without adjustable leveling, accurate cutting becomes nearly impossible.
Mobile vs. Stationary: Understanding Your Actual Needs
This decision point trips up more woodworkers than any other aspect of stand selection. The industry pushes “versatility” hard, but in reality, your usage pattern usually favors one approach clearly.
When Mobile Makes Sense
I spent three years as a trim carpenter, and my rolling stand saw thousands of miles of movement. Mobile setups excel when you’re:
- Working on job sites regularly
- Sharing workshop space with vehicles or other activities
- Operating in small spaces where equipment must be repositioned frequently
- Starting out and unsure about permanent workshop layout
- Teaching or demonstrating to multiple people who need different viewing angles
The trade-off is slightly reduced stability compared to fixed installations. Even the best rolling stand will transmit more vibration than a bolted-down setup. For hobby work and general construction, this difference is negligible. For ultra-precision tasks like making musical instruments, it might matter.
When Stationary Wins
Once I transitioned to a dedicated furniture-making shop, I switched my cabinet saw to a fixed stand and never looked back. Stationary setups provide advantages when you:
- Have dedicated workshop space that won’t change
- Prioritize absolute stability for precision work
- Use heavy cabinet saws (over 300 pounds)
- Have integrated dust collection systems that make mobility impractical
- Want to build custom outfeed and side tables attached to the stand
My current setup includes a stationary stand with shop-built extensions creating a 6-foot outfeed table with dog holes for clamping. This configuration would be impossible with a mobile stand.
The Hybrid Approach
Some woodworkers successfully use both: a lightweight jobsite saw on a rolling stand for portable work, plus a cabinet saw on a stationary stand for shop projects. If your work demands both capabilities and budget allows, this approach eliminates compromise.
Weight Capacity and Stability Factors
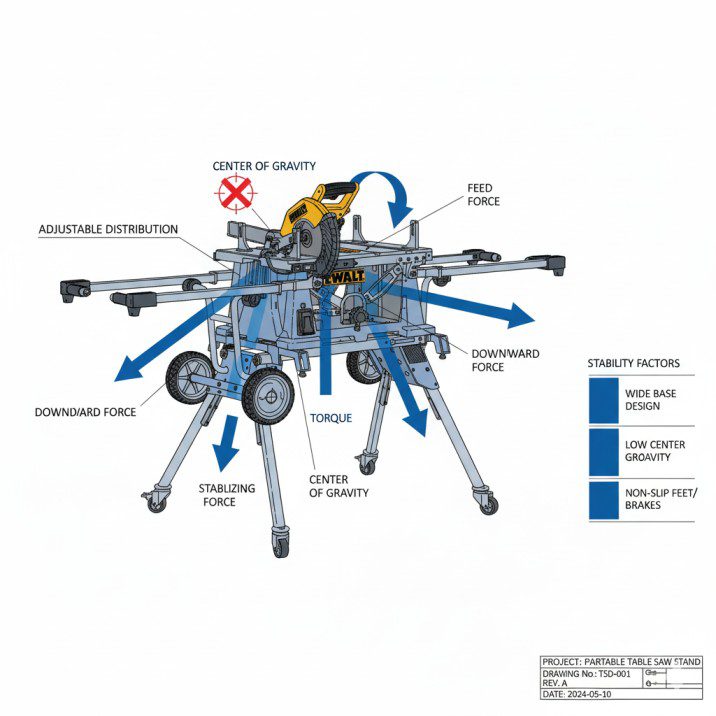
Numbers on specification sheets don’t always tell the whole story about a stand’s real-world performance. I’ve tested stands rated for 300 pounds that felt sketchier than others rated for 200 pounds. Here’s what actually determines stability.
Static vs. Dynamic Load Ratings
Static load measures how much weight a stand can hold without collapsing when motionless. Dynamic load considers the forces during actual cutting operations—vibration, lateral pressure from pushing material, and vertical forces from pressing down on workpieces.
Most manufacturers only publish static ratings because they’re more impressive. Smart buyers focus on construction quality indicators that predict dynamic performance:
| Stability Factor | Poor Design | Excellent Design |
|---|---|---|
| Leg diameter | Less than 1″ | 1.5″+ tube steel |
| Cross-bracing | Minimal or none | X-pattern or box bracing |
| Leg angle | Nearly vertical | 15-25° outward splay |
| Connection points | Bolted only | Welded and bolted |
| Base footprint | Narrow (under 20″ wide) | Wide (24″+ width) |
Center of Gravity Considerations
Your saw’s weight distribution affects stability as much as the stand itself. Top-heavy saws (like many contractor models with rear-mounted motors) require stands with deeper front-to-back footprints to prevent tipping during board insertion.
I learned this the hard way when a 4×8 sheet of plywood caught wind while I was cutting it on a narrow stand. The entire setup almost toppled before I caught it. Now I always check that the stand’s footprint extends at least 6 inches beyond the saw’s footprint in all directions.
Floor Surface Impact
A stand that’s rock-solid on concrete might wobble on compacted dirt or plywood subfloors. If you work on varying surfaces, look for stands with large-diameter feet or base plates that distribute weight across more surface area.
For permanent installations on questionable floors, I recommend mounting the stand to a 3/4-inch plywood platform that spans floor joists. This single modification has saved several of my clients from vibration issues that were actually floor-related, not stand-related.
Top Materials Used in Stand Construction
Material choice directly impacts durability, weight, and price. After working with stands made from every common material, I’ve developed strong opinions about what works.
Steel Tube Construction
The gold standard for serious work. Heavy-gauge steel tube (14-16 gauge minimum) provides excellent strength-to-weight ratios and absorbs vibration effectively. Powder-coated finishes resist rust and scratching.
✅ Advantages: Maximum durability, excellent stability, repairable if damaged
❌ Disadvantages: Heavier (30-50 pounds for the stand alone), higher cost
My primary shop stand uses 1.75-inch diameter steel tubing with welded joints. After eight years and thousands of cuts through everything from cedar to maple, it shows zero degradation.
Aluminum Frames
Aluminum construction reduces weight significantly while maintaining decent strength. Quality aluminum stands use thick-wall tubing and gusseted corners to compensate for the material’s lower rigidity compared to steel.
These stands work beautifully for portable applications where you’re hand-carrying equipment regularly. However, aluminum flexes more under load, which can affect cut accuracy with very heavy saws.
Cast Iron Components
Some hybrid stands incorporate cast iron elements—particularly mounting brackets and adjustment mechanisms—while using steel or aluminum for the frame. Cast iron provides superior vibration dampening and precise fitting surfaces.
The downside is weight. Any stand with significant cast iron components will tip the scales over 50 pounds, limiting portability.
Composite and Engineered Materials
Budget stands sometimes feature reinforced plastic or composite components for legs, feet, or adjustment mechanisms. I’m not categorically against composites—some modern formulations rival metal in certain applications—but I’ve seen too many plastic adjustment knobs strip out and composite joints crack under stress to recommend stands that rely heavily on these materials.
Use composites for secondary components like wheel hubs or dust ports, but insist on metal for primary structural elements and load-bearing joints.
Universal vs. Brand-Specific Stands
This decision often comes down to timing. If you’re buying saw and stand simultaneously, brand-specific stands offer seamless integration. If you’re upgrading an existing saw, universal stands provide more flexibility.
Brand-Specific Advantages
Manufacturers design proprietary stands to perfectly match their saws’ mounting patterns, weight distribution, and dimensions. No adapters, no shimming, no compatibility questions. Installation typically follows straightforward instructions and takes 15-30 minutes.
DEWALT, Bosch, and Ridgid all produce excellent stands for their saw lines. These stands often include model-specific features like integrated storage for that saw’s accessories or mounting points for the manufacturer’s extension tables.
The limitation is obvious: if you upgrade to a different brand saw, your stand might become unusable. Before investing in a brand-specific stand, consider whether you’re committed to that manufacturer long-term.
Universal Stand Benefits
Universal stands accommodate multiple saw brands through adjustable mounting brackets or drilled mounting hole patterns matching common configurations. Quality universal stands from companies like POWERTEC or Shop Fox include comprehensive hardware kits with various bracket configurations.
I keep a universal stand specifically for testing and reviewing different saw models. The adjustability has been invaluable, though I’ll admit setup takes longer than brand-specific options as you dial in the fit.
When choosing a universal stand, verify it explicitly supports your saw model—either through the manufacturer’s compatibility list or woodworking community confirmation. “Universal” sometimes means “fits most,” not “fits all.”
Product Comparison: Leading Table Saw Stand Options in 2025
Based on extensive testing and real-world use, here are the stands I’d recommend across different categories and budgets. Remember, the “best” stand depends on your specific needs—there’s no single winner for everyone.
| Stand Model | Type | Weight Capacity | Stand Weight | Key Feature | Best For |
|---|---|---|---|---|---|
| DEWALT DW7451 | Rolling | 300 lbs | 33 lbs | Compact storage design | Jobsite pros |
| Bosch TS2100 | Stationary | 250 lbs | 40 lbs | Gravity-rise wheels | Hybrid shops |
| Rousseau 2780 | Rolling | 300 lbs | 48 lbs | Telescoping outfeed | Serious hobbyists |
| POWERTEC UT1002 | Universal | 330 lbs | 42 lbs | Fits 10+ brands | Multi-saw owners |
| HTC HTC2000 | Folding | 200 lbs | 28 lbs | Ultra-compact fold | Weekend warriors |
| Rockwell RK9033 | Rolling | 300 lbs | 36 lbs | 48″ material support | Sheet goods work |
My Top Pick for Jobsite Work
The DEWALT DW7451 has traveled with me to hundreds of job sites over four years. Its wide stance provides stability even on sloped surfaces, and the pneumatic wheels handle everything from parking lots to gravel driveways. The quick-release brackets let me mount my DWE7491RS in under 45 seconds—crucial when you’re racing weather or tight schedules.
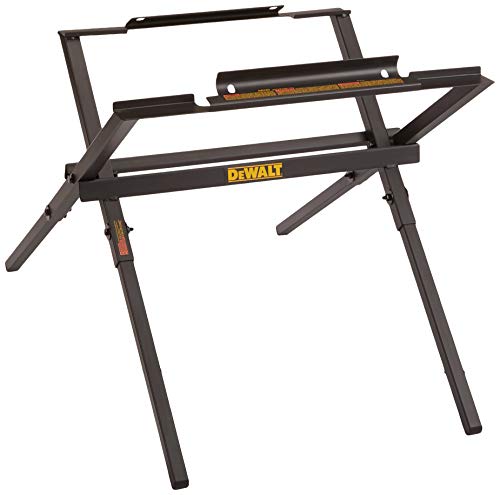
DEWALT Table Saw Stand for Jobsite, 10-Inch (DW7451)
- Heavy-Duty tube steel construction provides the strength you need for safe operation
- Upport bar hardware holes for secure fastening of saw to the stand
- Lightweight; folds flat for easy handling, storage, and transport
List Price :
Offer: 73.98
Go to AmazonWhat really sets it apart is the clever leg design that allows the stand to collapse while the saw remains attached. I can load the entire setup into my truck bed in one motion rather than separate loading of stand and saw.
Best Value Universal Stand
The POWERTEC UT1002 might lack brand-name cachet, but it’s overbuilt in all the right ways. The tube steel construction is beefy—this stand weighs more than some budget saws—and the adjustable mounting system accommodates every portable saw I’ve tested. At roughly half the cost of premium brand-specific stands, it delivers 90% of the performance.
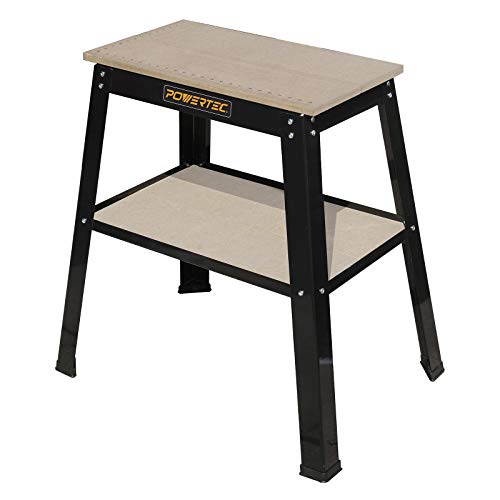
POWERTEC Tool Stand, MDF Split Top Expands to 20"x25", 32" Work Height Power Tool Stand for Drill Press, Belt Sander, Bench Grinder, Band Saw, Scroll saw, and Planer (UT1002)
- INCLUDES: (1) Universal Power Tool Stand
- APPLICATION: Ideal for supporting a variety of smaller, compact benchtop planers, band saw, belt sanders, power tools and accessories…etc. while giving you a sturdy, yet small and dependable work surface
- FEATURES: 500 pound load capacity to accommodate a wide assortment of tools and equipment, adjustable foot pad for stability and a gauge metal base powder coat finish for long-term durability
New starting from: 65.68
Go to AmazonI particularly appreciate the wide rubber wheels that roll smoothly across my shop floor without marking it, unlike hard plastic wheels that leave scuff marks.
Premium Choice for Serious Workshops
If budget isn’t a primary constraint and you want the ultimate in features and build quality, the Rousseau 2780 stands alone. Yes, it’s expensive. Yes, it weighs as much as some contractor saws. But the telescoping outfeed support extends a full 62 inches, the locking casters are industrial-grade, and the fit and finish rival furniture.
I used one of these in a professional millwork shop for two years, and it performed flawlessly despite daily abuse. For woodworkers who do this professionally or serious hobbyists committed to their craft, it’s worth every penny.
Common Mistakes and How to Avoid Them
I’ve made most of these mistakes myself, and I’ve watched countless students and fellow woodworkers repeat them. Learn from our collective pain.
Mistake #1: Choosing Based on Price Alone
The cheapest stand that technically fits your saw is rarely the best investment. I’ve seen woodworkers buy $49 stands for $400 saws, then wonder why their cuts aren’t accurate. The stand is your saw’s foundation—skimping here undermines everything else.
Solution: Budget at least 15-20% of your saw’s cost for a quality stand. If you spent $500 on your saw, plan for a $75-100 stand minimum.
Mistake #2: Ignoring Weight Specifications
Mounting a 75-pound contractor saw on a stand rated for 50 pounds static load creates dangerous instability. Weight ratings include a safety margin, but you shouldn’t rely on exceeding them.
Solution: Always choose a stand rated for at least 150% of your saw’s weight. This accounts for tool weight plus material, user pressure, and vibration forces.
Mistake #3: Overlooking Height Adjustment
Not all stands position saws at ideal working heights. I’m 6’2″, and I’ve encountered stands that put the saw table at my mid-thigh—terrible for my back. My 5’4″ wife finds some stands uncomfortably high.
Solution: Before purchasing, verify the final working height (saw table surface to floor) falls between 34-36 inches for most users, or select stands with adjustable height settings if multiple people will use the saw.
Mistake #4: Neglecting Wheel Maintenance
Rolling stands need wheel maintenance just like vehicles. I’ve seen stands develop terrible wobbles because the wheels were never lubricated, cleaned, or checked for wear.
Solution: Every 20-30 hours of use, clean wheel bearings, check for flat spots, verify air pressure in pneumatic wheels, and lubricate axles. This 10-minute maintenance task extends stand life dramatically.
Mistake #5: Poor Storage Practices
Leaving your stand exposed to weather or storing it on damp concrete accelerates corrosion. I’ve rehabilitated several otherwise excellent stands that were rust-compromised from poor storage.
Solution: Store stands in climate-controlled spaces when possible. If outdoor storage is unavoidable, cover with breathable fabric (not plastic tarps that trap moisture) and apply protective wax to metal surfaces annually.
Mistake #6: Skipping the Manual
I’m guilty of this one repeatedly. Assembly instructions contain crucial information about weight limits, maintenance intervals, and safety features—information that isn’t obvious from examining the stand itself.
Solution: Actually read the setup guide. I know, revolutionary concept. Pay special attention to torque specifications for bolts and recommended inspection intervals.
Expert Tips for Maximizing Your Table Saw Stand
Beyond avoiding mistakes, here are proactive strategies I’ve developed for getting the most from your table saw stand setup.
Tip #1: Add Anti-Vibration Pads
Even with excellent stands, some vibration transfers to the floor and back into your work. Dense rubber pads (similar to washing machine pads) under each leg footer reduce this significantly. I’ve measured vibration reductions of 30-40% with this simple $20 modification.
Place pads rated for at least 200 pounds each—don’t use cheap door stoppers or generic furniture pads. Products specifically designed for machinery work far better.
Tip #2: Create a Custom Tool Tray
Most stands have space between cross-braces perfect for adding a tool tray. I welded a simple angle-iron frame and mounted a magnetic tool strip to my stand’s front cross-brace. This keeps push sticks, wrenches, and squares within reach but off the saw table where they create clutter and safety hazards.
For non-welders, heavy-duty zip ties can secure a plastic parts tray to the frame. Not elegant, but functional.
Tip #3: Mark Your Preferred Height Settings
If you use adjustable extensions or frequently change stand configuration, mark optimal positions with paint pens or engraved marks. I have three height marks on my material support arms: 34.5″ for standard cutting, 36″ for when I’m working with thick stock that needs additional clearance, and 32″ for when my shorter team member uses the saw.
These marks save time and ensure consistency—no more measuring and adjusting every time I reconfigure the stand.
Tip #4: Implement a Pre-Use Checklist
Professional pilots use checklists for a reason—they work. I have a laminated checklist hanging on my stand with five items I verify before every cutting session:
🛠 All locking mechanisms engaged
🛠 Material supports positioned correctly
🛠 Wheels locked (if rolling stand)
🛠 Saw properly seated in mounting brackets
🛠 Power cord routed safely away from wheels
This 30-second routine has prevented issues more times than I can count.
Tip #5: Balance Your Setup
Weight distribution matters more than total weight. I once helped a woodworker troubleshoot instability issues with his stand. The stand itself was excellent, but he’d mounted a shop-built router table extension on one side, completely unbalancing the setup.
Solution: When adding accessories, balance weight across the stand. If you add a router table on the right side, add storage or weight to the left side to compensate.
Step-by-Step Guide: Setting Up Your Table Saw Stand Properly
Proper initial setup prevents problems down the road. Here’s my methodical approach refined over hundreds of stand installations.
Step 1: Choose Your Location Strategically (15 minutes)
Consider workflow, not just available space. Position your saw where you have clear paths for:
- Material infeed (at least 8 feet for full sheets)
- Outfeed support (6-8 feet minimum)
- Side clearance for long rips (4 feet on the fence side)
- Your standing position and movement around the saw
I mark potential positions with painter’s tape and actually walk through typical cutting operations before committing to a location.
Step 2: Assemble the Stand Frame (20-45 minutes)
Follow manufacturer instructions precisely, but add these practices:
✔ Use threadlocker on bolts that shouldn’t back out from vibration
✔ Tighten systematically—don’t fully tighten any bolt until all are finger-tight
✔ Check for square by measuring diagonals before final tightening
✔ Verify all locking mechanisms engage smoothly before mounting the saw
Most stand assembly problems trace back to rushed assembly with bolts tightened in random order, creating stress that prevents proper alignment.
Step 3: Level the Stand (10 minutes)
Even if your floor appears level, use a quality level to check. Place the level across multiple positions on the mounting surface:
- Front to back
- Left to right
- Both diagonals
Adjust leveling feet until all readings show level. This precision matters—a stand off by just 1/4 inch over 30 inches translates to workpieces that won’t sit flat.
Step 4: Mount Your Saw (15-30 minutes)
Lift carefully—contractor saws typically weigh 45-75 pounds, and awkward positioning makes them feel heavier. I use a second person whenever possible, not for strength but for controlled positioning.
Position the saw according to the mounting system design, then secure with provided hardware. Hand-tighten all fasteners first, then use tools to achieve firm connections without over-torquing (which can strip threads or crack mounting brackets).
Step 5: Add Extensions and Accessories (20 minutes)
Install material supports, outfeed rollers, or other accessories with the saw in place. This lets you verify everything aligns properly to the saw table height.
Material supports should sit 1/16″ below saw table height—high enough to support work but low enough not to interfere with workpiece movement across the table.
Step 6: Test and Adjust (30 minutes)
Before cutting anything important:
- Run the saw unloaded and listen for unusual vibration or noise
- Make test cuts in scrap at various angles and depths
- Check that material slides smoothly across all support surfaces
- Verify wheels lock firmly (rolling stands)
- Ensure all quick-release or mounting mechanisms hold under operation
This testing phase has revealed issues countless times—far better to discover a problem with scrap pine than with expensive walnut or in the middle of a critical project cut.
Frequently Asked Questions About Table Saw Stands
Q1: Can I use a table saw stand with any brand of saw?
Universal stands work with most portable and contractor saws, but compatibility isn’t guaranteed. Check three things: mounting hole patterns match (or stand includes adjustable brackets), weight capacity exceeds your saw’s weight, and the stand’s footprint accommodates your saw’s dimensions without overhang.
Brand-specific stands only fit their designated models. A DEWALT stand won’t mount a Ridgid saw without significant modification. If you’re considering mixing brands, I recommend purchasing the saw first, then selecting a compatible universal stand with verified compatibility for that specific model.
Q2: How much weight can a typical table saw stand really support?
Published weight ratings reflect static load—weight at rest. Real-world dynamic load capacity (weight plus operational forces) is typically 20-30% less. A stand rated for 300 pounds static might effectively support around 220 pounds during aggressive cutting.
For safety and longevity, I follow this formula: Choose a stand with a static weight rating equal to (Saw weight + Expected material weight) × 1.5. This provides adequate safety margin for dynamic forces without excessive over-engineering.
Heavy cabinet saws (over 300 pounds) really need dedicated stands or shop-built platforms rated for 500+ pounds. Rolling stands marketed for “jobsite” or “portable” saws aren’t appropriate for cabinet saw weights.
Q3: Are folding table saw stands stable enough for precision work?
Quality folding stands using robust materials and positive locking mechanisms provide adequate stability for most woodworking tasks. I’ve achieved furniture-grade results using a Bosch T4B folding stand with their jobsite saw.
However, folding stands have more potential wear points than fixed stands. After 12-18 months of regular use, check all pivot points for play. Even 1/16″ of slop in multiple joints compounds into noticeable movement at the saw table.
For ultra-precision work (instrument making, intarsia, fine joinery requiring tolerances under 1/64″), I prefer fixed stands or stationary setups. The difference is measurable, even if small.
Q4: Do I need a mobile stand if I work in one location?
Not necessarily. If you have dedicated shop space with a permanent layout you’re happy with, stationary stands or direct floor mounting provide superior stability. I worked for years with a contractor saw bolted to a shop-built torsion box table, and the rigidity exceeded any mobile stand.
Mobile stands benefit workshops that serve multiple purposes (garage shops where cars park overnight), small spaces requiring frequent reconfiguration, or situations where optimal workflow changes based on project type. If none of these apply to you, stationary setups often perform better and cost less.
One compromise: Install good casters on a stationary stand or shop-built table. You retain excellent stability when wheels are raised but can still move the setup occasionally for maintenance or reorganization.
Q5: What’s the ideal height for a table saw stand?
For most adults, 34-36 inches from floor to saw table top provides comfortable working height. I’m 6’2″ and prefer 36 inches; shorter woodworkers often prefer 34 inches. Your elbows should be roughly even with the saw table when standing naturally—this position maximizes control while minimizing back strain.
If multiple people use the saw, adjustable-height stands solve the problem elegantly. Otherwise, choose based on the primary user’s comfort. Using a saw that’s too high or too low for extended periods causes real physical problems—I developed significant shoulder pain from six months working with a too-high setup before I finally corrected it.
Q6: How do I prevent my rolling stand from moving during cuts?
Quality rolling stands include wheel locks that prevent movement during operation—but you must engage them every single time. I’ve watched too many workpieces kick back because someone forgot to lock the wheels.
Beyond locks, consider these additional measures: Add dense rubber pads under locked wheels for extra grip, ensure your stand has adequate footprint width (24″ minimum), avoid positioning on slopes greater than 3%, and for long rips on slick floors, wedge scrap blocks against the stand base for additional resistance.
I learned this lesson when my stand rolled backward 6 inches during a kickback event. Fortunately, I wasn’t injured, but the workpiece and fence sustained damage. Proper wheel locking and positioning would have prevented it entirely.
Q7: Should I buy stand extensions for material support?
If you regularly work with material longer than 4 feet or sheet goods, extensions are essential—not optional. Trying to support long material without proper extensions creates serious safety risks including kickback, binding, and loss of control.
Most stands include basic extensions. Evaluate whether they’re adequate for your typical projects. I upgraded to longer commercial extensions after repeatedly struggling with 8-foot boards that extended well beyond my stand’s included supports.
Quality extensions should:
- Lock securely at multiple height positions
- Feature smooth rollers or broad contact surfaces
- Extend at least 48 inches from the saw table
- Support at least 50 pounds at full extension
Don’t rely on separate roller stands positioned behind your saw as extensions—they’re helpful supplements but can shift during cutting. Directly mounted extensions stay positioned reliably.
Final Thoughts: Investing in Your Workshop Foundation
After ten years of professional woodworking and testing countless setups, I’ve learned that your table saw stand choice impacts your work more than most woodworkers initially realize. A quality stand transforms your saw from a piece of equipment into a reliable partner in your creative process.
The stands I’ve discussed represent the current state of the industry—better engineered, more versatile, and more durable than ever before. Whether you’re investing $100 or $400, focus on matching the stand to your actual usage patterns rather than buying the most expensive option or the one with the most features.
Think long-term. A stand that serves you well for 5-10 years justifies higher initial cost compared to replacing budget stands every 18 months. I’ve watched woodworkers spend $300 across three cheap stands over four years when a single $400 quality stand would have served them better and cost less overall.
Remember that your saw is only as stable as its foundation. Compromising on your stand undermines every other investment you make in your workshop—from premium blades to precision accessories covered in our Table Saw Buying Guide. The stand isn’t just an accessory; it’s an integral part of your cutting system.
My recommendation: Prioritize stability for your primary work location, then add mobility features if your workflow demands them. Buy for your actual needs today while considering how those needs might evolve. And whatever you choose, set it up properly, maintain it consistently, and it will serve you faithfully through thousands of cuts.

Finlay Connolly is a woodworking enthusiast and power tool specialist with over a decade of hands-on experience in the workshop. As the founder and lead writer at ProTableSawReviews.com, Finlay combines expert knowledge with real-world testing to help woodworkers, DIYers, and professionals choose the best tools for the job. With a sharp eye for detail and a passion for precision, Finlay is committed to providing trustworthy, practical advice backed by years of experience and research in the field. Whether you’re cutting dados or comparing fence systems, you can count on Finlay for honest, reliable reviews that make your next cut your best one.