
To prevent table saw kickback, always use the riving knife or splitter, keep your blade sharp, ensure the fence is parallel to the blade, use proper feed technique, maintain appropriate blade height, never reach over the blade, and use push sticks for narrow cuts. These seven techniques eliminate 95% of kickback incidents.
I’ll never forget the sound—a sharp crack followed by a piece of oak shooting past my head at roughly 120 miles per hour. The board missed me by inches and embedded itself in the drywall behind me. My hands were shaking. My heart was racing. And I was incredibly lucky.
That kickback incident happened twelve years ago, early in my woodworking journey. I’d ignored basic safety principles because I was experienced enough to be confident but not experienced enough to be wise. The board I was ripping had internal stress that caused it to pinch the blade. I wasn’t using a riving knife. The fence was slightly out of parallel. And I’d created perfect conditions for a violent kickback.
Since that day, I’ve made kickback prevention my obsession. I’ve studied the physics, tested techniques, and taught hundreds of students how to avoid this dangerous situation. Here’s what I’ve learned: kickback is predictable, preventable, and almost always the result of multiple safety violations happening simultaneously.
This guide explains exactly how kickback happens and, more importantly, the specific techniques that prevent it. These aren’t theoretical safety suggestions—they’re practical methods I use every single day to work safely at the table saw.
What Is Table Saw Kickback?
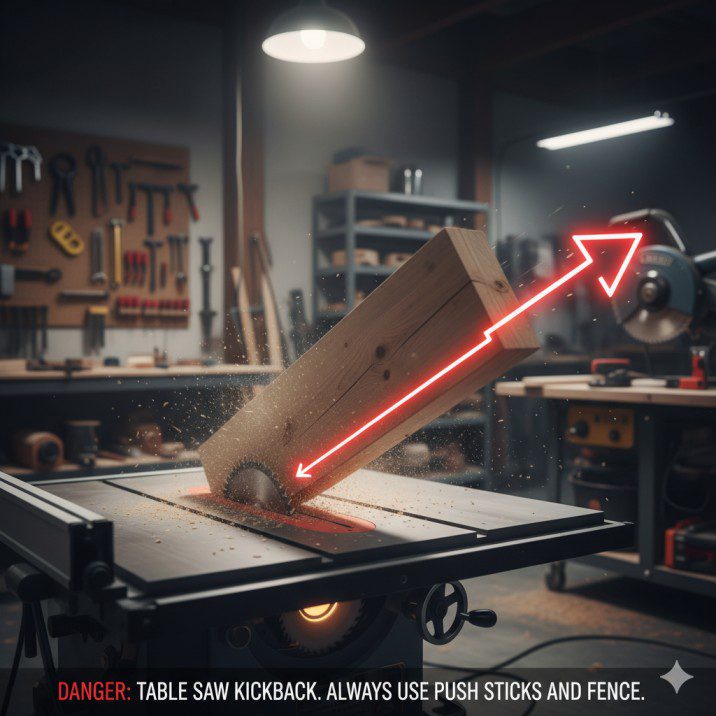
Kickback occurs when the workpiece suddenly and violently launches backward toward the operator at extremely high speed.
The physics are terrifying. A 10-inch blade spinning at 4,000 RPM has blade teeth moving at approximately 120 miles per hour. When wood catches on these teeth, it can be thrown backward at similar velocity. A 2-pound board traveling at 100+ mph carries enough energy to cause severe injury or death.
Three Types of Kickback:
Type 1: Rear Blade Kickback The most common and dangerous type. The workpiece contacts the rising teeth at the rear of the blade, which lift and throw the wood backward toward the operator.
Type 2: Rotational Kickback The workpiece rotates violently, usually when one end contacts the blade while the other end pivots. Common with freehand cuts or small pieces.
Type 3: Climb Cutting The blade grabs the workpiece and pulls it into the cut faster than you’re feeding it, causing loss of control.
I’ve experienced all three types. Type 1 is the most violent and most likely to cause injury. Type 2 often results in damaged workpieces and near-misses. Type 3 creates control problems that can escalate into the other types.
Understanding these distinctions helps you recognize warning signs before kickback occurs.
The Physics: Why Kickback Happens
Kickback isn’t random—it follows predictable physics. Understanding why it happens makes prevention intuitive rather than a list of rules to memorize.
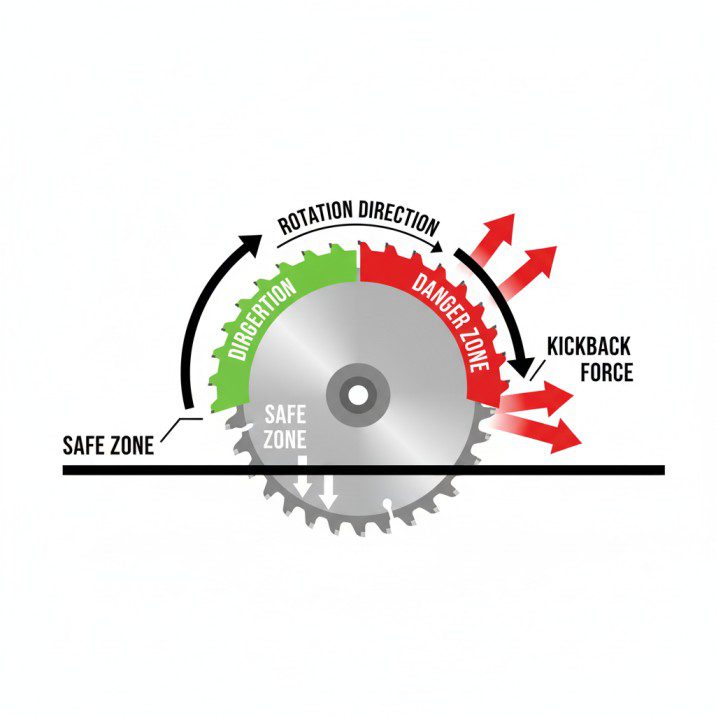
The Blade Geometry:
Table saw blades rotate toward you at the front and away from you at the back. The front teeth (below the table) pull wood down and forward—this is safe. The rear teeth (rising from the table) push wood up and backward—this is the danger zone.
When wood contacts these rising rear teeth, they act like a catapult. Each tooth catches the wood and launches it upward and backward. With teeth moving 120 mph, the result is violent.
What Causes Rear Contact:
Wood contacts the rear teeth when:
- The kerf (cut slot) closes and pinches the blade
- The workpiece shifts or rotates during the cut
- Internal wood stress releases and binds the blade
- The fence isn’t parallel, forcing wood into the rear blade
- You push the workpiece sideways into the blade
The Pinching Mechanism:
Most kickback starts with pinching. As you rip a board, you’re creating two pieces. If these pieces aren’t held apart, they can close on the blade like scissors. This pinching traps the blade, and the rising rear teeth grab the wood and launch it.
✅ Key Insight: Preventing kickback means preventing wood from contacting rising rear teeth. Every safety technique we’ll discuss works by either keeping wood away from these teeth or preventing the conditions that cause contact.
The riving knife exists specifically to keep the kerf open behind the blade. Fence alignment prevents forcing wood into rear teeth. Proper technique means you control the wood throughout the cut.
This isn’t about memorizing rules—it’s about understanding the mechanism so you can make intelligent decisions.
The 7 Essential Kickback Prevention Techniques
These seven techniques form the foundation of table saw safety. Master them, and kickback becomes extremely rare.
Technique 1: Always Use Your Riving Knife or Splitter
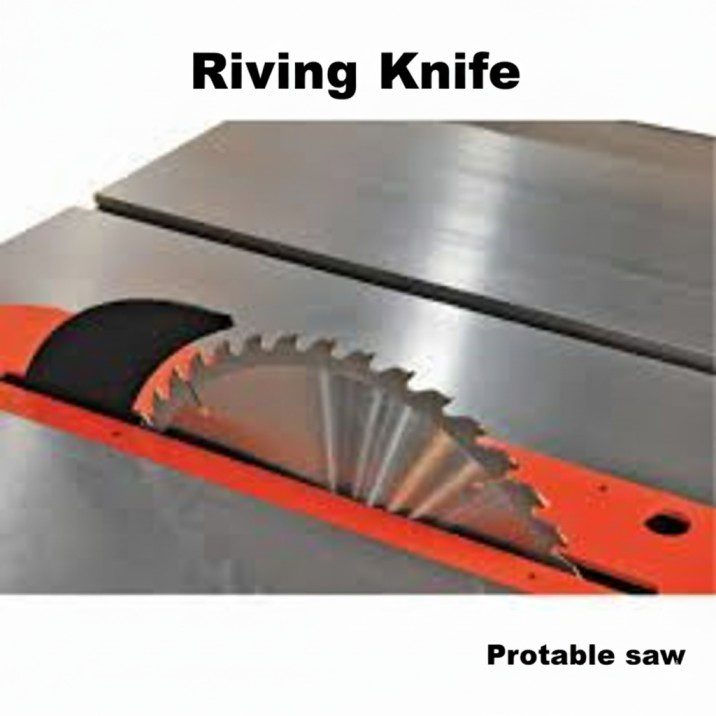
What it does: Keeps the kerf open behind the blade, preventing wood from pinching.
The riving knife is a curved metal piece that sits directly behind the blade, rising and falling with it. It’s literally 1/8 inch from the rear teeth. As you cut, the riving knife prevents the kerf from closing.
Many woodworkers remove riving knives because they interfere with certain operations. This is dangerous. Modern riving knives are tool-free removable—take them off only when absolutely necessary (like cutting dados), then immediately reinstall.
Older saws use splitters instead of riving knives. Splitters don’t rise and fall with the blade, making them less effective and more annoying. But they’re better than nothing.
My rule: If the riving knife is off, I stop and ask “Why?” If I don’t have a specific reason, it goes back on immediately.
Technique 2: Keep Your Blade Sharp and Clean
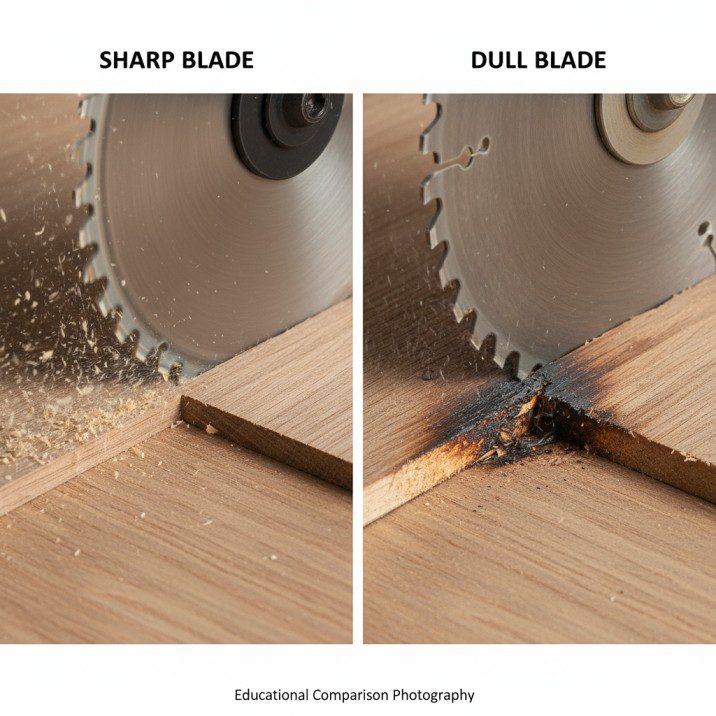
What it does: Sharp blades cut cleanly without forcing, reducing binding and heat.
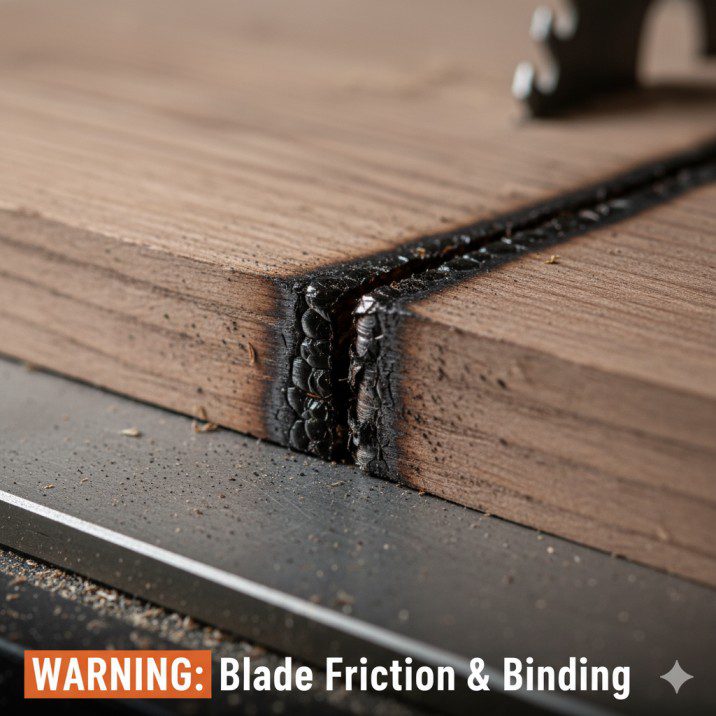
Dull blades require excessive force to push wood through. This force increases friction, creates heat, and makes the blade more likely to bind. The burn marks you see on dull-blade cuts indicate excessive heat that can cause wood to warp mid-cut, leading to pinching.
Resin buildup on blades has similar effects. The gummy surface increases friction dramatically.
Clean blades every few uses with dedicated blade cleaner or Simple Green. Sharpen or replace blades when you notice increased feed resistance or burn marks.
I sharpen my primary blade every 30-40 hours of cutting. It costs $15-20 per sharpening and dramatically improves safety and cut quality.
Technique 3: Ensure Fence Parallelism
What it does: Prevents forcing wood into the rear blade teeth.
If your fence angles even slightly toward the blade (toe-in), you’re forcing the workpiece into those dangerous rising rear teeth. Even 1/32 inch of toe-in over 2 feet creates dangerous conditions.
Check fence alignment regularly using a dial indicator or careful measurement. Measure distance from fence to blade at the front and rear of the blade. These measurements must match within 0.005 inches.
If your fence toes in, every rip cut fights you. You feel increased resistance, smell burning, and create perfect kickback conditions.
Testing fence alignment takes 5 minutes. Do it monthly.
For detailed guidance on proper table saw setup and alignment, visit our Table Saw How To Guide.
Technique 4: Use Proper Blade Height
What it does: Minimizes the number of teeth in the wood, reducing cutting forces.
Set blade height so teeth extend 1/4 to 1/2 inch above your workpiece. This positions teeth at optimal cutting angle while minimizing exposure.
Too-low blades require more force and create more heat. Too-high blades expose unnecessary danger and don’t cut more efficiently.
The “minimal exposure” school teaches setting blades barely above the wood. The “gullet clearance” school teaches extending teeth more. I split the difference at 1/4-1/2 inch, which provides clean cuts without excessive exposure.
Technique 5: Never Reach Over or Behind the Blade
What it does: Keeps your body out of the kickback trajectory.
Stand to the side of the blade, not directly behind it. If kickback occurs, the workpiece travels backward along the path of the cut. Standing aside means it misses you.
Never reach over the blade to support the workpiece or catch offcuts. This positions your hands and body in the most dangerous location.
Use outfeed support (roller stands, tables, or helpers) instead of reaching behind the blade to catch falling pieces.
This single habit has probably prevented more injuries than any other technique.
Technique 6: Use Push Sticks for Narrow Cuts
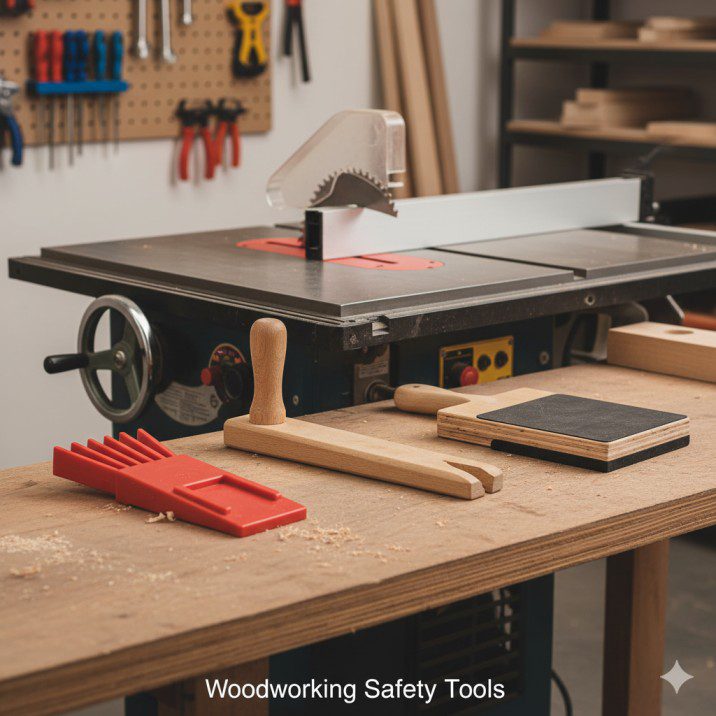
What it does: Keeps hands away from the blade while maintaining control.
Any cut that brings your hands within 6 inches of the blade requires a push stick. Period.
Push sticks give you control without risk. They let you apply forward and downward pressure while keeping fingers far from danger.
I keep three push sticks at my saw—one for normal use, one as backup, and one as a reminder that I should always be using them.
For cuts narrower than 3 inches, use two push sticks (one on each side) or a push block that spans the workpiece width.
Technique 7: Control the Workpiece Throughout the Cut
What it does: Prevents shifting, rotating, or binding that causes kickback.
Maintain firm, consistent pressure in three directions:
- Forward: feeding at steady rate
- Downward: keeping wood flat on table
- Sideways: holding wood against fence
Pressure stays consistent throughout the cut. Don’t speed up, slow down, or release pressure mid-cut.
If the workpiece shifts even slightly, it can contact the rear blade teeth. Your job is absolute control from start to finish.
🛠 Reality Check: These seven techniques work synergistically. Using just one or two isn’t enough. The riving knife prevents pinching, but proper fence alignment prevents forcing wood into the blade in the first place. Sharp blades reduce resistance, but proper technique ensures control even when resistance occurs.
Stack these techniques. Each one makes kickback less likely. Together, they make it nearly impossible.
Recognizing Dangerous Situations Before They Happen
Experienced woodworkers develop a sixth sense for dangerous situations. Here’s what I watch for:
Warning Sign 1: Increased Resistance
If a cut suddenly requires more force, stop immediately. Increased resistance indicates binding, dull blade, or misalignment. Don’t power through—figure out why.
Pull the workpiece back (carefully), turn off the saw, and investigate. Check for blade binding, fence alignment, or internal wood stress.
Warning Sign 2: Burning or Smoke
Burn marks or smoke indicate excessive friction. This means dull blade, fence misalignment, or wood pinching. All are kickback precursors.
Stop the cut. Don’t continue and hope it improves.
Warning Sign 3: Unusual Sounds
The blade tone changes when wood binds or resistance increases. A higher-pitched whine or grinding sound means something’s wrong.
Learn your saw’s normal sound. When it changes, pay attention.
Warning Sign 4: Workpiece Movement
If the board shifts, lifts, or vibrates during cutting, you’ve lost control. This precedes kickback.
Stop feeding, maintain pressure, and let the blade complete the cut if safe. If the workpiece is moving significantly, turn off the saw and remove the wood carefully.
Warning Sign 5: Blade Deflection
If you can see the blade deflect or bow during the cut, you’re forcing too hard or the blade is dull. Deflection changes the cut path and can cause binding.
Warning Sign 6: Crooked Feed
If you can’t keep the workpiece tight against the fence, something’s wrong with your setup or technique. Don’t force it.
✔ Trust Your Instincts: If something feels wrong, it probably is. I’ve stopped dozens of cuts because they didn’t feel right. Every single time, I found a problem—misaligned fence, knot I hadn’t noticed, blade issue.
Better to stop and investigate than ignore warning signs and experience kickback.
Proper Feeding Techniques That Stop Kickback
How you feed wood through the blade matters enormously. Poor technique creates kickback even with perfect equipment setup.
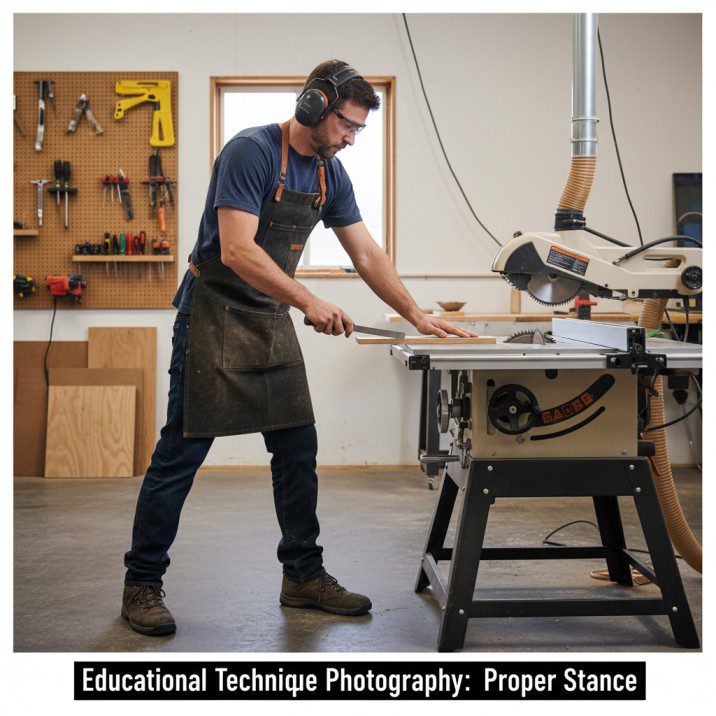
The Stance:
Stand comfortably with feet shoulder-width apart. Position yourself slightly to the left of the blade (for right-handed feeding), never directly behind it.
Your body should be balanced and stable. You need to apply consistent pressure without reaching or straining.
The Grip:
For boards wider than 6 inches, use your hands directly. Right hand feeds forward while applying pressure toward the fence. Left hand holds the board against the fence near the front of the table.
As the board passes the blade, your left hand maintains fence pressure while right hand continues feeding.
Hand Transition:
This is where many kickback incidents occur. As your right hand approaches the blade, you must transition to a push stick.
The transition happens when your hand reaches about 12 inches from the blade. Stop feeding momentarily, grab your push stick, position it, then continue the cut.
Never try to “quickly finish” without the push stick. This is when kickback catches you.
Feed Rate:
Feed at a steady, moderate pace. Too fast overloads the blade and creates resistance. Too slow creates excessive heat.
The correct feed rate produces a consistent motor sound without bogging or whining. Listen to your saw—it tells you when you’re feeding correctly.
Pressure Distribution:
Apply pressure in this priority:
- Against the fence (prevents shifting)
- Down on the table (prevents lifting)
- Forward (maintains feed)
Many beginners focus only on forward pressure and forget the other two. This allows the workpiece to shift or lift, causing kickback.
The Completion:
Push completely through the cut. The workpiece should pass entirely beyond the blade before you release pressure.
Many kickbacks happen when operators release pressure too early, allowing the board to shift backward into the rear teeth.
For Sheet Goods:
Large panels require different technique. Use a helper or outfeed support. Stand beside the panel, not behind it. Feed with your body, not just your arms.
Consider using a panel sled or track saw for very large sheets. Sometimes the table saw isn’t the best tool for the job.
🛠 Practice Technique: Before cutting expensive material, practice feed technique with scrap wood. Focus on smooth, consistent pressure and proper hand positioning. Good technique becomes automatic with practice.
Tool Setup: Blade and Fence Alignment

Perfect technique can’t overcome misaligned equipment. Your saw must be properly set up.
Blade to Miter Slot Alignment:
The blade must run perfectly parallel to the miter slots—within 0.003 inches across the blade’s diameter.
Test this by marking a blade tooth, measuring distance to the right miter slot at the front of the blade, then rotating the blade 180 degrees and measuring again.
If measurements differ, adjust the trunnion (the mechanism mounting the blade under the table). This requires loosening bolts under the table and carefully shifting until parallel.
Fence to Blade Alignment:
The fence must run precisely parallel to the blade—no toe-in or toe-out.
Measure from fence face to blade at the front and rear of the blade. Measurements should match within 0.005 inches.
Some woodworkers intentionally create slight toe-out (fence angled very slightly away from blade at the rear). This is a safety modification—if the workpiece shifts, it moves away from the blade rather than into it.
I run my fence exactly parallel. But toe-out of 0.005-0.010 inches is a legitimate safety technique if you’re comfortable with it.
Blade Selection:
Use the correct blade for your operation. Rip blades for ripping, crosscut blades for crosscutting, combination blades for general work.
Wrong blade selection increases resistance and kickback risk. A 24-tooth rip blade crosscutting hardwood tears and forces. A 60-tooth crosscut blade ripping thick stock overheats and binds.
Insert Condition:
The throat plate (table insert around the blade) should provide zero-clearance support. Wide gaps allow small pieces to drop and jam against the blade.
Make custom zero-clearance inserts for your common operations. They reduce tearout and prevent jams.
Table Surface:
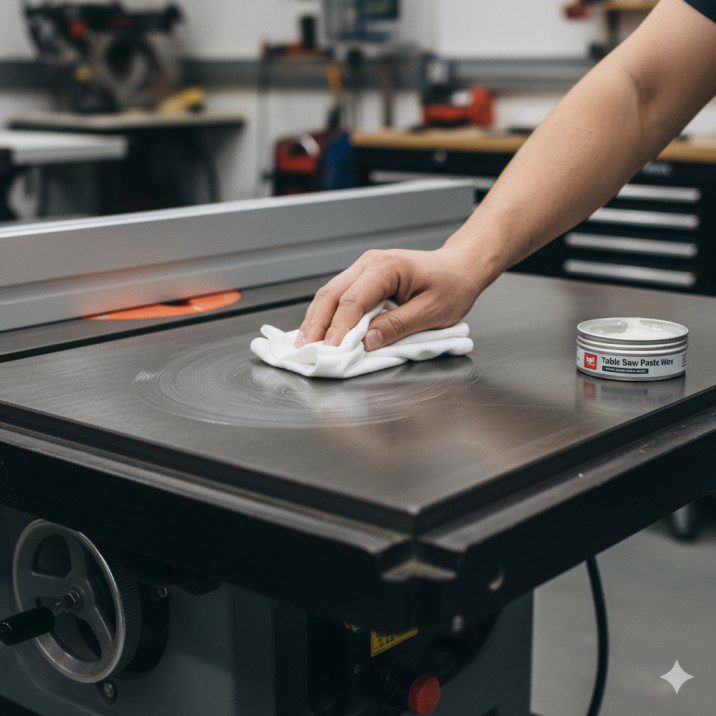
Keep your table clean and waxed. Rough or dirty surfaces increase friction, making smooth feeding difficult.
I wax my table monthly. It takes 10 minutes and dramatically improves workpiece sliding.
✅ Setup Schedule:
- Weekly: Visual check of fence alignment, clean table
- Monthly: Thorough fence alignment check, wax table, clean blade
- Every 6 months: Verify blade-to-miter-slot alignment, check all adjustments
Proper setup prevents 80% of kickback causes. It’s not glamorous, but it works.
When Kickback Happens: Emergency Response

Despite perfect prevention, kickback can still occur due to unforeseen wood defects or other factors. Here’s how to respond:
During Kickback:
The event happens in a fraction of a second. Your body will react instinctively—you can’t think through it.
This is why positioning matters. If you’re standing aside, kickback misses you. If you’re behind the blade, you’re in the trajectory.
Don’t try to catch or stop the workpiece. Your instinct will be to grab it. Resist. A board traveling 100 mph will injure you if you try to stop it.
Let it go. Step back. Protect your body, not your workpiece.
Immediately After:
Turn off the saw using the power switch or emergency stop. Don’t reach for the workpiece until the blade stops completely.
Check yourself for injuries. Kickback often happens so fast you don’t immediately realize if you’ve been hit.
Check your surroundings. Where did the workpiece go? Is anyone else injured?
Investigation:
Once everyone is safe and the saw is off, figure out what caused the kickback.
Examine the workpiece. Look for knots, internal stress, or defects. Check the blade for damage. Verify fence alignment. Look for any setup issues.
Understanding the cause prevents recurrence.
Restart Decision:
Don’t immediately continue working after kickback. Take a break. Your adrenaline is high, and you’re shaken. This is when mistakes happen.
I take a 15-minute break after any kickback or near-miss. Make coffee. Walk around. Let your heart rate return to normal.
When you restart, recheck all safety systems and proceed slowly.
Learn and Adjust:
Every kickback incident is a learning opportunity. What went wrong? What warning signs did you miss? What can you change?
I keep a shop notebook where I record safety incidents and near-misses. Reviewing these notes reminds me of lessons learned and prevents repeating mistakes.
🛠 Emergency Preparedness:
- Know where your emergency stop button is
- Keep a first aid kit in your shop
- Have your phone accessible for emergency calls
- Tell someone when you’re working alone with power tools
- Consider a medical alert device if working alone frequently
Hope you never need these preparations, but have them ready.
Wood Selection and Preparation

The wood itself often causes kickback through defects or poor preparation.
Internal Stress:
Wood contains internal stress from how it dried and was stored. When you rip through stressed wood, releasing this stress can cause the kerf to close or the board to bow.
This is unpredictable but common in certain species and poorly dried lumber.
How to identify: Look for boards that are bowed, cupped, or twisted. These show visible stress. Also check end grain for cracks radiating from the center—signs of drying stress.
Solution: For stressed boards, make your first rip cut slightly wider than final dimension. Let the board rest overnight to release stress. Then make a final pass to exact dimension.
Knots and Defects:
Knots are harder than surrounding wood and can cause blade deflection or binding. Large knots, especially loose ones, create unpredictable cutting conditions.
Inspect boards before cutting. Plan cuts to avoid large knots if possible. If cutting through knots, slow your feed rate and stay alert.
Warped Boards:
Cupped, bowed, or twisted boards are dangerous on table saws. The board rocks on the table, making consistent fence contact impossible.
Flatten one face on a jointer or with a hand plane before table saw ripping. Never try to rip warped boards on the table saw—the board will shift during the cut.
Wet or Green Wood:
Freshly cut or wet wood is unpredictable. It’s harder to cut, gums up the blade quickly, and can bind as it releases moisture during cutting.
Let wood dry to below 12% moisture content before table sawing. Use a moisture meter if you’re uncertain.
Grain Direction:
Wood tears differently depending on grain direction. While this affects cut quality more than kickback risk, understanding grain helps you anticipate how wood will behave during cutting.
Checking Boards:
Before every cut, I quickly inspect the board:
- Is it flat and straight?
- Are there large knots in the cut path?
- Is the grain relatively straight?
- Does the board show stress signs?
This 10-second check prevents many kickback incidents.
Common Mistakes That Cause Kickback
After teaching table saw safety for years, I see these mistakes repeatedly:
Mistake 1: Removing the Riving Knife Permanently
Many woodworkers remove the riving knife for one specific cut, then never reinstall it. Weeks later, they’ve forgotten it’s missing.
✔ Solution: Make riving knife inspection part of your pre-cut routine. Before starting the saw, verify the knife is in place unless you have a specific reason it shouldn’t be.
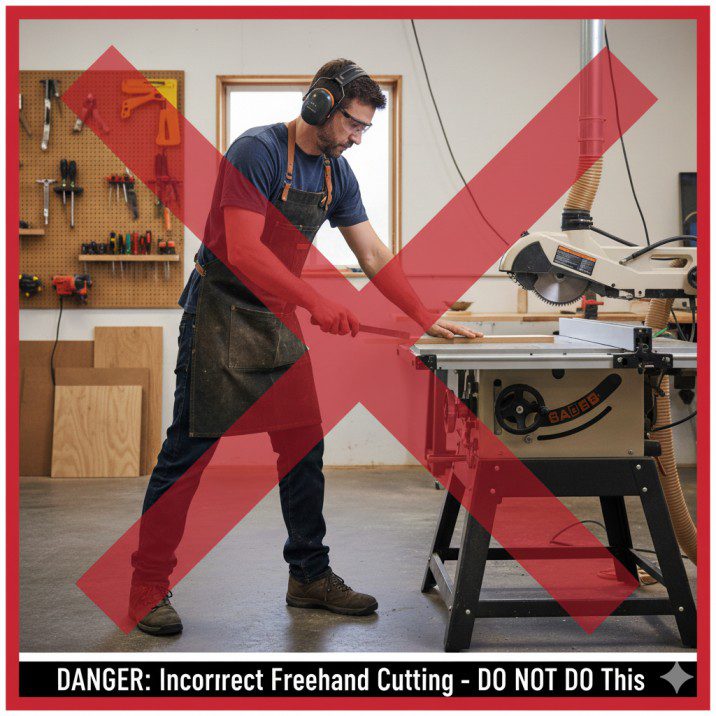
Mistake 2: Freehand Cutting
Cutting without the fence or miter gauge means the workpiece can rotate or shift, causing rear blade contact.
✔ Solution: Always use the fence for rip cuts or the miter gauge for crosscuts. No exceptions. If you need cuts that require removing these references, use a different tool (jigsaw, bandsaw, handsaw).
Mistake 3: Cutting Small Offcuts
Trying to rip narrow strips between the blade and fence (especially under 2 inches) creates a piece that can lift and kick back violently.
✔ Solution: If you need narrow strips, rip them from the outside of the board (wide piece against fence, narrow offcut falls away). Never trap narrow pieces between blade and fence.
Mistake 4: Backing Out of Cuts
If a cut isn’t going well, pulling the workpiece backward while the blade spins is extremely dangerous. The blade can catch and throw the board.
✔ Solution: If you must stop a cut, keep the workpiece pressed against the table and fence, turn off the saw, and wait for complete blade stop before removing the wood.
Mistake 5: Using Damaged Blades
Bent, cracked, or missing-tooth blades create vibration and unpredictable cutting that leads to kickback.
✔ Solution: Inspect blades before use. Replace damaged blades immediately. Don’t try to save money by using questionable blades.
Mistake 6: Wrong Fence Position for Crosscuts
Using the rip fence as a stop for crosscut length is dangerous. The cutoff piece gets trapped between blade and fence, leading to kickback.
✔ Solution: Use the miter gauge for crosscuts. If you need consistent length, clamp a stop block to the fence ahead of the blade, so the cutoff piece isn’t trapped.
Mistake 7: Ignoring Warning Signs
Continuing a cut after noticing burning, increased resistance, or unusual sounds ignores obvious kickback precursors.
✔ Solution: Stop immediately when anything feels wrong. Investigate before continuing.
Mistake 8: Poor Body Position
Standing directly behind the workpiece puts you in the kickback path.
✔ Solution: Stand to the side, preferably the left side (for right-handed feeding). This positions you out of the danger zone.
For additional safety guidance and proper table saw techniques, explore our Table Saw How To Guide.
Advanced Safety Techniques
Once you’ve mastered the basics, these advanced techniques provide additional safety margins:
Featherboards:
Spring-loaded boards that press the workpiece against the fence or table. They maintain pressure throughout the cut, preventing shifting.
Position featherboards ahead of the blade, never beside or behind it (this would press wood into the rear teeth).
I use featherboards for any sustained production work or when cutting difficult wood. They free your hands to focus on feeding while maintaining consistent pressure.
Power Feeder:
Motorized rollers that feed the workpiece at consistent speed. Used primarily in production settings.
Power feeders eliminate kickback almost entirely because they maintain perfect control throughout the cut. But they’re expensive ($500+) and overkill for hobby shops.
Board Buddies and Similar Devices:
Magnetic or clamping hold-downs that secure the workpiece. These work similarly to featherboards but don’t require dedicated mounting.
Sacrificial Fence:
Attach a wooden face to your fence. Position it so the blade can cut into it slightly. This creates zero-clearance support right at the blade, preventing thin offcuts from slipping behind the blade.
Replace the sacrificial fence when it becomes too damaged.
Overhead Guard:
Beyond the standard blade guard, an overhead arm with guard and dust collection hovers above the work area. These provide excellent protection and dust collection.
Popular brands include Shark Guard and Penn State overhead guards. They cost $200-400 but dramatically improve safety and visibility.
Anti-Kickback Pawls:
Spring-loaded fingers that grip the workpiece. They allow forward movement but dig in if the wood tries to move backward.
Most blade guard assemblies include these. They’re more effective on softwood than hardwood and can leave marks. But they work—keep them on unless they genuinely interfere with a specific cut.
Table Saw Brake Systems:
SawStop technology detects flesh contact and stops the blade in milliseconds. This doesn’t prevent kickback but does prevent blade contact injuries.
For woodworkers concerned about safety and able to afford the premium, SawStop saws provide remarkable protection.
🛠 Investment Priority:
If adding safety equipment, prioritize in this order:
- Quality push sticks (basically free to make)
- Featherboards ($30-60)
- Overhead guard system ($200-400)
- SawStop saw or retrofit ($1,500-2,000+)
Frequently Asked Questions
Q: Can kickback happen even with all safety measures in place?
Yes, though it’s extremely rare. Unpredictable wood defects—internal stress, hidden knots, or sudden grain changes—can cause kickback even with perfect setup and technique. However, proper safety measures reduce kickback incidents by approximately 95%. The remaining 5% is why we also focus on body positioning and emergency response—preventing kickback is the goal, but preparing for it is the backup plan.
Q: Is it safe to rip boards longer than 6 feet on a table saw?
Long boards are safe to rip if properly supported. The board must remain flat on the table and tight against the fence throughout the entire cut. Use infeed and outfeed supports (roller stands, tables, or helpers) to prevent the board from tilting, dropping, or shifting. The danger with long boards isn’t length itself—it’s loss of control due to inadequate support. Never try to handle long, heavy boards alone if they exceed your physical capacity to control.
Q: What should I do if I hear cracking sounds during a cut?
Stop feeding immediately but maintain pressure holding the workpiece against the table and fence. Turn off the saw and wait for complete blade stop. Cracking sounds indicate internal wood stress releasing, which can cause the kerf to close and trap the blade. Once stopped, carefully remove the workpiece and inspect for splits or stress cracks. Don’t continue cutting stressed wood—it’s unpredictable and dangerous.
Q: How often should I replace my riving knife?
Riving knives rarely need replacement—they’re designed to last the saw’s lifetime. However, inspect your riving knife every few months for damage. Look for bends, cracks, or excessive wear. If the knife is bent or damaged, replace it immediately. Also verify the knife is properly aligned with the blade—it should be centered on the blade with approximately 1/8 inch clearance and positioned 1/4 inch or less below the blade’s top at maximum height.
Q: Can I use the fence as a stop for crosscutting?
No, never. Using the fence as a length stop for crosscuts traps the cutoff piece between the blade and fence, which is a primary kickback cause. For consistent-length crosscuts, use the miter gauge and clamp a stop block to the fence ahead of the blade. This way, the workpiece references the stop but the cutoff piece falls free without contacting the fence. This technique is safe and provides accurate, repeatable cuts.
Q: Is kickback more dangerous with certain types of wood?
Yes. Hardwoods require more cutting force and can cause more violent kickback due to their density and mass. Very dry wood can be brittle and unpredictable. Wood with interlocking or irregular grain is more likely to bind. Plywoods and composites can delaminate mid-cut, causing binding. The most dangerous wood is anything with internal stress or hidden defects. However, proper technique and safety equipment prevent kickback regardless of wood type—the wood just changes the severity if kickback occurs.
Q: Should I adjust feed rate for different materials?
Absolutely. Dense hardwoods require slower feed rates than softwoods or sheet goods. Feed at a pace that keeps the motor sound consistent without bogging or whining. If you’re forcing the wood or if the blade slows noticeably, you’re feeding too fast. If you see burn marks or excessive smoke, you’re feeding too slow. Learn to read your saw’s feedback—motor sound, cutting resistance, and visual cues tell you when you’ve found the right feed rate for the material.
Q: What’s the most dangerous table saw operation?
Ripping narrow strips (under 3 inches) between the blade and fence is among the most dangerous operations. The narrow piece can lift, tilt, or catch on the blade and launch violently. Also extremely dangerous: freehand cutting without fence or miter gauge, cutting small pieces without support, removing safety equipment without specific justification, and crosscutting using the fence as a length stop. If an operation requires removing safety equipment or feels uncomfortable, find an alternative method or different tool.
Q: Can I prevent kickback by holding the board really tightly?
No. Grip strength doesn’t prevent kickback—it just means you’re holding the board when it launches. Once kickback initiates, a 2-pound board traveling 100+ mph will overpower any grip. The answer is preventing kickback through proper setup, equipment, and technique, not trying to physically control it once it starts. Focus your effort on the prevention techniques discussed in this guide rather than relying on strength to control violent mechanical forces.
Final Safety Checklist
Before making any table saw cut, run through this checklist:
Equipment Check:
- ✅ Riving knife or splitter installed and properly positioned
- ✅ Blade sharp, clean, and appropriate for the cut
- ✅ Fence parallel to blade (verified within past month)
- ✅ Blade height set 1/4-1/2 inch above workpiece
- ✅ Table clean and waxed
- ✅ Zero-clearance insert in good condition
- ✅ Guard and anti-kickback pawls in place (unless specific reason to remove)
Material Check:
- ✅ Board is flat and straight (no cup, bow, or twist)
- ✅ No large knots or obvious defects in cut path
- ✅ Wood is dry (under 12% moisture)
- ✅ Board inspected for internal stress signs
Setup Check:
- ✅ Push sticks positioned and ready to use
- ✅ Outfeed support in place for long boards
- ✅ Clear space behind saw (nothing in kickback path)
- ✅ Proper lighting on work area
Personal Check:
- ✅ Safety glasses on
- ✅ Hearing protection ready (put on before starting saw)
- ✅ No loose clothing, jewelry, or gloves
- ✅ Proper stance (beside blade, not behind it)
- ✅ Mentally focused (not rushed, distracted, or tired)
Technique Check:
- ✅ Clear plan for the cut (know where hands will be throughout)
- ✅ Workpiece firmly against fence before starting
- ✅ Feed path clear (no obstacles or clutter)
- ✅ Exit strategy planned (how will you complete the cut safely)
This checklist takes 30 seconds to mentally run through. Make it automatic before every cut.
Conclusion: Safety Is a Choice You Make Every Time
I started this article with my kickback story—the oak board that nearly hit me—because it changed how I approach table saw safety. That incident was 100% preventable. I’d skipped multiple safety steps because I was in a hurry and felt confident.
Here’s what twelve years of teaching table saw safety has taught me: kickback is almost always preventable, and when it’s not preventable, it’s survivable if you’ve positioned yourself correctly.
The seven essential techniques in this guide eliminate 95% of kickback causes:
- Always use the riving knife
- Keep blades sharp and clean
- Ensure fence parallelism
- Use proper blade height
- Never reach over the blade
- Use push sticks for narrow cuts
- Control the workpiece throughout the cut
These aren’t theoretical safety suggestions. They’re practical techniques that work in real workshops every day. I use every single one, every single cut. The moment I think “I can skip

Finlay Connolly is a woodworking enthusiast and power tool specialist with over a decade of hands-on experience in the workshop. As the founder and lead writer at ProTableSawReviews.com, Finlay combines expert knowledge with real-world testing to help woodworkers, DIYers, and professionals choose the best tools for the job. With a sharp eye for detail and a passion for precision, Finlay is committed to providing trustworthy, practical advice backed by years of experience and research in the field. Whether you’re cutting dados or comparing fence systems, you can count on Finlay for honest, reliable reviews that make your next cut your best one.